Prerequisites

How to:

Magnify requires an application server (for example, Tomcat or WebSphere) in order to read and write to index libraries. It can be installed on a Windows (64-bit preferred) or UNIX\Linux-based server, using the same language as the WebFOCUS Client.

Processing should be at least a dual-core machine, however, four CPUs are generally recommended. Moreover, a minimum of 8GB in memory is required, while 16GB is usually recommended. Depending on the size of the data, storage space should be anywhere between 250GB to 1TB or higher (it is usually estimated as three times the size of the expected data set).

Note: This all varies depending on the type of search-based application being proposed. Indexing frequency, volume of data, and concurrent usage affect how storage space and memory are allocated. Therefore, the use of a split-tier environment is recommended for a Magnify platform where the Reporting Server, Magnify, and each data source are each provided with their own dedicated resources. Magnify does scale in order to accommodate any environment.

The following are the prerequisites to configuring and using Magnify:


Top of page

x
Procedure: How to Add the JAXB Library to Your System

JAXB is part of the Oracle Distribution. As such, it resides in a special location in the path reserved for endorsed Java Standard files. The location of this file varies by application server. This section provides instructions on how to install the JAXB component into the JRE 1.6 classpath.

In addition, a Tomcat Server requires that you set a system property variable to point to the directory where the JAXB component resides.

  1. On your machine, create the $JAVA_HOME/jre/lib/endorsed directory.
  2. Download the most current JAXB version from the Oracle website to an empty new directory:
    https://jaxb.dev.java.net -console
  3. Follow the installation instructions provided with the downloaded files.
  4. Copy the jaxb-api.jar file to the $JAVA_HOME/jre/lib/endorsed directory that you created in Step 1.

Top of page

x
Procedure: How to Set the Endorsed Directory Variable for Tomcat Servers

Different versions of Tomcat use different directories to support the endorsed features. When running a Tomcat Application Server with JRE 1.6, in addition to adding the jaxb-api.jar file to the endorsed directory, you must also set the system property variable, java.endorsed.dirs, to include the path to the endorsed directory.

Note: If Tomcat was installed by your WebFOCUS Client installation, the jaxb-api.jar file is placed in the following location:

C:\ibi\WebFOCUS80\webapps\webfocus\licenses\jaxb-api.jar_license.txt
  1. Copy the jaxb-api.jar file into the following Tomcat directory:

    For Tomcat 7:

    C:\Program Files\Apache Software Foundation\Tomcat 7.0\endorsed
  2. Edit the system property variable to include the location of the endorsed directory on your machine.

    The following is an example of the system property variable for Tomcat 7 on Windows:

    java.endorsed.dirs=C:\Program Files\Apache Software Foundation\
    Tomcat 7.0\endorsed
  3. Restart the Tomcat Server.

Top of page

x
Procedure: How to Add the JAXB Library to WebSphere
  1. Download the following file to a new, empty directory. The directory must be accessible to your WebSphere Application Server.
    https://jaxb.dev.java.net/2.0.5/JAXB2/20070122.jar
  2. In the new directory, issue the following command to install the files to your current directory:
    java -jar JAXB2_20070122.jar
  3. Copy the following JAR files found in /jaxb-ri-20070122/lib into the root of the endorsed directory:
    activation.jar
    jaxb1-impl.jar
    jaxb-api.jar
    jaxb-impl.jar
    jaxb-xjc.jar
    jsr173_1.0_api.jar
  4. Create two custom Java properties for your application server (java.endorsed.dirs and javax.xml.transform.TransformerFactory) as follows:
    1. Open the WebSphere Application Server console and in the left pane, select Servers, then Application Servers, as shown in the following image.
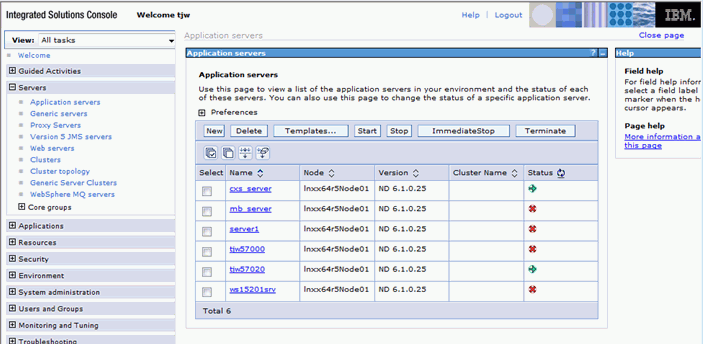
    2. From the Application servers list in the right pane, select your application server. The right pane displays information about the selected server.
    3. In the right pane, under the Server Infrastructure heading, expand Java and Process Management, then select Process Definition, as shown in the following image.
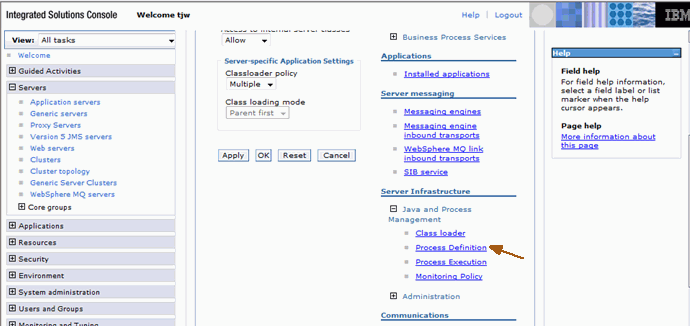
      Process Definition, Configuration information is displayed in the right pane, as shown in the following image.
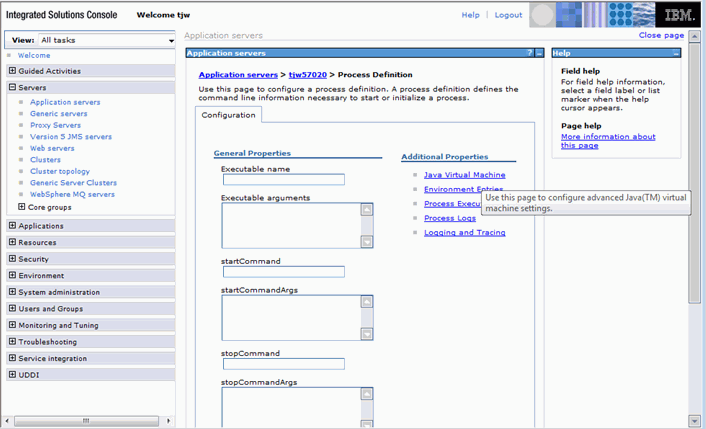
    4. Under Additional Properties, select Java Virtual Machine. The Configuration display in the right pane refreshes.
    5. Under Additional Properties, select Custom Properties. The Preferences dialog box appears in the right pane, as shown in the following image.

    6. Click New. The Configuration, General Properties dialog box appears in the right pane, as shown in the following image.
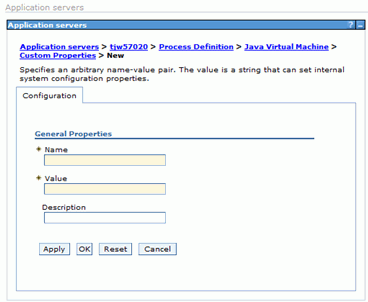
    7. In the Name field, type:
      java.endorsed.dirs

      In the Value field, type:

      /path/jaxb-ri-20070122/lib
    8. Click OK.
    9. Click New and repeat Steps g and h, using the following:

      In the Name field, type:

      javax.xml.transform.TransformerFactory

      In the Value field, type:

      org.apache.xalan.xsltc.trax.TransformerFactorylmpl
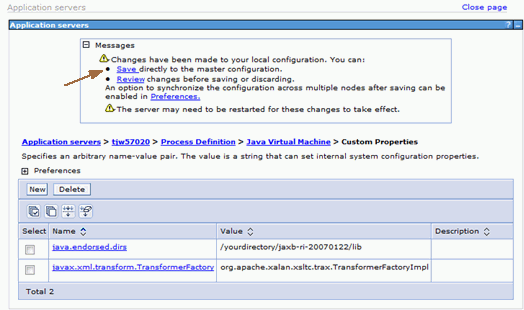
    10. Click the Save link in the Message window, as shown in the following image.
  5. Restart your application server.

WebFOCUS