In this section: How to: Reference: |
After selecting a data source and target, you can create
mappings to transform your data in the following ways:
There are three methods for mapping columns:
x
Reference: Considerations for Mapping to an Existing Flat File
While
you can map to an existing flat file, there are some considerations
that should be taken into account.
- Flat files
do not have all of the options for loading data into the target
that other data types do (for example, key matching logic).
- DataMigrator
respects the data types described in the synonym of the flat file.
For example, if the synonym describes numeric columns in integer
format, data will be written to the file in that format.
- If a file already
exists with the specified name, DataMigrator will append data to that
file, unless you select the Prior to Load option
of Delete File. Existing data in a flat file
cannot be updated.
x
Procedure: How to Automatically Map All Columns
-
On the
Flow tab, in the Tools group, click Options.
-
Select Data
Flow Designer from the User Preferences tree.
-
Select
the Automatically map all columns check box
in the On Add Target section.
-
Click OK.
x
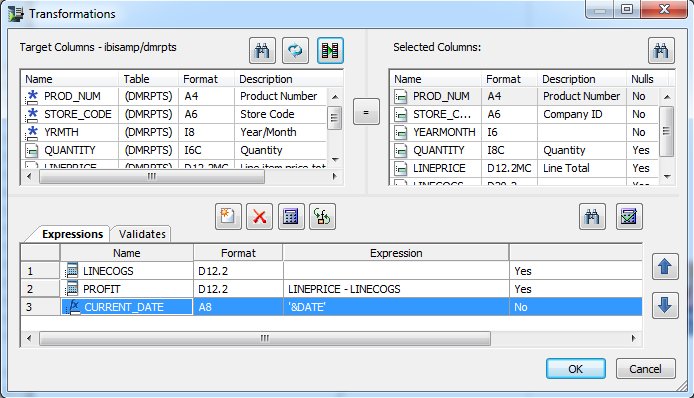
Procedure: How to Map Transformations
-
From the
data flow workspace, double-click a target, or right-click a target
and select Target Transformations.
The Transformations window opens.
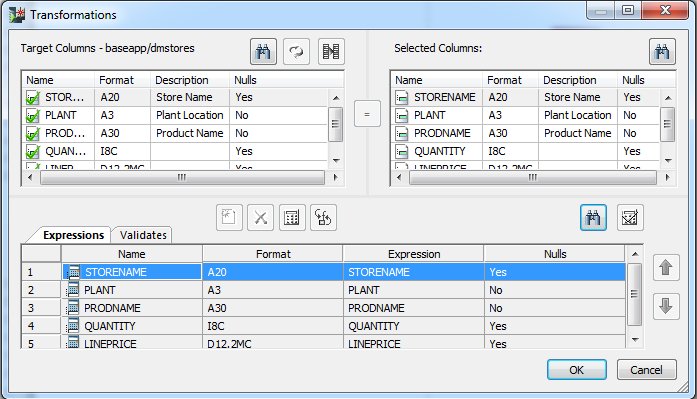
-
To map
columns with identical names click the AutoMap
 button.
The mapping will appear in the grid under the Expressions tab.
-
To map
columns with different names, select one column from each grid and
click the equal sign.
The mapping will appear in the grid under the Expressions
tab, with the Selected Column appearing in the Transform Expression
box.
-
To create
a complex mapping for a target column, double-click a column to
move it to the Expressions tab.
-
Click
the Edit transforms button.
The Transformation Calculator opens.
-
Create
an expression using the Columns/Variables and Functions tabs, and
the calculator buttons. For details on using the Transformation
Calculator, see Transformation Calculator. For information about using functions, see Using Functions.
For information about using variables, see Using Variables in a Flow.
Note: When you create expressions, keep in mind
their order of evaluation. For details, see Order of Evaluation
-
Click OK.
Note: Clicking
a column heading will sort the column grid on that heading.
The
new mapping will appear in the grid under the Expressions tab.
Note: The
transformations will occur in the order in which they appear in
the Expressions tab. If you need to change the order, select a transformation
and use the up and down arrows.
x
Procedure: How to Create a Temporary Column for Mapping
-
In the
data flow workspace, double-click a target or right-click a target
and select Target Transformations.
The Transformations window opens.
-
Click
the Insert Transforms
 button.
The Transformation Calculator opens.
-
Type
a name and type or select a format for the column.
-
Create
an expression using the Columns/Variables and Functions tabs, and
the calculator buttons. For details on using the Transformation
Calculator, see Transformation Calculator. For information about using functions, see Using Functions.
For information about using variables, see Using Variables in a Flow.
Note: When you create expressions, keep in mind
their order of evaluation. For details, see Order of Evaluation.
-
Click OK.
The
new mapping will appear in the grid under the Expressions tab.
The
new mapping is now available as a column in the Transformation Calculator,
and can be used to create a complex expression.
Tip: Since
calculations are performed in the order they appear, make sure that
your temporary column appears before any column in the Transform
Rules box that uses it to calculate a value.
x
Procedure: How to Create a Target Transformation Using Relational Lookups
The
DB_LOOKUP function allows you to build data flows that perform lookups
into multiple tables using target transformations instead of explicit
joins. This approach can simplify flows that require lookup values
from numerous tables. For information about using the DB_LOOKUP
function to create source transformations, see Using Lookups to Create Multi-Table Flows Without Joins.
-
From
the data flow workspace, double-click a target object, or right-click
it and select Target Transformations.
The Transformations window opens.
-
Double-click
the column that will use the lookup. The column is moved to the
Expression grid.
-
With
the column selected in the Expression grid, click the Edit
transforms button.
The Transformation Calculator opens.
-
Click Functions tab,
expand the Data Source and Decoding folder,
and double-click the DB_LOOKUP function.
The prototype for DB_LOOKUP appears in the Expression window
and the Lookup window opens.

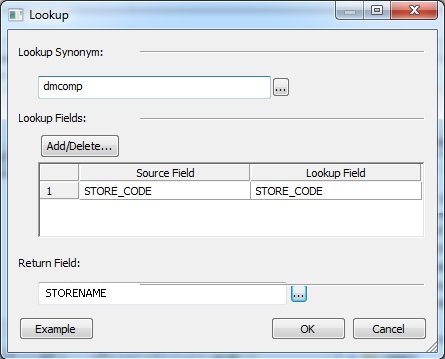
-
Select
a synonym to use for the lookup by clicking the ellipsis (...) after the Lookup
Synonym field.
The Select Synonym dialog box opens.
-
Select
a synonym and click Select.
-
From
the Lookup window, click the Add/Delete button.
-
A lookup
is similar to a join in that it uses columns from two different tables.
Select a column from the Source and Lookup Fields lists, and click
the equal sign (=).
Note: If you have Automatically add join conditions checked
in the Data Management section of the Options dialog box, the Lookup
is added automatically since both data sources have a column with
the same name and format and that column is a key column in the
lookup table.
When you have selected the columns, the Lookup
window will look like this:
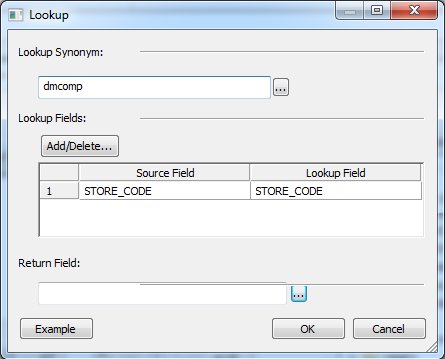
-
To select
the value to return from the lookup, click the ellipsis (...) after the Return
Field field.
The Lookup columns window opens.
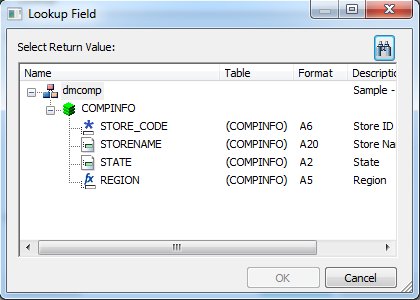
-
Select
the original column name and click OK. Note
that in this case, the format of the column is A20.
The Lookup window should look like this:
-
Click OK.
The expression is completed in the Transformation Calculator
window.
The Transformation Calculator should now look like
this.

-
Click OK.
The target transformation is added to the Transformations window.
-
Click OK to
close the Transformations window.
x
Procedure: How to Create a Transformation That Uses a Variable
From
the Transformations window:
-
Click
the Insert Transforms
button.
The Transformation Calculator opens.
-
Type
a name or select a format for the virtual column.
-
Double-click
the variable you want assigned to the column from the DM or System
Variables folder in the Columns/Variables tab. You can also type
in the variable, which must be enclosed in single quotation marks.

-
Click OK.
The
variable appears in the Expression column in the Transformations window.
For
more information about using variables, see Using Variables in a Flow.
x
Procedure: How to Edit a Transformation Mapping
From
the Transformations window:
-
Double-click
the column number or name in the Expressions tab.
or
Select the column name in the Expressions tab
and click the Edit transforms button.
The
Transformation Calculator opens.
-
Modify
the expression.
Note: You can use the Function Assist button
to change the parameters of a transformation that uses the DB_LOOKUP function.
-
When
you are finished with your changes click OK.
You
can also double-click the Expression field
in the Expressions tab, and enter the expression directly.
x
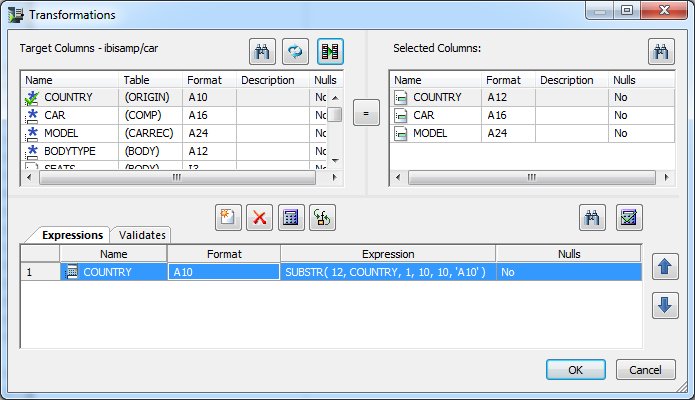
Procedure: How to Adjust a Transformation Mapping
If
the format of the target column is smaller than the format of the
source column, the transformation mapping will fail. For example,
moving a column formatted as A24 into a column formatted as A10
will fail because you can not move 24 characters into a 10-character
field. To solve this problem, you would need to use edit or substring
in a transform expression.
The Transformations window provides
an option for automatically adjusting the transformation to reconcile
different format sizes. Adjust will also convert integer, alphanumeric,
and datetime source columns so that they match the target column.
In
the Transformations window:
-
Map
the source and target columns by selecting one from each list and
clicking the equal sign.
The mapping appears in the Expressions list.
-
With
the expression highlighted, click the Adjust Expression
 button.
The Transform Expression now shows the use of substring
to move the correct number of characters into the target field,
for example, only as many character as will fit in the target column.
x
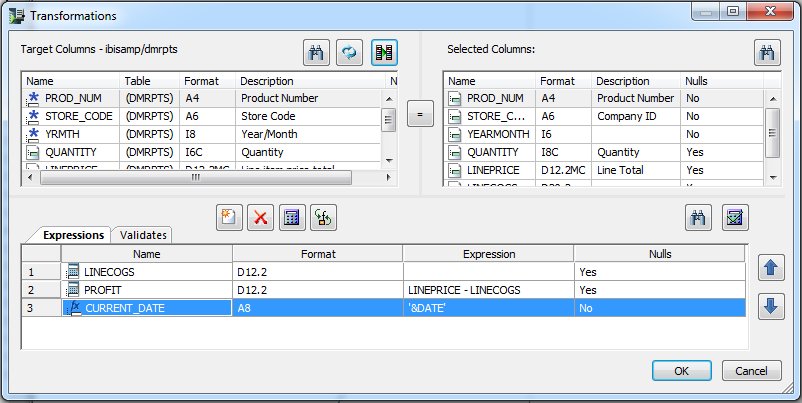
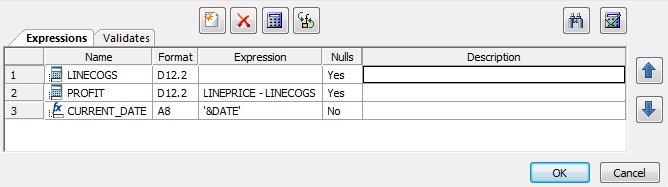
Procedure: How to Add Comments to a Transformation
-
Right-click
the title bar under the Expression tab in the Transformations window.
-
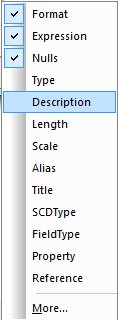
Select Customize from
the context menu and then select Description,
as seen in the following image.
The
Transformations window opens and now shows a Description column. Here
you can enter a comment for the transformation that is stored in
the flow, as shown in the following image.
x
Procedure: How to Test Mappings
From
the Transformations window:
-
Click
the Test Transformation
 button.
The Test Transformation window opens with sample data for
the transformations.
-
Click
the Close button.
x
Reference: Transformations Window
The Transformations
window is available from the data flow workspace by double-clicking
a target, or by right-clicking a target and selecting Target Transformations.
The
Transformations window contains the following fields and options:
-
 Find
Find
-
Allows you to search for a column.
-
 Refresh
-
Refreshes the columns in the target.
-
Automap
-
Maps all columns with identical names.
-
Target Columns
-
Lists the columns in the data target.
Note: Clicking
a column heading will sort the column grid on that heading.
-
Selected Columns
-
Lists the columns in the data source. Next to each column
name there is a symbol that indicates regular columns, key columns,
index columns, and virtual columns.
In both Target and Selected
columns, the symbols are:
|
Symbol
|
Description
|
|---|
|

|
Key column
|
|

|
Regular column
|
|

|
Index column
|
|

|
Virtual columns (in Target columns only).
These are grayed and cannot be selected for mapping.
|
-
=
-
Establishes the relationship between the selected columns
as equal.
-
Insert Transforms
-
Inserts a new mapping and opens the Transformation Calculator.
-
 Delete
-
Deletes a selected mapping.
-
 Edit Transforms
-
Opens the Transformation Calculator to edit the selected mapping.
-
 Adjust Expressions
-
Adjusts the transformation expression to reconcile different
format sizes.
-
Expressions tab
-
Lists the transformation mappings. A context menu with available
options for the transformations is available by right-clicking a
transformation in this tab. For more information, see Source Transformations Context Menu.
-
Validates tab
-
Lists transformations that screen records as they are loaded
into the data target. If a record does not meet the criteria, it
is rejected.
-
Test transforms
-
Retrieves, by default, 50 records and 4096 characters per
row from the source and applies all available transformations. This
option enables you to review the data being moved and ensure that
the syntax of each transformation is correct. No duplicate processing
is performed. For example, if a key value is duplicated, a unique constraint
violation may occur. Similarly, if a value is missing for a column
described as not null, a constraint violation will occur at run
time.
Note: You can set the number of rows retrieved
from the Options dialog box under the Run Options branch
of the User Preferences tree. The default
is 50 rows.
If there are any errors, the Server Messages window
displays an error message and marks the incorrect transformation
in red.
-
Up and Down arrows
-
Move the selected mapping to change the order of the transformations.
x
Procedure: How to Document Transformations
-
In the Transformations
window, right-click the header line for the transformations and
select Customize.
-
In the list
of column names, select Description.
-
A Description
column now appears. You can enter descriptions for any transformations
and they are saved as part of the flow.
x
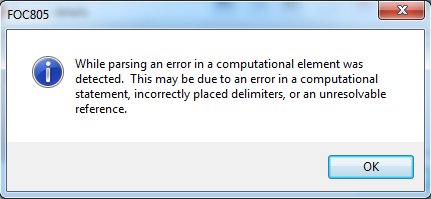
Procedure: How to View Error Details
Error
details for transformations can be viewed in the DMC. If an error
is made, the transform will appear in red, as shown in the following
image.
-
Right-click
the error and select Error Details, as seen
in the following image.
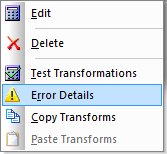
-
The Error(s)
Details window opens, as seen in the following image.

To
see the error message details, click the error message number.
A window opens explaining the error, as seen in the following image.
-
Click OK.
Note: This method of viewing error details also
applies to target transformations.
x
You can create a business rule that screens records
as they are loaded into the data target. If a record does not meet
the criteria, it is rejected.
If a value meets the criteria of the rule, a value of 1 is assigned
to the record and the record is loaded. If the value does not meet
the criteria of the record, the value of 0 is assigned to the record
and the record is rejected.
x
Procedure: How to Validate Records
-
In the
Transformations window, select the Validates tab.
-
Click
the Insert Transforms
button.
The Transformation Calculator opens with a name and format
already provided.
-
Optionally,
enter a name for the validation rule in the Column field.
-
Create
an expression for the validation rule using the Columns, Functions,
and Variables tabs, and the calculator buttons.
If the expression evaluates to TRUE then the row is loaded
in the target table. If the expression evaluates to FALSE then the
row is rejected as invalid.
Note that the validation is performed
after any filters or aggregation. For example, if you enter QUANTITY
GT 10 only records where the sum of the values of QUANTITY for the
group by fields is greater than 10 will be loaded.
The count
of rejected rows is reported in the DataMigrator log as "invalid"
records. These records can also be logged to a file for review.
For more information, see Transformation Calculator.

-
Click OK.
The
validation rule appears in the grid below the Validates tab.