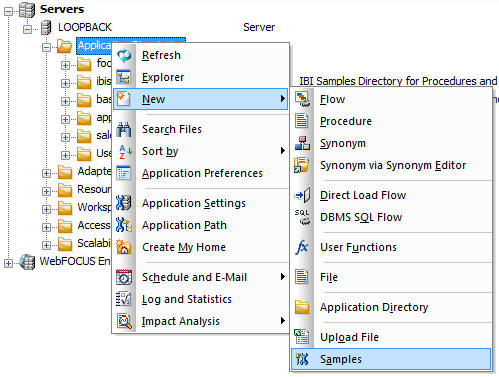
Creating Metadata

How to:

Synonyms constitute the metadata that DataMigrator requires to define unique names (or aliases) for each table or view that is accessible from the server. A synonym must be created for every table that DataMigrator accesses.

Once you have created the metadata (synonym), it is a good idea to test it to make sure that the data is available for DM processing.

You can also create and test metadata from the Managing Metadata page of the Web Console. For information, see the Server Administration for UNIX, Windows, OpenVMS, IBM i, and z/OS manual or the Web Console online help.


Top of page

x
Procedure: How to Create Synonyms
  1. In the Data Management Console, right-click an application directory and select New, and then Synonym.

    The Select adapter to configure dialog box opens, showing the adapters that you have configured.

  2. Expand a configured adapter folder, select a connection, and click OK.

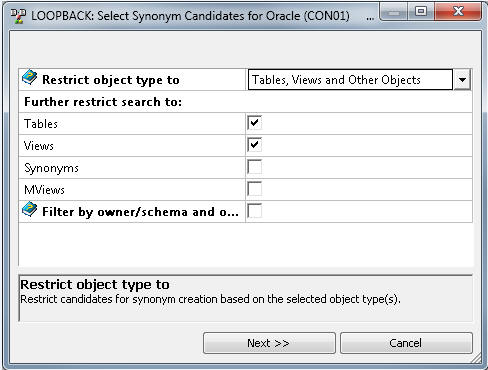
    The Select Synonym Candidates dialog box opens, as shown in the following image.

    Select Synonym Candidates Dialog Box

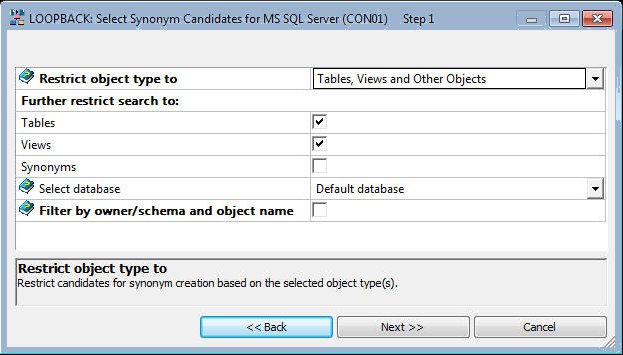
    Note: The contents of this dialog box will depend on the adapter selected.

  3. To use the database specified when the connection was added, leave Default Database as is, or select a different database from the drop-down menu. This option is only available for Informix, Microsoft SQL Server, and Sybase ASE adapters.
  4. Optionally, restrict candidates based on object type by selecting/deselecting the corresponding check boxes. The object types will vary depending on the adapter.
  5. Optionally, filter the possible candidates by name and owner. Selecting this option adds Owner and Table Name parameters to the dialog box.
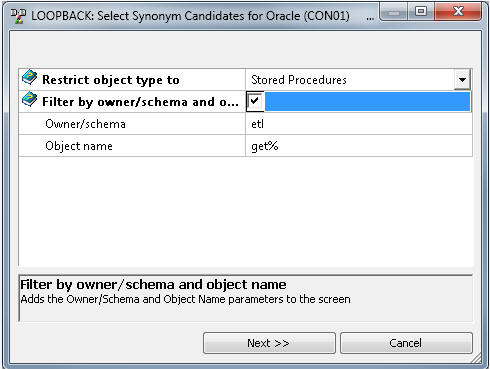
    • For the Owner parameter, type a string for filtering the owner IDs, inserting the wildcard character (%) as needed at the beginning and/or end of the string. For example, enter ABC% to select tables or views whose owner IDs begin with the letters ABC; %ABC to select tables or views whose owner IDs end with the letters ABC; %ABC% to select tables or views whose owner IDs contain the letters ABC at the beginning, middle, or end.
    • For the Table Name parameter, type a string for filtering the table or view names, inserting the wildcard character (%) as needed at the beginning and/or end of the string. For example, enter ABC% to select all tables or views whose names begin with the letters ABC; %ABC to select tables or views whose names end with the letters ABC; %ABC% to select tables or views whose names contain the letters ABC at the beginning, middle, or end.
  6. Click Next.

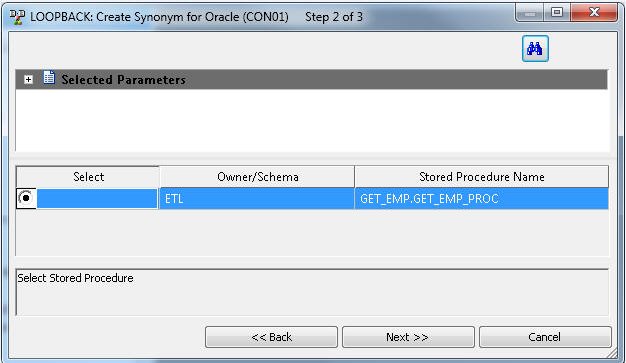
    The Create Synonym dialog box opens, as shown in the following image, showing all objects that meet the specified criteria.

    Create Synonym dialog box

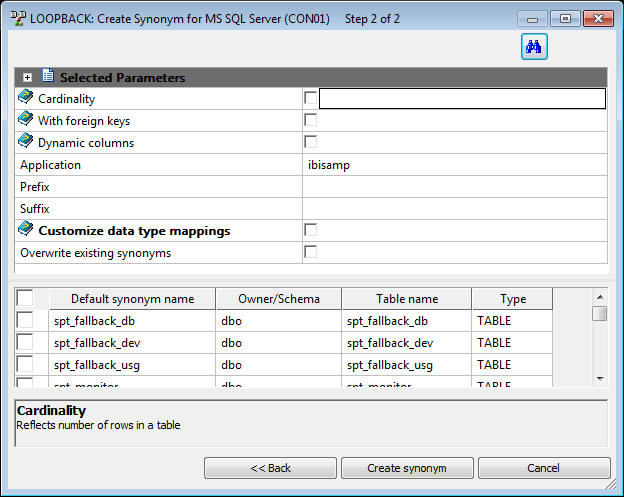
  7. If you have tables with identical table names, you can assign a prefix or a suffix to distinguish them. For example, if you have identically named human resources and payroll tables (most likely with different owners), assign the prefix HR to distinguish the synonyms for the human resources tables. Note that the resulting synonym name cannot exceed 64 characters. Alternately, you can specify different application directories for different schemas or owners.
  8. To specify that this synonym should overwrite any earlier synonym with the same fully qualified name, select the Overwrite existing synonyms check box.
  9. To reflect the current cardinality (number of rows or tuples) in the table during metadata creation, select the Cardinality check box. The use of cardinality is for equi-joins. The order of retrieval is based on the size (cardinality) of the table. Smaller tables are read first.

    Note: If the cardinality of the tables to be used in the application are dynamic, it may not be beneficial to choose this setting.

  10. If you are creating a synonym for a table that has a foreign key to another table, select the With foreign keys check box to provide access to both tables in the synonym and Access File.
  11. To specify that the synonym should not contain column information, select the Dynamic columns check box.

    If this option is selected, column data is retrieved dynamically from the data source at the time of the request.

  12. To create a synonym with a different name from a table name, select its corresponding check box and enter the desired synonym name in the Default Synonym Name column.
  13. Select the Customize data type mappings check box to access additional settings, as shown in the following image.

    Customize data type mappings check box

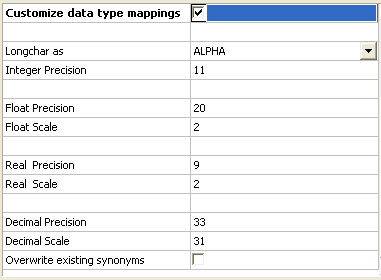
  14. From the Longchar as drop-down menu, you can select: ALPHA, TEXT, or BLOB. TEXT is the default value. Use ALPHA for DataMigrator. You can also change the scale and precision settings.
  15. Complete your table or view selection:

    To select all tables or views in the list, select the check box to the left of the Default Synonym Name column heading.

    To select specific tables or views, select the corresponding check boxes.

  16. The Default Synonym Name column displays the name that will be assigned to the synonym. To assign a different name, replace the displayed value.
  17. Click Create Synonym.

    Synonyms are created and added under the specified application directory.

    The status field of the Create Synonym window shows that the synonyms were created successfully, as shown in the following image.

    Create Synonym window


Top of page

x
Procedure: How to Create a Synonym for a Relational Stored Procedure

If you create a synonym for a relational stored procedure, you can use that stored procedure as a data source in a flow. When you create the synonym, you will be prompted for values for the parameters of the procedure. For information on creating the flow, see How to Use a Relational Stored Procedure as a Data Source.

We are using Oracle as an example for this procedure.

  1. In the navigation pane, right-click a configured relational Oracle connection and select Create Synonym.

    The Select Synonym Candidates (Step 1) dialog box opens, as shown in the following image.

    Select Synonym Candidates (Step 1) dialog box

  2. Select Stored Procedure from the drop-down menu and the Filter by owner/schema and object name check box, as shown in the following image. Enter an Owner/schema or Object name or both and click Next.

    Select Synonym Candidates fields

    The Select Synonym Candidates (Step 2) dialog box opens.

  3. Select the radio button for a stored procedure as shown in the following image and click Next.

    Select Synonym Candidates (step 2) dialog box

    The Select Synonym Candidates (Step 3) dialog box opens.

  4. Select check boxes for the parameters and supply a value for testing. Click Create Synonym.

    Note: Values entered are used only when creating the synonym and are not saved.

    Select Synonym Candidates (Step 3) dialog box

    A confirmation message appears.

  5. Click Close.

    The synonym now appears in the navigation pane listed under the application directory it was created in, as shown in the following image.

    New synonym


Top of page

x
Procedure: How to Test Synonyms for Tables or Files
  1. In the Data Management Console, right-click a server name and select Connect.
  2. Expand the Application Directories folder, and expand the application directory where you created your synonyms.

    Note: If the synonyms are not listed, select the synonyms button from the toolbar above the navigation pane.

  3. Right-click the synonym you wish to test and select Sample Data. Sample data appears in the workspace, looking similar to the following image:

    Sample Data


Top of page

x
Procedure: How to Create Sample Procedures and Data

Sample procedures and data are needed for Tutorial: Creating Data and Process Flows With DataMigrator and for the exercises in Advanced DataMigrator Tips and Techniques.

  1. From the DMC, right-click Application Directories in the navigation pane. Select New and then Samples, as shown in the following image.

    Samples Option

    The Create Sample Procedures and Data dialog box opens, as shown in the following image.

    Create Sample Procedures and Data

  2. From the Sample procedures and data for drop-down menu, choose DataMigrator - General, DataMigrator - Iterator, DataMigrator - File Listener, DataMigrator - Star Schema, WebFOCUS - Retail Demo, or WebFOCUS - Star Schema with Variable Data, as shown in the following image.

    Drop-down menu

    Note: The WebFOCUS samples are not used with DataMigrator but creates Star Schemas and loads data into them for reporting.

    The Retail Demo loads tables with a pre-determined amount of data designed for WebFOCUS reports.

    The Star Schema with variable data option generates random data. It allows you to specify the number of rows generated for each dimension table, a start date, and the number of rows loaded in the fact table.

  3. From the Select DBMS drop-down menu as shown in the following image, choose a DBMS type, and click Create. FOCUS/FDS will be the only choice if you do not have other adapters configured.

    Select DBMS menu

    For the Prefix for SQL Tables field, use the default value unless you have a reason to avoid tables starting with the indicated default. If so, enter a different value.

    For the Application directory field, use the default directory, ibisamp, to make it easier to follow the tutorial described in Tutorial: Creating Data and Process Flows With DataMigrator, Advanced DataMigrator Tips and Techniques, and other examples in this manual.

    When the creation process is complete, a confirmation message appears, as shown in the following image. The message will depend on the type of samples you create, for example, DataMigrator - General, DataMigrator - Iterator, DataMigrator - File Listener, DataMigrator - Star Schema, Star Schema with Stress Test Data.

    The message also displays in the Console Log.

    The procedures and synonyms appear in the ibisamp application directory, which is created and added to the server search path during installation. For FOCUS, the sample data is also stored in ibisamp. For other adapters, it is stored in the database of the configured adapter. The source data for the file listener flow is stored in ibisamp in four files with names starting with dmord and an extension of data.

  4. Ensure that the ibisamp application directory is in the server path. It will be in the path unless you delete it.
    • In the DMC, examine the navigation tree in the server you are using.
    • On the Managing Metadata page of the Web Console, click the Application Directories link in the navigation pane to see the Configure Application Path page.

Top of page

x
Procedure: How to Create Sample Procedures and Data for Star Schema

Star Schema sample procedures are needed for Loading a Star Schema.

  1. From the DMC, right-click Application Directories in the navigation pane and select New, Samples.

    The Create Sample Procedures and Data dialog box opens. Your display will depend on the specific adapters you have configured.

  2. Select DataMigrator - Star Schema from the Sample procedures and data for drop-down menu.
  3. From the Select DBMS drop-down menu, select a relational database that you have configured.

    For the Prefix for SQL Tables field, use the default value unless you have a reason to avoid tables starting with the indicated default. If so, enter a different value.

    For the Application directory field, use the default directory, ibisamp, to make it easier to follow the tutorial described in Tutorial: Creating Data and Process Flows With DataMigrator, Advanced DataMigrator Tips and Techniques, and other examples in this manual.

  4. Click Create. The following status message should appear:

    Star Schema sample procedures created for database

    where database indicates the database type you have selected.

The procedures and synonyms appear in the ibisamp application directory, which is created and added to the server search path during installation.


Top of page

x
Procedure: How to Create Sample Procedures and Data for File Listener

From the DMC:

  1. Right-click on Application Directories in the navigation pane and select New, Samples.

    The Create Sample Procedures and Data dialog box opens. Your display will depend on the specific adapters you have configured.

  2. Select DataMigrator - File Listener from the Sample procedures and data drop-down menu.
  3. From the Select DBMS drop-down menu, select a relational database that you have configured.

    For the Prefix for SQL Tables field, use the default value unless you have a reason to avoid tables starting with the indicated default. If so, enter a different value.

    For the Application directory field, use the default directory, ibisamp, to make it easier to follow the tutorial described in Tutorial: Creating Data and Process Flows With DataMigrator, Advanced DataMigrator Tips and Techniques, and other examples in this manual.

  4. Click Create to create the sample procedures and data for file listener.

Top of page

x
Procedure: How to Create Sample Procedures and Data for Iteration

Additional sample procedures and data are needed for Iterating Through Multiple Tables. These instructions should be followed after you have loaded the sample data and procedures for DataMigrator.

  1. From the DMC, right-click Application Directories in the navigation pane and select New, Samples.

    The Create Sample Procedures and Data dialog box opens. Your display will depend on the specific adapters you have configured.

  2. Select DataMigrator - Iterator from the Sample procedures and data drop-down menu.
  3. From the Select DBMS drop-down menu, select a relational database that you have configured.

    For the Prefix for SQL Tables field, use the default value unless you have a reason to avoid tables starting with the indicated default. If so, enter a different value.

    For the Application directory field, use the default directory, ibisamp, to make it easier to follow the tutorial described in Tutorial: Creating Data and Process Flows With DataMigrator, Advanced DataMigrator Tips and Techniques, and other examples in this manual.

  4. Click Create. The following status message should appear:

    Sample procedures created for database

    where

    database

    Indicates the database type you have selected.

    The procedures and synonyms appear in the ibisamp application directory, which is created and added to the server search path during installation.

  5. Load the tables just created. Expand the ibisamp directory.

    Find the dmplntpf flow in the list, right-click it and select Submit.


iWay Software