
Reporting Objects are stored in folders in the tree within domain folders under the Content folder. They can include selection criteria (WHEREs), JOINs, virtual fields (DEFINEs), filters, and other WebFOCUS statements, as well as reports or charts supplied as templates.
Note: A Reporting Object will not be listed in the tree when the user cannot functionally use the Reporting Object.
The browser Reporting Object tool allows you to create, edit, test, run, or delete a Reporting Object or its components. The main interface, as shown in the following image, consists of a static Quick Launch toolbar, a ribbon of context-sensitive options, and a window that displays the components of the Reporting Object with which you are working.
The Reporting Object tool Quick Launch toolbar is a static menu whose commands apply to the entire Reporting Object, not simply to the particular component that you have selected. The following table describes each command in the Reporting Object tool Quick Launch toolbar.
|
Button |
Shortcut Keys |
Command |
Description |
|---|---|---|---|
|
|
None |
Reporting Object tool main menu |
Launches a menu allowing you to Save, Save As, Run, and Exit. |
|
|
Ctrl+S |
Save |
Saves the Reporting Object. |
|
|
Ctrl+Z |
Undo |
Undoes the last action. |
|
|
Ctrl+Y |
Redo |
Repeats the last action. |
|
|
None |
View code |
Displays Reporting Object code in a read-only window. |
|
|
Ctrl+R |
Run |
Runs the Reporting Object. |
The Reporting Object tool ribbon is a menu whose commands apply to what you have selected, whether that is the Reporting Object as a whole, a particular component, or an individual example of a component. For example, a particular filter or filter group, if you have selected one, rather than selecting the entire Filter component.
The following table describes each command on the Reporting Object tool ribbon.
|
Button |
Command |
Description |
|---|---|---|
|
|
New |
Creates a new join, DEFINE statement, filter, or WHERE statement. |
|
|
Open |
Launches InfoAssist to create or edit a report or chart, or launches the appropriate tool to create or edit a join, DEFINE statement, filter, or WHERE statement. |
|
|
Edit |
Opens component source code in the text editor. |
|
|
Properties |
Renames the selected filter or filter group. |
|
|
Run |
Runs the selected component. |
|
|
Delete |
Deletes the selected item. |
|
|
Delete All |
Deletes all items of the type selected, for example, all WHERE statements, all filters in a particular group, or all filters in every group if the Filter component itself is selected. |
To view or edit the properties of a Reporting Object, right-click the object and select Properties. The Reporting Object Properties dialog box opens, as shown in the following image.
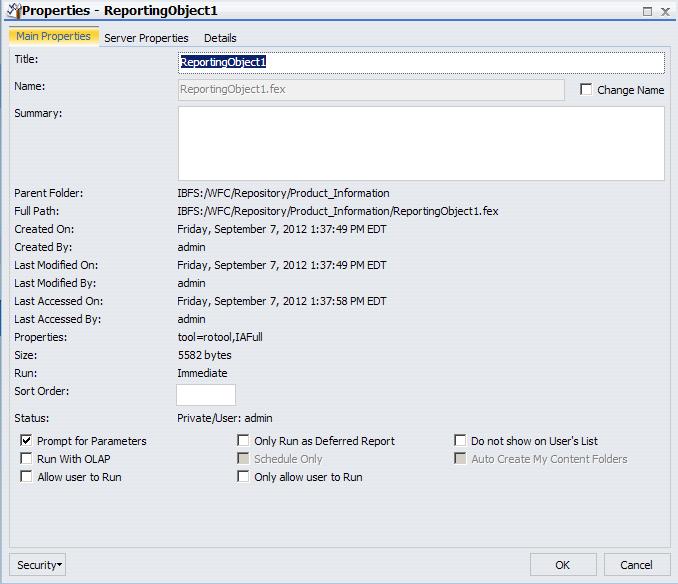
In the Properties dialog box, the Main Properties tab displays information, such as the parent folder (location), file name, size, status, and run option of the object, along with the user and date of the creation, last access, and last modification of the object. Authorized users can edit the title, name, and sort order, and select the following options that control how the Reporting Object will be run or accessed:
Note: This option is not available for use with Reporting Objects.
Authorized users can view or edit the access rules, effective policy, or sharing permissions by clicking Security.
The Server Properties tab, shown in the following image, allows you to manage the server and application path settings.
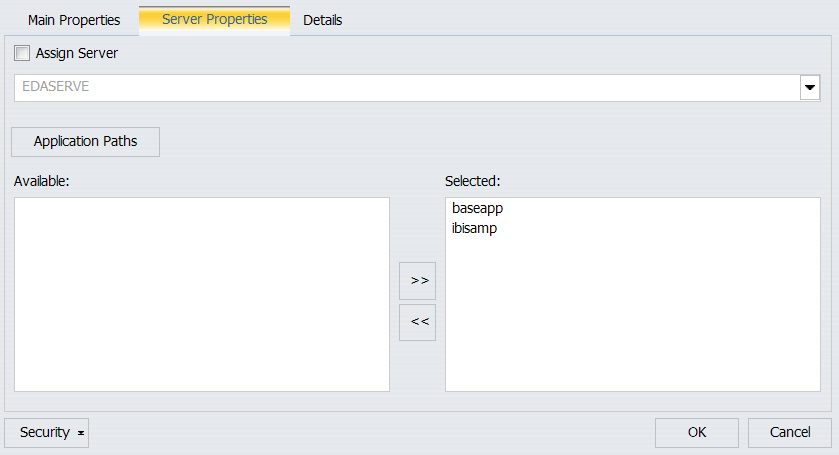
To change the server, check Assign Server and select one of the available servers. Move application paths from the Available box to the Selected box by double-clicking them or by selecting them and using the movement arrows. Use the up and down arrows to change the preferred order of the application paths.
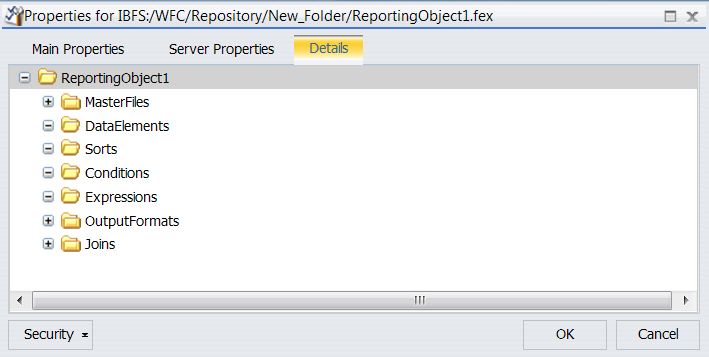
The Details tab, as shown in the following image, allows you to see the Master Files, data elements, sorts, conditions, expressions, output formats, and joins used by the Reporting Object.
The New Folder dialog box opens.
If you do not select a server or an application path, each is set to the default server and application paths for your WebFOCUS installation. For more information, see the Managed Reporting manual.
The Tool Setup dialog box opens, as shown in the following image.

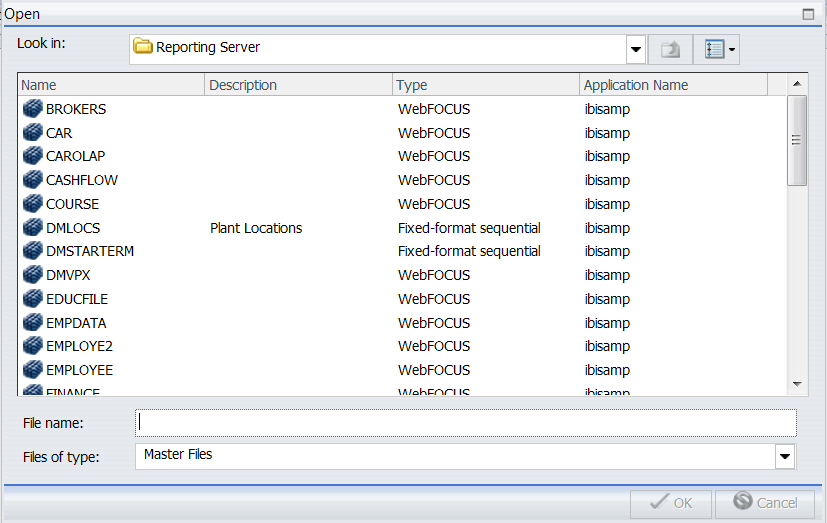
The Open dialog box opens, prompting you to select a Master File, as shown in the following image.
The Reporting Object tool appears.
Right-click the Reporting Object and select Edit.
Note: Double-clicking the Reporting Object runs the Reporting Object rather than allowing you to edit it.
 icon
on the Quick Launch toolbar.
icon
on the Quick Launch toolbar.
The Save dialog box opens.
From now on, clicking Save or pressing Ctrl+S saves the Reporting Object without launching the Save dialog box.
In this section: |
You can run a Reporting Object or any individual component of it from the browser. You can run a Reporting Object in the following ways:
The Run option in the Reporting Object tool is enabled regardless of the setting of the Only Run as a Deferred Report property.
When you select and run a Reporting Object, the expected behavior is as follows:
Your request did not return any output to display.
Possible causes:
- No data rows matched the specified selection criteria.
- Output was directed to a destination such as a file or printer.
- An error occurred during the parsing or running of the request.
A Reporting Object may contain any of the following types of components, which are run in the order of precedence, as listed:
Users using the Reporting Object to create a report do not see the DEFINE statements, WHERE statements, or JOIN commands defined in the Reporting Object, which are issued automatically every time a user accesses the Reporting Object. However, the report or chart components, including headers, footers, and styling features, are visible to authorized users who can use them to create their own customized report.
The filters defined in the Filter component are applied only if the user of the Reporting Object activates them when the report or chart based on the Reporting Object is run.
Reference: |
The Preprocessing Other component contains custom code that must run before all other components. You can use the text editor in the component to create and edit code or to paste the code that you have copied from another application.
To create or edit a Preprocessing Other component, do one of the following:
The Preprocessing Other text editor appears.
See the Creating Reports With WebFOCUS Language manual for more information about using the WebFOCUS language to code procedures.
Note:
InfoAssist previews in the Report component and the Chart component are disabled if the Preprocessing Other component contains the syntax:
-OLAP ON
To avoid this issue, enable OLAP through the Reporting Object properties instead of the Preprocessing Other component. For more information on the Reporting Object properties, see Properties of a Reporting Object.
When using Amper Auto prompting, users may be prompted to supply amper variable values for parameters that the private user content does not reference. These scenarios are directly related to the internal processing of reports created using a Reporting Object.
Auto prompting considerations and expected behavior must be understood when referencing amper variables within a Reporting Object. For information on the Amper Auto prompting facility, see the Developing Reporting Applications manual. The specification of values for the amper variables in the Reporting Object Other component using –DEFAULT, –DEFAULTH, or –SET commands will assign a default value for amper variables in a report request to avoid a FOC error for not specifying a value. A consideration for –DEFAULTH and –SET is that Amper Auto prompting does not prompt for amper variables that have values assigned using –DEFAULTH and –SET.
Whether a user is prompted by the Amper Auto prompting facility for amper variables assigned a default value using the –DEFAULT command is dependent on the setting of the WebFOCUS Client configuration parameter, IBIMR_prompting. When IBIMR_prompting is set to XMLPROMPT, users are prompted for amper variable values, and default values are displayed in fields in which the default values have been specified. When IBIMR_prompting is set to XMLRUN, users are not prompted for values when all amper variables have been assigned a default value. For more information on setting the IBIMR_prompting parameter, see the WebFOCUS Security and Administration manual.
Suppose that your company has a data warehouse and you need a Reporting Object that uses an extract from that data warehouse. In your Preprocessing Other component, you create a HOLD file from the data warehouse, and then you use that HOLD file in each Reporting Object component. You can clear the JOIN command and delete the HOLD file in the Postprocessing Other component so that it is not mistakenly used again the next time that the Reporting Object is used.
This task has the following steps:
For more information on creating a Reporting Object, see Properties of a Reporting Object.
APP HOLD IBISAMP
TABLE FILE EMPLOYEE
PRINT EMPLOYEE.EMPINFO.DEPARTMENT AS 'NEWDEP'
EMPLOYEE.EMPINFO.CURR_SAL AS 'NEWCURR_SAL'
BY EMPLOYEE.EMPINFO.EMP_ID AS 'EMP_ID'
BY EMPLOYEE.EMPINFO.HIRE_DATE AS 'NEWHIRE_DATE'
ON TABLE HOLD AS WINFILE FORMAT FOCUS INDEX EMP_ID
END
The following output is produced:
0 NUMBER OF RECORDS IN TABLE= 12 LINES= 12
The Join component is prefilled with the EMPLOYEE table.
The following code for the Join component is displayed:
-*COMPONENT=Join_J001
JOIN EMPLOYEE.EMPINFO.EMP_ID IN EMPLOYEE
TO MULTIPLE WINFILE.SEG01.EMP_ID IN WINFILE TAG J001 AS J001
END
-*COMPONENT=Join_J002
JOIN EMPLOYEE.PAYINFO.JOBCODE IN EMPLOYEE
TO MULTIPLE JOBFILE.JOBSEG.JOBCODE IN JOBFILE TAG J002 AS J002
END
InfoAssist is launched.
The report is displayed as a table with four columns, sorted by EMP_ID.
The report that you created in InfoAssist is displayed in the browser.
JOIN CLEAR *
? JOIN
The report that you created in InfoAssist is displayed in the browser.
The following comment is displayed:
<!-- 0 NUMBER OF RECORDS IN TABLE= 12 LINES= 12 0 NUMBER OF RECORDS IN TABLE= 12 LINES= 12 0 HOLDING HTML FILE ON PC DISK ... JOINS CURRENTLY ACTIVE HOST CROSSREFERENCE FIELD FILE TAG FIELD FILE TAG AS ALL WH ----- ---- --- ----- ---- --- -- --- -- EMPLOYEE.EM>EMPLOYEE WINFILE.SEG> WINFILE J0 J0 Y N EMPLOYEE.PA>EMPLOYEE JOBFILE.JOB> JOBFILE J1 J1 Y N 0 NO JOINS CURRENTLY IN EFFECT -->
How to: |
A join is a temporary connection between two or more data sources that share at least one common field. After you join two data sources, each time that WebFOCUS retrieves a record from the first data source (the host file), it also retrieves the matching records from the second data source (the target file).
For more information on joining data sources, see the WebFOCUS InfoAssist User’s Manual.
Note:
The Join tool opens, displaying the data source associated with the Reporting Object.
For more information on using the Join tool, see Join Group in the WebFOCUS InfoAssist User’s Manual.
To delete a join, right-click the join and select Delete, or select the join and click Delete on the Quick Launch toolbar.
The Edit Join dialog box opens.
The new description appears under the Join component in the Reporting Object tool. The internal name used for the join remains the same name assigned to the join when you created it.
The join code is displayed in a text editor.
How to: |
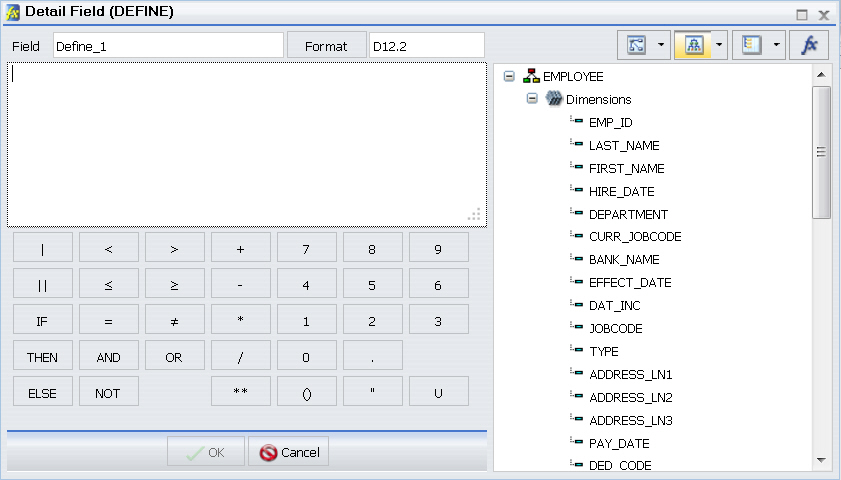
A virtual field is a field whose value is not stored in the data source but can be calculated from the data that is there. A virtual field takes up no storage space. It is created only when a user accesses the Reporting Object that includes the virtual field.
You use the Define tool to create a virtual field. Using this tool, you specify the virtual field name and format, and the expression that defines the field. An expression enables you to combine fields, constants, predefined functions, and operators into an operation that produces a single value. When you define a virtual field, you must specify a field format type, length, and appropriate display options.
For more information about defining fields, see Data Tab in the WebFOCUS InfoAssist User’s Manual.
The Define tool dialog box opens, as shown in the following image.
For more information about the Define tool, see Data Tab in the WebFOCUS InfoAssist User’s Manual.
The virtual field now appears in the field list when a user accesses this Reporting Object.
Note:
To save the first virtual field, exit from the Define tool by clicking OK. Reopen the Define tool to create the second field. Alternatively, you can type the name of the first virtual field in the expression instead of selecting it from the field list. In this case, you do not need to exit and reopen the Define tool.
Existing virtual fields appear under the Defines node, as shown in the following image.
The Define tool dialog box opens, displaying the selected field.
How to:
Reference: |
Filters enable users to quickly select predefined criteria that limit the data included in a report or chart. Filters are selection criteria (WHERE statements) that you create for users, who then select the filters needed to limit the data in a report or chart without having to create their own selection criteria.
In order to create a filter, you must create the filter group and define the filters that make up the group.
Note: The Undo and Redo functions are not available for the Filter component until you have created at least one filter.
For more information about filters, see Filter Group in the WebFOCUS InfoAssist User’s Manual.
Make the filter group name as explicit as possible, because users depend on this name to select the correct filter to apply to their reports.
You are returned to the Reporting Object tool. The filter group folder appears below the Filter component node.
The New Filter dialog box opens.
Make the filter names as explicit as possible, because users depend on these names to select the correct filter to apply to their reports.
The Advanced Filter dialog box opens, as shown in the following image.
For more information about defining filters, see Data Tab in the WebFOCUS InfoAssist User’s Manual.
If you clicked Add new in step 2, the New Filter dialog box opens. If you clicked OK in step 2, you are returned to the Reporting Object tool.
Existing filters appear under the Filter group beneath the Filters node, as shown in the following image.
The Advanced Filter dialog box opens, displaying the selected filter.
The text editor opens, displaying the selected filter.
When Amper Auto prompting is used (Prompt for Parameters is selected in the Reporting Object properties), there are scenarios in which users are prompted to provide amper variable values in selection criteria (WHERE statements) in the Reporting Object that the user did not save with the report. This is due to the internal processing of reports created from Reporting Objects. You can avoid this issue by using the Filter component to predefine selection criteria for users to include in reports. Only the filter or filters that users select for inclusion in their reports are evaluated by the WebFOCUS Amper Auto prompting facility.
How to: |
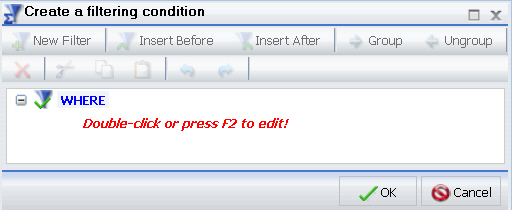
WHERE statements or selection criteria, restrict the data retrieved to only those records that meet the conditions that you specify. Filters are selection criteria that run when the user selects the filter in WebFOCUS. Other selection criteria run when the user opens the Reporting Object, preventing data values that do not meet the criteria from being available to the user.
For more information on WHERE statements, see Field Tab in the WebFOCUS InfoAssist User’s Manual.
The New Filter dialog box opens, as shown in the following image.
For more information on creating selection criteria, see the Filter Group in the WebFOCUS InfoAssist User’s Manual.
The Report component creates a report template and saves it in a Reporting Object. Authorized users can use the report template to create a report that suits their needs and then save the new report.
To create a report template, double-click the Report component, or right-click the component and select Open. InfoAssist opens, allowing you to create a report template.
For more information on using InfoAssist, see the WebFOCUS InfoAssist User’s Manual.
Note:
The Chart component works exactly like the Report component. The Chart component creates a chart template and saves it in a Reporting Object. Authorized users can use the chart template to create a chart that suits their needs and then save the new chart.
To create a chart template, double-click the Chart component, or right-click the component and select Open. InfoAssist opens, allowing you to create a chart template.
For more information on using InfoAssist, see the WebFOCUS InfoAssist User’s Manual.
Note:
The Postprocessing Other component contains custom code that must run after all other components. You can use the text editor in the component to create and edit code, or to paste the code that you have copied from another application.
To create or edit a Postprocessing Other component, double-click the component, or select the component and click Editon the ribbon. Alternatively, right-click the component and select Edit. The Postprocessing Other dialog box opens.
See the Creating Reports with the WebFOCUS Language manual for more information about using the WebFOCUS language to code procedures.
Note:
-OLAP ON
To avoid this issue, enable OLAP through the Reporting Object properties instead of the Postprocessing Other component. For more information on the Reporting Object properties, see Properties of a Reporting Object.
For information on Amper Auto Prompting, see Considerations for Amper Auto Prompting With the Preprocessing and Postprocessing Other Components.
| WebFOCUS |


