Universal Concatenation in Report Painter
In this section: How to: Reference: |
With universal concatenation, you can retrieve data
from unlike data sources in a single request. All data, regardless
of source, appears to come from a single file. The Universal Concatenation
dialog box, available from Report Painter, applies the MORE command
to your procedure. You can concatenate all types of data sources,
provided they share corresponding fields with the same format. You
can use WHERE and IF selection tests in conjunction with MORE.
To use universal concatenation, you must divide your request
into:
- One main request
that retrieves the first data source and defines the data fields,
sorting criteria, and output format for all data.
- Subrequests that
define the data sources and fields to be concatenated to the data of
the main request. The fields printed and sorted by the main request
must exist in each concatenated data source. If they do not, you
must create them as virtual fields.
During retrieval, data is gathered from each data source in turn,
then all data is sorted and the output formatted as specified in
the main request.
x
Procedure: How to Concatenate Data Sources
Universal concatenation specifies how to combine data from
sources with dissimilar Master Files.
-
Create the
main request.
This contains all the formatting for the
resulting report and names the first file to be concatenated. It
also contains all printing and sorting information. The fields printed and
the sort fields must exist as real or DEFINE fields in each file.
-
From Report
Painter, select Universal Concatenation from
the Report menu.
or
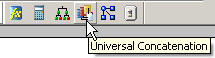
Click the Universal
Concatenation button, located on the Setup toolbar,
as shown in the following image.
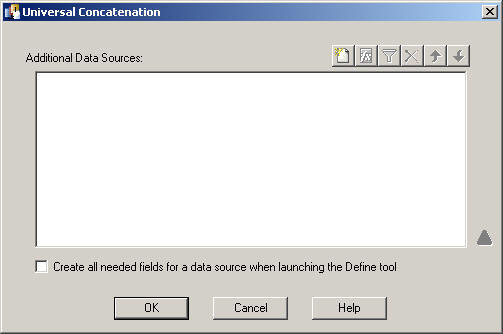
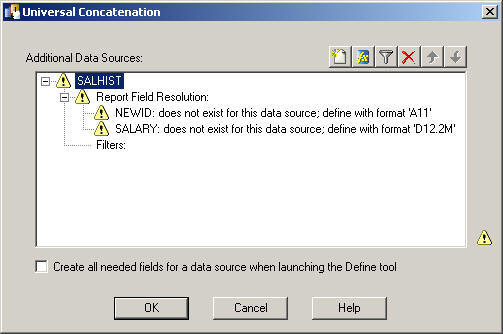
The Universal Concatenation dialog
box opens, as shown in the following image.
-
Click the Add
Source button to add additional data sources.
The Open dialog box appears.
-
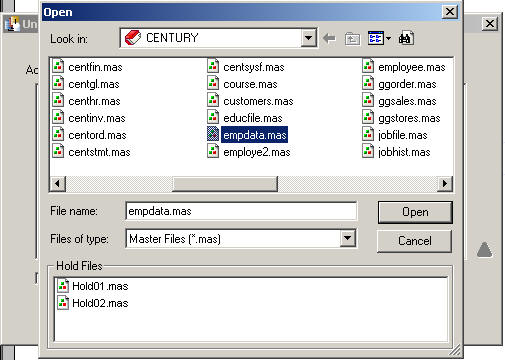
Select a
Master File and click Open.
If there are temporary HOLD files associated
with the procedure, HOLD files are available from the Open dialog
box, as shown in the following image.
The selected data source is added,
showing the Report Field Resolutions and Filters. Additionally,
the Define tool is activated.
Note: If the field names for the selected data source are
not the same names and formats as the fields being printed and sorted
in the main request, the Universal Concatenation dialog box indicates
that you need to define these fields with status icons.
-
Create or
modify a field for the universal concatenation with the Define tool.
- Click the Define button
from the Universal Concatenation toolbar.
or
- Double-click the
field name from the Additional Data Sources window.
The Define tool opens.
Note: The Define tool opens automatically if the Create
all needed fields for a data source when launching the Define tool option
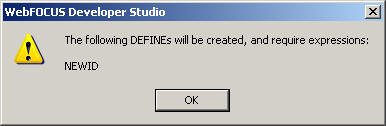
is selected. This creates the missing defines for the data source.
A message appears before the Define tool opens, stating which DEFINEs
will be created and require expressions, followed by a list of the
created DEFINE fields. This option is off by default.
-
Create selection
criteria for the universal concatenation with a Filter.
You may create a filter through a WHERE clause.
-
Click OK to
close the Universal Concatenation dialog box and add the MORE command
to the procedure.
xField Name and Format Matching
All fields referenced in the main request
must either exist with the same names and formats in all the concatenated
files, or be remapped to those names and formats using virtual fields.
Referenced fields include those used in COMPUTE commands, headings, aggregation
phrases, sort phrases, and the PRINT, LIST, SUM, COUNT, WRITE, or
ADD commands.
A successful format match means that:
|
Usage Format Type
|
Correspondence
|
|---|
|
A
|
Format type and
length must be equal.
|
|
I, F, D
|
Format type must
be the same.
|
|
P
|
Format type and
scale must be equal.
|
|
DATE (new)
|
Format information
(type, length, components, and order) must always correspond.
|
|
DATE (old)
|
Edit options must
be the same.
|
|
DATE -TIME
|
Format information (type, length, components,
and order) must always correspond.
|
Text (TX) fields and CLOB fields (if supported) cannot be concatenated.
x
Reference: Universal Concatenation Dialog Box
The following image shows the Universal Concatenation
dialog box.
-
Universal Concatenation Toolbar
-
The following tools are available from the
Universal Concatenation toolbar.
|
Button
|
Action
|
|---|
|

|
Add Source enables
you to add an additional data source. Select a Master File and click Open.
|
|

|
Launches the Define
tool. The Define tool enables you to create a virtual field as a
component in a reporting procedure. The objective is to define or
modify fields to match the report fields from the main request.
Define the virtual field by assigning
a format and typing an expression or composing it using the calculator
and the fields and functions listed in the tabbed panes in the Define
tool window. The DEFINE expression is written in the procedure ahead
of the TABLE request.
|
|

|
Opens the Expression
Builder. You can create a Where, If, or Where Total expression from
there.
|
|

|
Deletes the selected
data source, or selected expressions, from the list.
|
|

|
Moves the selected
data source up or down the list.
|
-
Additional Data Sources Window
-
Shows a field tree of data sources, filters,
and unresolved concatenations.
Note: The data source and report field items are preceded by
status icons to indicate if the additional data source fields are
configured correctly, as shown in the following example. Double-click
the field name or filter expression to open the associated tool.
-
Create all needed fields for a data source when launching the Define tool
-
Select this option to create the missing
defines for the data source. A message appears before the Define
tool opens, stating which DEFINEs will be created and require expressions,
followed by a list of the created DEFINE fields.
Note: This option is off by default.
The Universal Concatenation dialog box stores this setting when
the Universal Concatenation dialog box is reinitialized.
The following image is an example of the message
that appears when selecting this option. Click OK to
open the Define tool to create the required expression.
-
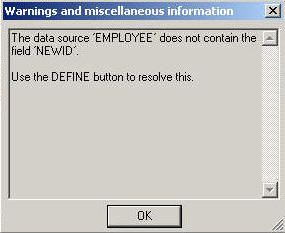
Warning icon

-
Shows warnings and miscellaneous information
about the concatenation that you are creating.
Note: If the Warning icon is activated,
this means there is unresolved information for the data source.
Click the Warning icon for details, as shown
in the following example.
-
OK
-
Closes the Universal Concatenation dialog
box and applies the MORE command to the procedure.
-
Cancel
-
Closes the Universal Concatenation dialog
box without saving any changes.
-
Help
-
Opens the documentation topic related to
Universal Concatenation in Report Painter.
Example: Matching Field Names and Formats
The following example concatenates data from the EMPDATA
and SALHIST data sources.
Tip: EMPDATA
contains sample data about company employees. SALHIST contains information
about employee salary history. These data sources (empdata.mas and
salhist.mas) are available from the ibisamp folder of your Developer Studio
application (apps) directory. You may copy these source files to
the project directory of your choice.
- Create a new procedure
in Developer Studio:
- With the Procedures
folder highlighted, click New from the File
menu.
or
- Right-click the Procedures
folder and click New from the context menu,
then click Procedure.
The Add Procedure dialog box opens.
- Type MORE_rp in
the File name field and click Open.
The
Procedure Viewer opens.
- Define NEWID in the
EMPDATA data source with the same name and format as the sort field
that will be referenced in the main request.
- Create the main request
for the universal concatenation.
This contains all the formatting
for the resulting report and names the first file to be concatenated.
It also contains all printing and sorting information. The fields
printed and the sort fields must exist as real or DEFINE fields
in each file.
- Type Employee
Salaries in the Page Heading object.
- Identify your sort
column for the main request. Click the By button
on the Report Painter toolbar, then double-click or drag NEWID from
the Fields tab of the Object Inspector.
- Identify your print
column for the main request. Click the Detail button
on the Report Painter toolbar, then double-click or drag SALARY from
the Fields tab of the Object Inspector.
- Create the WHERE
clause for the main request.
Note: The WHERE criterion in the main request applies
only to the EMPDATA data source.
- Create the universal
concatenation with the MORE command. This concatenates the SALHIST
data source to the EMPDATA data source.
- Click the Universal
Concatenation icon, located on the Setup toolbar.
The
Universal Concatenation dialog box opens.
- Click the Add
Source icon from the Universal Concatenation toolbar.
- Select salhist.mas as
the data source and click Open.
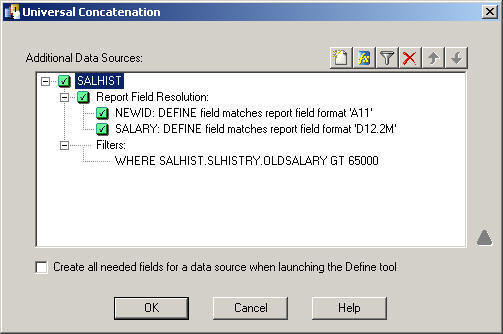
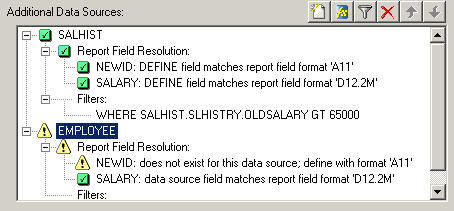
The SALHIST
data source appears in the Universal Concatenation dialog box, indicating
status icons for the field names, as shown in the following image.
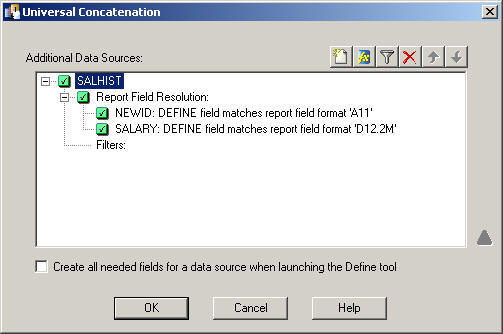
- Define the NEWID
and SALARY fields in the SALHIST data source, to create the required
expression with the same name and format as the sort field referenced
in the main request.
- Click the Define icon
from the Universal Concatenation toolbar.
The Define tool opens.
- Type NEWID as
the Field name.
- Type A11 as
the Format.
- Enter the following
expression in the Define expression window:
EDIT (PIN, '999-99-9999')
- Click New to
create an additional Define field.
- Type SALARY as
the Field name.
- Type D12.2M as
the Format.
- Type the following
expression in the Define expression window:
OLDSALARY
- Click OK to
close the Define tool.
The Universal Concatenation dialog box
shows the report field resolutions, as shown in the following image.
The status icons indicate that the required expressions are defined.
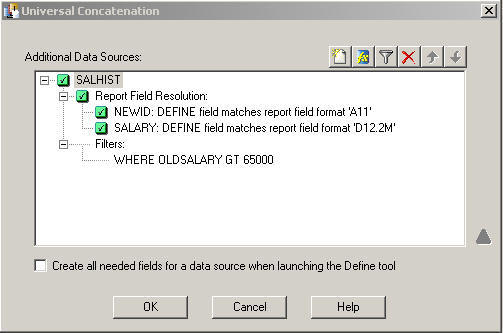
- Create a filter for
the SALHIST data source.
- Click the Where/If icon
from the Universal Concatenation toolbar.
The Expression Builder
opens.
- Enter the following
expression in the Advanced section:
OLDSALARY GT 65000
- Click OK to
close the Expression Builder.
The Universal Concatenation dialog
box shows the filter expression, as shown in the following image.
Note that this WHERE criterion applies only to the SALHIST data source.
Notice that it references a field that is not defined in the EMPDATA
data source.
Note: To view or modify any of the fields
from the Additional Data Sources window, double-click the field
name or filter expression to open the associated tool.
- Click OK to
close the Universal Concatenation dialog box.
The MORE command
is added to the procedure.
- Save and run the
report.
The output is shown in the following image.
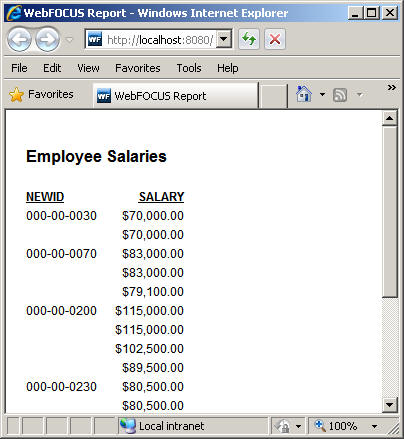
When you concatenate
data, record sets are simply appended, not grouped or aggregated
across files. Therefore, if duplicate sort fields exist, they show
up twice in the report output.