Using Input Controls to Supply Parameter Values
Creating an input control from the Design view prompts
you to create a bound parameter on the Parameters tab. Binding a
control to a parameter will populate the parameter.
Note:
- You may also add
input controls from the New Parameters dialog box that appears when
creating a report or graph with parameters. For more information
about the New Parameters dialog box, see Automatically Creating Controls From the New Parameters Dialog Box.
- Except for the Hidden
control, the Properties and settings dialog box will display for all
controls when in the Design tab and Parameters tab. The Properties
and settings dialog box will display for the Hidden control only
when in the Parameters tab.
x
A text box enables you to enter a value in a text entry
field.
x
Procedure: How to Create a Text Box
A text box only provides a single-select
value.
-
Add
a text box by doing one of the following:
- Click the Text
Box button from the Components toolbar.
or
- From the Insert
menu, select Controls, then click Text
Box.
The cursor changes
to a crosshair.
-
Drag
the crosshair to create a text box and adjust it to the size you want.
A text box is created in the layout and
assigned the name edit(n), where n is a number.
-
Optionally,
change the properties of the text box by adjusting the properties
displayed in the Properties tab of the Properties window. For details,
see Text Box Properties in the Properties Window.
-
To bind
an existing parameter to the text box:
Binding a parameter
to a text box creates an incoming parameter. An incoming parameter
is a parameter that is bound to a control. The parameter value will populate
the text box with values.
-
To bind
the text box to a parameter:
If binding a text box to a parameter, the
value can only be single select. Binding the text box to a parameter
will populate the parameter with the single value.
x
Procedure: How to Enter Masked Text in a Text Box
When entering a value in a text box at run time, you may
set the mask text property so that the text is not displayed as
text, but masked by default characters. This is recommended when
using passwords or other sensitive information.
-
Select
the Text Box object to view the associated properties.
You may also select the text box properties
from the drop-down list of the Properties window. The properties
for the text box appears as edit(n) <INPUT>.
-
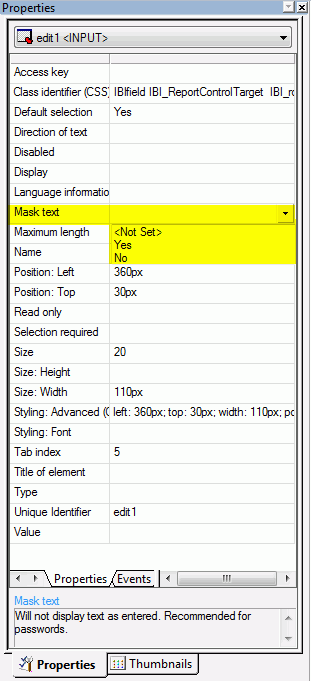
From the Mask text property field,
select Yes.
-
Run
the report and enter a value in the text box.
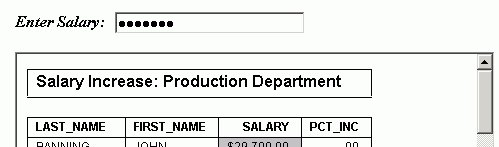
The value being entered appears as masked text, as shown
in the following image.
x
Reference: Text Box Properties in the Properties Window
When a text box is selected, the
Properties tab in the Properties window contains options that control
the properties of your text box.
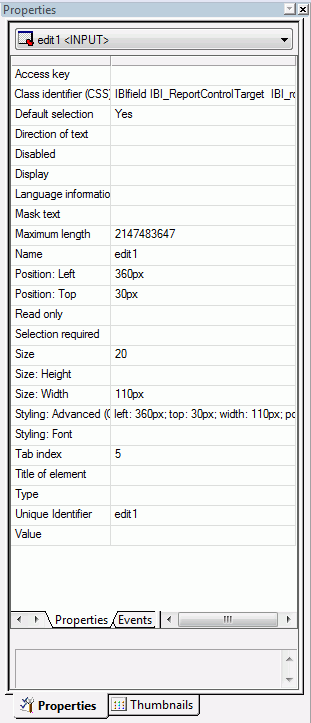
Click a property to display a description
of the selected property at the bottom of the Properties window.
x
A text area is a single-select control that enables
you to enter multiple lines of text that can be assigned to a single
variable. The behavior is similar to a text box, but you are not
restricted to entering just one line of text. For example, if you
want to assign a paragraph (multiple lines of text) to a variable
that can be referenced by a procedure, you can add the paragraph
to a text area from the Properties and settings dialog box on the Parameters
tab.
Note: When the Multiple property is set for
a text area control, you can enter data values separated by semicolons,
commas, or carriage returns.
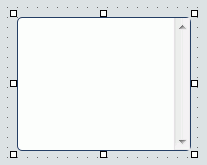
The following image shows the text area component in HTML Composer.
x
Procedure: How to Create a Text Area
-
Click
the Text Area
 button
from the Components toolbar.
button
from the Components toolbar.
or
From the Insert
menu, select Controls, then click Text
Area.
The cursor changes to a
crosshair.
-
Drag
the crosshair to create a text area and adjust it to the size you want.
A text area is created in the layout and
assigned the name textarea(n), where n is a number.
-
Optionally,
you can change the properties of the text area in the Properties
tab of the Properties window. For details, see Text Area Properties in the Properties Window.
-
To bind
an existing parameter to the text area:
Binding a parameter
to a text area creates an incoming parameter. An incoming parameter
is a parameter that is bound to a control. The parameter value will populate
the text area with values.
-
To bind
the text area to a parameter:
If binding a text area to a parameter,
the value can only be single select. You can create one or more
lines of text for the single value. Binding the text area to a parameter will
populate the parameter with the single value.
- Click the Parameters tab.
The
Properties and settings dialog box opens.
- Create the
single value for the text area. You can create a single Static or Dynamic
value.
Note: If you are creating
a Static Data type for the text area, you
may enter one or more lines of text by typing or pasting text into
the Selected Value input field.
- Close the Properties
and settings dialog box to create the text area with the single
value.
- Bind the text
area to a parameter. Select the center of the text area, left-click and
drag the text area to the center of the parameter object, and release
the mouse to complete the binding.
x
Reference: Text Area Properties in the Properties Window
When a text area is selected, the
Properties tab in the Properties window contains options that control
the properties of your text area.
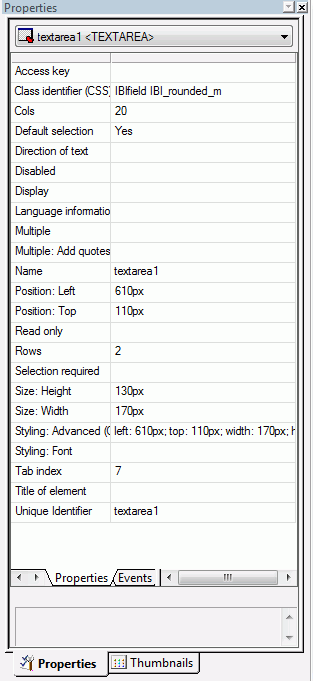
Click a property to display a description
of the selected property at the bottom of the Properties window.
x
A drop-down list enables you to select a single value
from a list of supplied values. You can use a dynamic or static
list of values for the drop-down list.
x
Procedure: How to Add a Drop-Down List
-
Add a drop-down list by doing one of
the following:
- Click the Drop Down List button from
the Components toolbar.
or
- From the Insert menu, select Controls,
then click Drop Down List.
The cursor changes to a crosshair.
-
Drag the crosshair to create a drop-down
list, and adjust it to the size you want.
A
drop-down list is created in the layout and assigned the name combobox(n), where n is
a number.
-
Optionally,
change the drop-down list properties by adjusting the properties
displayed in the Properties tab of the Properties window. For details,
see Drop-Down List Properties in the Properties Window.
-
Binding
a parameter to a drop-down list creates an incoming parameter. An
incoming parameter is a parameter that is bound to a control. The parameter
value will populate the drop-down list with values. To bind an existing parameter
to the drop-down list:
-
To bind
the drop-down list to a parameter:
Binding the drop-down list to a parameter
will populate the parameter with a list of values.
x
Procedure: How to Select Multiple Values From a Drop-Down List
When using a drop-down list input control to
supply parameter values, the Multiple property value indicates whether
multiple values can be selected from a list of supplied values at
run time.
Note: A multiselect
list enables you to select multiple values by using the Ctrl key
while selecting values. In order to select multiple values in the
drop-down list, the procedure must be set up to accept multiple
values. Ensure that the Variable Type for the parameter value is
Multiselect OR or Multiselect AND in the procedure.
-
From HTML
Composer, insert a report with parameters that accept multiple values.
For example, create a report with Multiselect
OR as the variable type for the parameter, accepting
a dynamic list of values from ggsales, with REGION as
the value for returned and displayed fields.
-
When the
New Parameters dialog box appears, accept the default control type
of Drop down list and click OK.
A drop-down list is created in the layout
and assigned the name combobox(n), where n is a number.
-
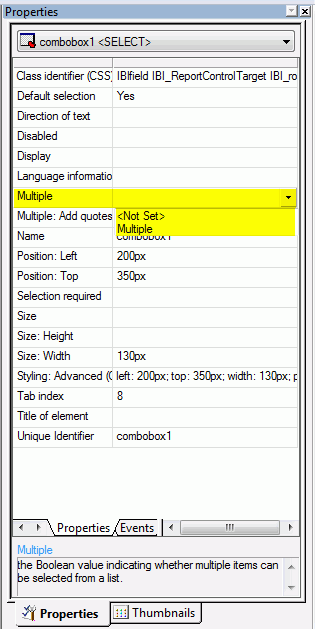
Select Multiple from
the Multiple drop-down list in the Properties tab of the Properties
window.
This indicates that multiple items can
be selected from the drop-down list.
-
Save and
run the HTML page.
Select multiple values by using the Ctrl
key while selecting values from the drop-down list, as shown in
the following image.
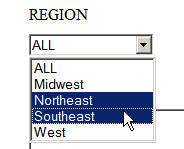
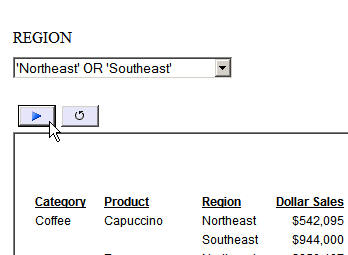
The drop-down list shows the selected
multiple values. Click the Run button to
run the report with the selected value parameters.
x
Reference: Drop-Down List Properties in the Properties Window
When a drop-down list is selected, the Properties tab in
the Properties window contains options that control the properties
of your drop-down list.
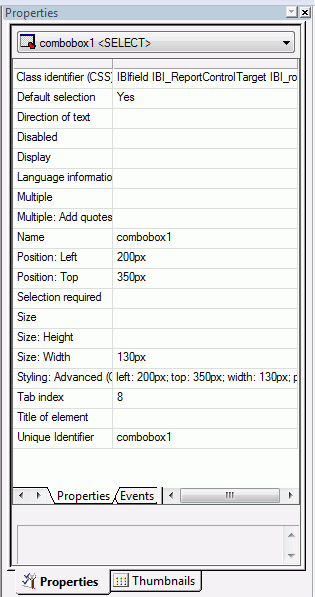
Click a property to display
a description of the selected property at the bottom of the Properties
window.
x
A list box enables you to select single or multiple
values at one time:
- A single-select
list enables you to select only one value for each time a request
is run.
- A multiselect
list enables you to select multiple values by using the Ctrl key
while selecting values. In order to provide multiple values, the
procedure must be set up to accept multiple values.
List box values can be dynamic or static.
x
Procedure: How to Add a List Box
-
Add
a list box by doing one of the following:
- Click the List
box button from the Components toolbar.
or
- From the Insert
menu, select Controls, then click List
Box.
The cursor changes
to a crosshair.
-
Drag
the crosshair to create a list box, and adjust it to the size you want.
A list box is created in the layout and
assigned the name listbox(n), where n is a number.
-
Optionally,
change the properties of the list box by adjusting the properties
displayed in the Properties tab of the Properties window. For details,
see List Box Properties in the Properties Window.
-
Binding
a parameter to a list box creates an incoming parameter. An incoming
parameter is a parameter that is bound to a control. The parameter
value will populate the list box with values. If binding a parameter
to a list box, the value can be single or multiselect. To bind an
existing parameter to the list box:
-
Bind
the list box to a parameter.
Binding the drop-down list to a parameter
will populate the parameter with a list of values.
x
Reference: List Box Properties in the Properties Window
When a list box is selected, the Properties tab in the
Properties window contains options that control the properties of
the selected list box.
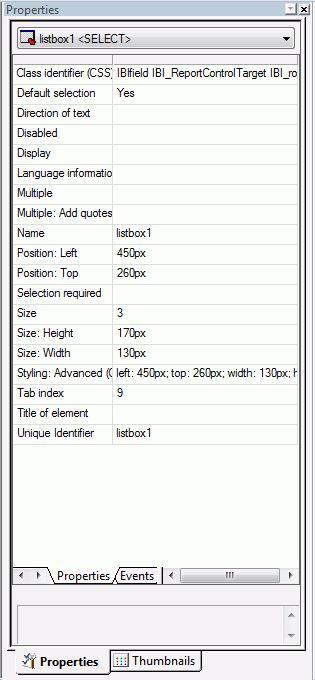
Click a property to display a description
of the selected property at the bottom of the Properties window.
x
Procedure: How to Reorder the Selected Values in the List Box
When using a list box, you may reorder the selected values
in the report.
-
In the
Design view of the HTML page, select the list box object, right-click,
and select the Add Move Items control.
An up and down arrow is added next
to the list box control.
-
Run
the HTML page.
-
Select
values from the list box and run the report.
-
To reorder
the selected values, click the up arrow to move the selected value
up in the list box, or click the down arrow to move the selected
value down in the list box.
-
Run
the report again to view the results with the selected values.
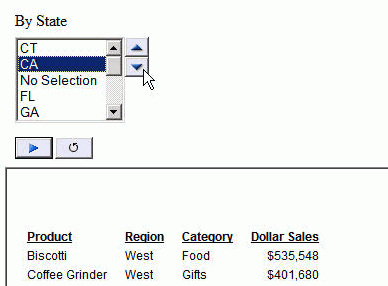
In the following example, CA is the first
value in the By State list box. Select the down arrow to reorder
the location of CA in the list box and rerun the report again.
xUsing a Double List Control
You may add a double list control for displaying multiselect
values. This enables you to view a list of the available values
and add or remove them from one list to another. At run time, a
report is generated based on the values that are added.
Note: When creating a static list of values
for a double list control, the add everything value option is not
available.
x
Procedure: How to Add a Double List Control
-
Add
a double list control by doing one of the following:
- From the Components
toolbar, click the Double List Control button.
or
- From the Insert
menu, select Controls, then click Double
List Control.
The cursor changes to a crosshair.
-
Drag
the crosshair to create a double list control, and adjust it to
the size you want.
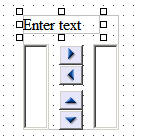
A double list control is created in the
layout and assigned the name customselect(n)_selectfrom and
customselect(n)_selectto, where n is a number.
-
You
may edit the default description for the double list control by double-clicking Enter
text, and typing the description of your choice.
-
Optionally,
change the double list control properties by adjusting the properties
displayed in the Properties tab of the Properties window. For details,
see Double List Box Properties in the Properties Window.
-
Bind
an existing parameter to the double list control.
Binding a parameter
to a double list control creates an incoming parameter. An incoming
parameter is a parameter that is bound to a control. The parameter
value will populate the double list control with values. If binding
a parameter to a double list control, the value can be single or
multiselect.
-
Bind
the double list control to a parameter.
Binding the double list control to a parameter
will populate the parameter with a list of values.
Note: You can change the
default double list control to other types of controls by right-clicking
the control object on the Parameters tab or the Design tab and selecting Set
Control Type.
The options are
Calendar, Check box, Drop down list, Hidden, List box, Radio button,
Text area, Text box, Single source Tree control, and Multi source
Tree control.
-
Run
the HTML page and select values by using the right and left arrows to
add or remove values to the selected column.
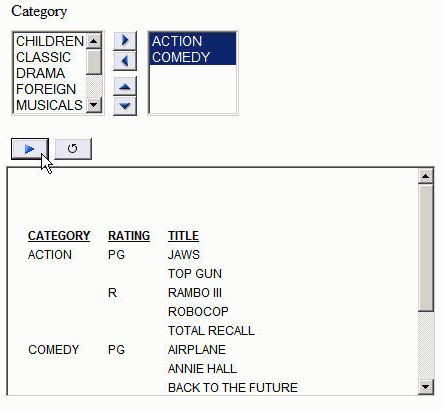
The selected values
appear in the second column. The output is generated based on the
selected values in the second column. In the following example, Action
and Comedy are the selected values for the report.
-
Optionally,
you may reorder the selected values in the report.
The up and down arrows
reorder the selected values that appear in the second column of
the double list control.
Click the up arrow
to move the selected value up in the second column of the double
list control, or click the down arrow to move the selected value
down in the double list control.
x
Reference: Double List Box Properties in the Properties Window
When a double list box is selected, the Properties tab
in the Properties window contains properties of double list controls.
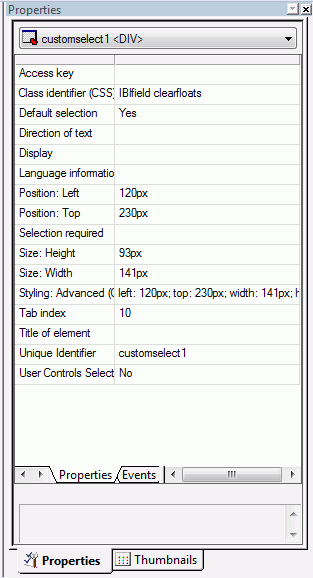
Keep Selected Value. When Yes is
selected, this option will accumulate values you search for in the
right-side box. When you search for another value, the previously
searched values will not be deleted. No is
selected by default.
Click a property to display a description
of the selected property at the bottom of the Properties window.
xAdding a Paging Control in HTML Composer
You may add a paging control to a List Box, Drop Down
List, and the first control of a Double List Control, which enables
you to page through a large list of values before selecting a value.
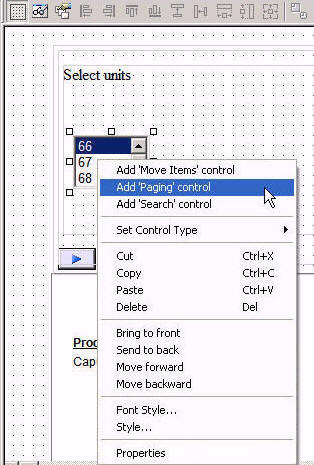
The Add 'Paging' control option is available through the right-click context
menu on the Design tab of HTML Composer when an input control is
selected.
x
Procedure: How to Add a Paging Control
The Add 'Paging' control option enables you
to page through a large list of values for a List Box, Drop Down
List, and the first control of a Double List Control, before selecting
a value. For example, suppose that you have a list box showing 50
values. Adding the paging control enables you to display these values
as pages of values, as well as go directly to the first, previous,
next, and last pages to select the value.
-
Select the
input control on the Design tab of HTML Composer, right-click, and
select Add 'Paging' control.
Note: The paging
control is only valid for a List Box, Drop Down List, and the first
control of a Double List Control.
The following
image shows the Add 'Paging' control option in
HTML Composer.
The paging control is added below
the input control on the canvas, as shown in the following image.
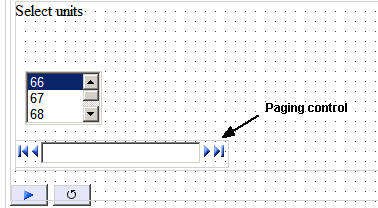
Note: If
the paging control is not visible, you may need to resize the control
and input control objects on the canvas.
-
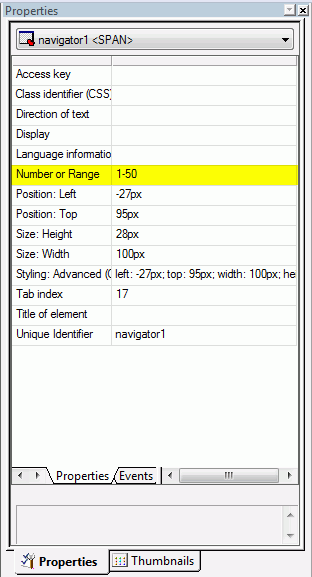
Optionally,
change the Number or Range property for the
paging control in the Properties tab of the Properties window.
The default Number or Range property is
1-50. This specifies the number or page range of values to show,
per page, for the input control and the starting item number. For
example, the input control starts at the first value and displays
a range of 50 values per page.
Note: The paging control properties are available
from the Properties tab of the Properties window when the paging
control is selected. The paging control appears as navigator(n) in
the Properties window drop-down list.
The following image shows the Number
or Range property for the paging control in HTML Composer.
-
Run the
HTML page.
-
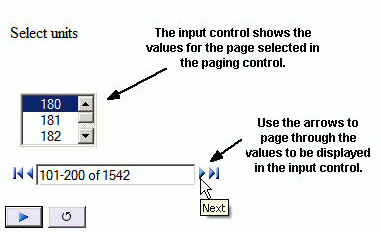
Use the
arrow buttons to page through the values to be displayed for the
input control. You may select First, Previous, Next,
or Last.
Note: You may
also type in a page number or range in the paging control at run
time, as described in the Number or Range property in step 2. This specifies
the number or range of values, per page, for the input control.
The input control shows the values
for the page selected in the paging control.
-
Select a
value from the input control.
-
Click the Run button
to refresh the report, showing the value selected in the input control.
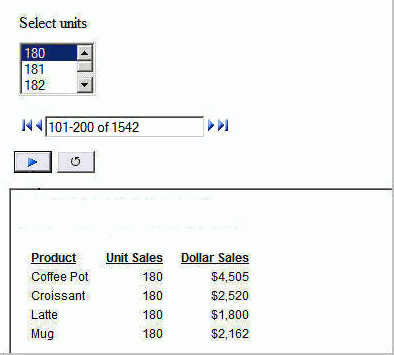
In the following example, the paging
control shows 101-200 of 1542. This indicates
that there are 99 values available to select from on this page,
as shown in the list box. The list box shows the value of 180 as
the selected unit. Running the report shows the results with Unit
Sales of 180.
xAdding a Search Control in HTML Composer
You may add a search control to a List Box, Drop Down
List, and the first control of a Double List Control, which enables
you to search for a value in a control, before selecting a value.
The Add 'Search' control option is available through the right-click
context menu on the Design tab of HTML Composer when an input control
is selected.
x
Procedure: How to Add a Search Control
The Add 'Search' control option enables you to search
for a value in a control for a List Box, Drop Down List, and the
first control of a Double List Control. For example, suppose that
you have a list box showing 30 items. Adding the search control
adds an additional input field to your output page. Type the value
you are looking for and click the search button to find the value
in your input control.
-
Select the
input control on the Design tab of HTML Composer, right-click, and
select Add 'Search' control.
Note: The search
control is only valid for a List Box, Drop Down List, and the first
control of a Double List Control.
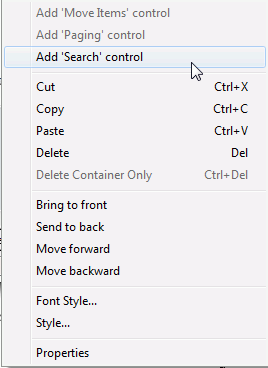
The following
image shows the Add 'Search' control option in
HTML Composer.
The search control is added above
the input control on the canvas, as shown in the following image.
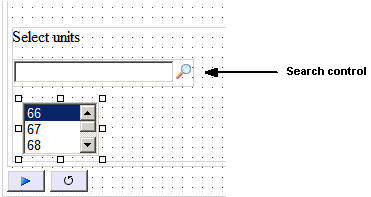
Note: If
the search control is not visible, you may need to resize the control
and input control objects on the canvas.
-
Run the
HTML page.
-
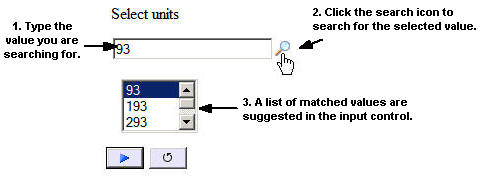
Type the
value to be displayed for the input control and click the search button.
Pressing the Enter key
will not execute the search. You must click the search button.
The input control shows a suggested
list of matched values.
-
Select a
value from the input control.
-
Click the Run button
to refresh the report showing the value selected in the input control.
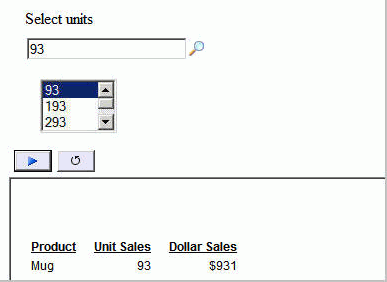
In the following example, the search
control shows 93 as the search value. This
indicates searching the list box records for a value matching 93.
The list box shows the value of 93 as the
selected unit. Running the report shows the results with Unit
Sales of 93.
xUsing Global Search and Paging
You can use the global search and paging option on the
BODY object to have one search and paging control that can be used
with each input control on the page.
x
Procedure: How to Enable Global Search and Paging
-
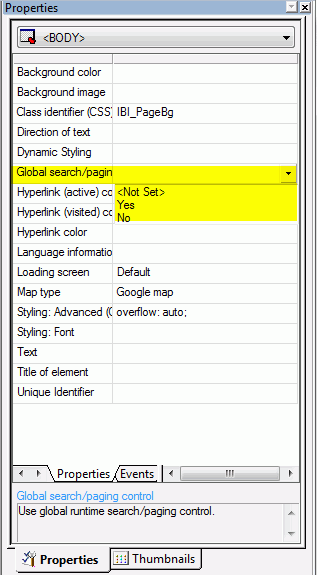
Click the
Global search/paging property in the Properties tab of the Properties
window for the BODY object, as shown in the following image.
-
Select Yes from
the drop-down menu.
At run time, the Search/Paging
window opens in the Home position, as shown in the following image.
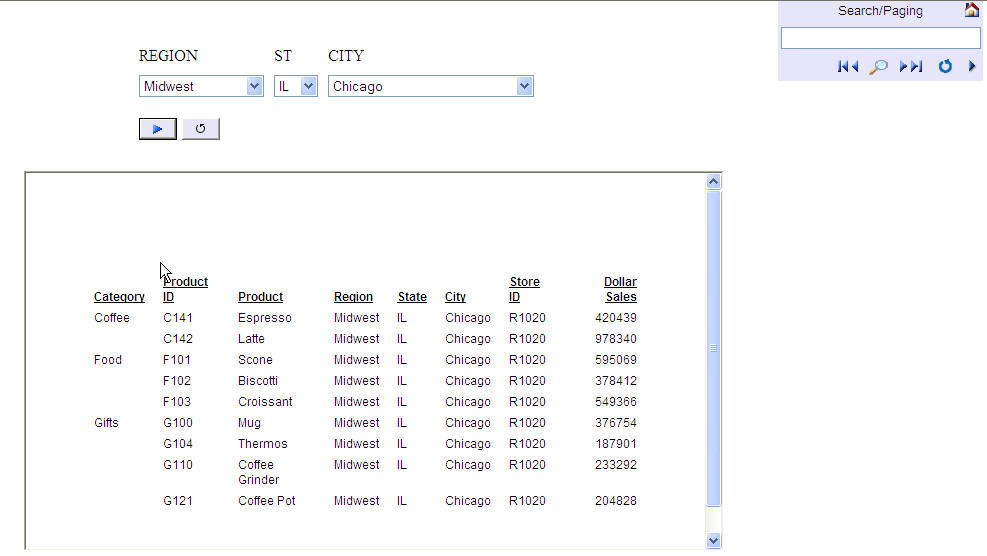
When you click an input control,
because the Auto-link to selected control option is on by default,
the Search/Paging window appears under the input control, as shown
in the following image. By default, the window shows all values
on one page (for example 1-4 of 4).
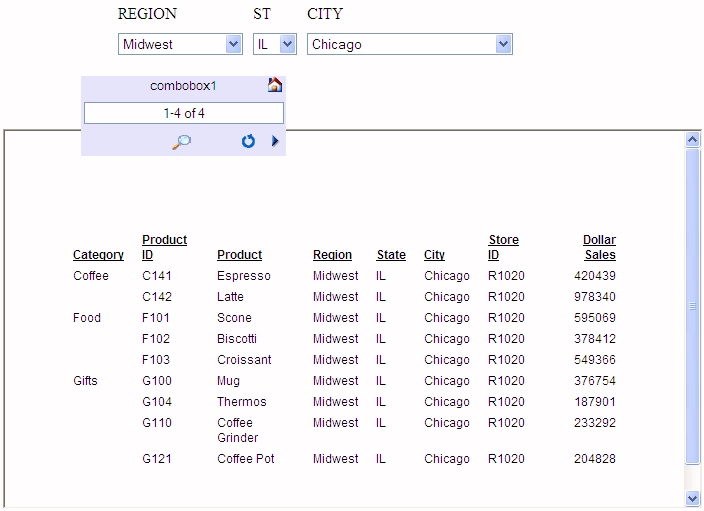
The label
for the input control is displayed showing that it is linked to that
input control. If no label is associated with the input control,
the window will show the unique identifier for the input control,
for example, combobox1.
-
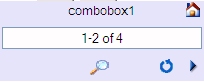
If you want
multiple pages, type a range in the Search/Paging field in the format
1-2 of 4, as shown in the following image and press the Enter key.
-
Click the Show
settings
 button
on the Global Search and Paging window to expand the window and
show the search and paging options, as shown in the following image.
button
on the Global Search and Paging window to expand the window and
show the search and paging options, as shown in the following image.
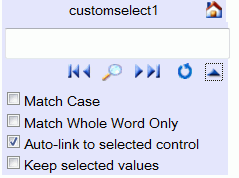
The Search/Paging options are:
-
Match Case. Search
value must match the value in the input control exactly.
-
Match Whole Word Only. Search
value word must exist in the string.
-
Auto-link to selected control. Search/Paging
window appears under the selected input control. Auto-link is on
by default.
-
Keep selected values. This
option only affects a double-list. When checked, this option will
accumulate values you search for in the right-side box. When you
search for another value, the previously searched values will not
be deleted.
Note:
- The Global control
option overrides individual control options. If Keep selected values
is selected for Global searching/paging, that will override whether
the double-list has it, regardless of whether it is set for the
control itself.
- You can click the up
arrow
 button
on the expanded window to collapse the options.
button
on the expanded window to collapse the options.
- You can click the House icon
on the Search/Paging window to move the window back to the Home
position.
x
Procedure: How to Reference: Use Search and Paging Features
You can use the following buttons on the Search/Paging
window to navigate through the pages.
|
Button
|
Description
|
|---|
|

|
First. Shows
the first page of values.
|
|

|
Previous. Shows the previous page of values.
|
|

|
Search. Initiates the search of values based
on the text box input.
|
|
|
Next. Shows the next page of values.
|
|

|
Last. Shows the last page of values.
|
|

|
Reset All. Resets the paging back to the original.
|
|
|
Show Settings. Expands the Global/Paging window
and shows the options.
Once expanded,
use the button
to collapse the settings display.
|
x
Check boxes enable you to select a single value from
a list of supplied values. Note that if there are multiple check
box input controls that are grouped together, you may select the Multiple properties
for each control. Multiple ensures that you can select a single
value from each check box control.
Check box list values can be dynamic or static.
x
Procedure: How to Add Check Boxes
-
Add
check boxes by doing one of the following:
- Click the Check
box button from the Components toolbar.
or
- From the Insert
menu, select Controls, then click Check
Box.
-
Drag
the crosshair to create a check box list and adjust it to the size you
want.
A check box is created in the layout and
assigned the name checkbox(n), where n is a number.
-
Optionally,
change the properties of the check box list by adjusting the properties
displayed in the Properties tab of the Properties window. For details,
see Check Box Properties in the Properties Window.
-
Bind
an existing parameter to the check box.
Binding a parameter
to a check box creates an incoming parameter. An incoming parameter
is a parameter that is bound to a control. The parameter value will
populate the check box with values.
-
Bind
the check box to a parameter.
Binding the check box to a parameter will
populate the parameter with a list of values.
- Click the Parameters tab.
The
Properties and settings dialog box opens.
- Create the
list of values for the check box. You can create a list of Static
or Dynamic values.
- Optionally, select Add
display image to display images, in addition to the
text next to the check box.
You can select the image by clicking
the ellipsis button in the Display column of the Properties and
settings dialog box.
To use dynamic image
values, there must be a field in the data source that contains the
image file name. The physical image file must exist in the current application
if you are working in Local Projects. If
you are working in Managed Reporting, the image must reside in the
domain Other folder. This field name must be specified as the Display
field in the Properties and settings dialog box.
- If a report on the
HTML page is coded to use the User Output format (Parameter name
WFFMT), the user can select a check box control from the New Parameters dialog
box. The tool will automatically associate the output type image,
included with the product, to each check box.
Note: For
more information on the User Output format, see the Creating Reports With Report
Painter manual and the WebFOCUS InfoAssist User’s Manual.
- Close the Properties
and settings dialog box to create the check box with the list of
values.
- Bind the check
box to a parameter. Select the center of the check box, left-click and
drag the check box to the center of the parameter object, and release
the mouse to complete the binding.
x
Reference: Check Box Properties in the Properties Window
When a check box is selected, the Properties tab in the
Properties window contains properties of the selected check box.
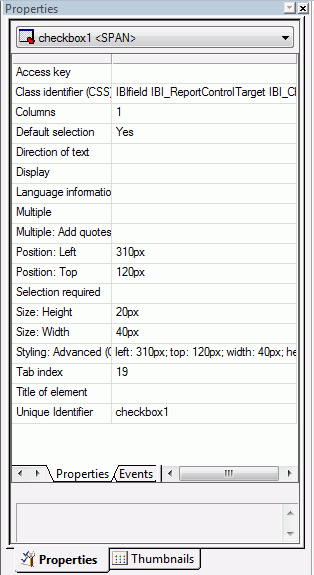
Click a property to display a description
of the selected property at the bottom of the Properties window.
x
Radio buttons enable you to select a single value from
a list of supplied values. Radio button values can be static or
dynamic.
x
Procedure: How to Add Radio Buttons
-
Add
radio buttons by doing one of the following:
- Click the Radio button
from the Components toolbar.
or
- From the Insert
menu, select Controls, then click Radio
Button.
The cursor changes
to a crosshair.
-
Drag
the crosshair to create a radio buttons list and adjust it to the
size you want.
A radio button placeholder is created in
the layout and assigned the name radio(n), where n is
a number.
-
Optionally,
change the properties of the radio buttons by adjusting the properties
displayed in the Properties tab of the Properties window. For details,
see Radio Buttons Properties in the Properties Window.
-
Bind
an existing parameter to the radio button.
Binding a parameter
to a radio button creates an incoming parameter. An incoming parameter
is a parameter that is bound to a control. The parameter value will
populate the radio button with values.
-
Bind
the radio button to a parameter.
Binding the radio button to a parameter
will populate the parameter with a list of values.
- Click the Parameters tab.
The
Properties and settings dialog box opens.
- Create the
list of values for the radio button. You can create a list of Static
or Dynamic values.
- Optionally, as shown in the following image, select Add
display image to display images in addition to the text next
to the radio button.
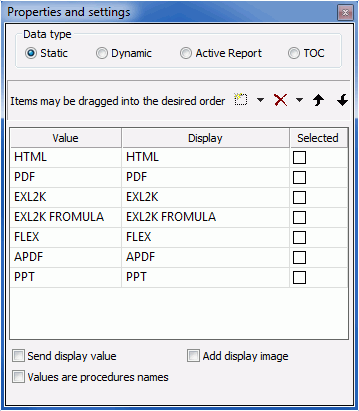
You can select the
image by clicking the ellipsis button in the Display column of the
Properties and settings dialog box.
To
use dynamic image values, there must be a field in the data source
that contains the image file name. The
physical image file must exist in the current application if you
are working in Local Projects. If you are working in Data Servers,
the image must reside in the Current Application folder. If you
are working in Managed Reporting, the image must reside in the domain
Other folder. This field name must be specified as the Display field
in the Properties and settings dialog box.
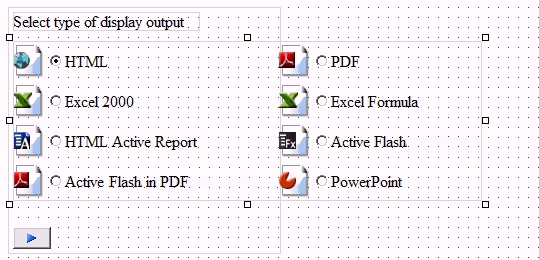
- If a report on the
HTML page is coded to use the User Output format (Parameter name
WFFMT), the user can select a radio button control from the New
Parameters dialog box. The tool will automatically associate the
output type image included with the product to each radio button,
as shown in the following image.
Note: For more information on the User
Output format, see the Creating Reports With Report Painter manual
and the WebFOCUS InfoAssist User’s Manual.
- Close the Properties
and settings dialog box to create the radio button with the list
of values.
- Bind the radio
button to a parameter: Select the center of the radio button, left-click
and drag the radio button to the center of the parameter object,
and release the mouse to complete the binding.
x
Reference: Radio Buttons Properties in the Properties Window
When a radio button is selected, the Properties tab in
the Properties window contains options that control the properties
of your radio buttons.
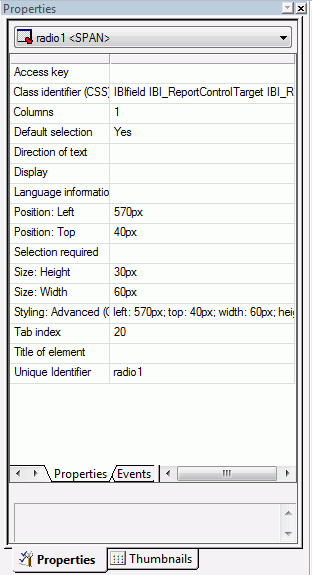
Click a property to display a description
of the selected property at the bottom of the Properties window.
x
By using a tree structure in an HTML report, you can show hierarchical data from a multidimensional data source (for example,
SAP BW), that uses the parent/child model. You may also use a tree
control for non-hierarchical data sources. Level hierarchies are
not supported.
The behavior of the tree control is integrated with the parameter
definition. If a parameter is defined as a single value and that
parameter is bound to a tree control, the tree control uses option
buttons for each node in the hierarchy. If the parameter is defined as
Multiselect OR or Multiselect AND, and that parameter is bound to
a tree control, then the tree control uses check boxes for each
node in the hierarchy, enabling you to select multiple nodes.
The following image shows the Tree Control component in HTML
Composer.
Note: Cube data should
be used to populate single source trees.
x
Procedure: How to Add a Tree Control to an HTML Page Using an Embedded Procedure
This procedure describes how to add a tree control for
a multi-dimensional data source, using an embedded procedure.
-
In HTML
Composer, insert a tree control from the Components toolbar.
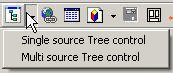
Tip: You may select
Single source Tree control or Multi source Tree control. If no type
is selected, Single source Tree control is the default, as shown in
the following image.
The cursor changes to a crosshair.
-
Drag
the crosshair to create a tree control, and adjust it to the size
you want.
A tree control is created in the layout
and assigned the name treecontrol(n), where n is a
number. Additionally, the Properties and settings dialog box appears
for the tree control.
-
Optionally,
you may select the Expanded property from
the Properties tab of the Properties window to show the tree control expanded
at run time.
-
Optionally,
you may select the Hyperlink property from
the Properties tab of the Properties window to show the tree nodes
as hyperlinks, instead of radio buttons at run time.
-
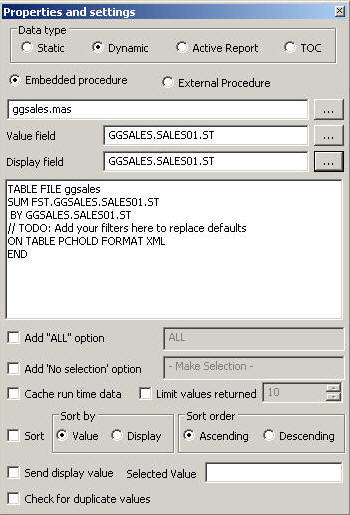
From
the Properties and settings dialog box, select Dynamic as
the Data type.
-
Keep Embedded
procedure selected and click the browse (...) button
adjacent to the first input field.
The Get source file dialog box opens.
-
Select
a multi-dimensional data source and click Open.
The multi-dimensional data source is added
as the embedded procedure.
-
Click
the Value field browse button to select a field
from the hierarchy.
The Value field is the data source field
from which the values will be retrieved.
-
Click
the Display field browse button to select a
field from the hierarchy.
The Display field is the text that represents
the parameter value in the tree control.
-
Save and
run the page to view the multi-dimensional data source in the tree
control.
x
Procedure: How to Add a Tree Control to an HTML Page Using an Existing Procedure
You can select an existing procedure to add to the tree
control in an HTML page. When you select a procedure, it should
use fields from the parent/child hierarchy and be set up as follows:
TABLE FILE file
SUM FST.dispfield
BY ParentUniqueField
BY UniqueField
BY datafield
ON TABLE PCHOLD FORMAT XML
END
where:
- file
-
Is the name of the data source.
- dispfield
-
Is the field whose values display in the
tree control.
- ParentUniqueField
-
Is the field that represents the parent
for the parent/child hierarchy (PROPERTY = PARENT_OF).
- UniqueField
-
Is the field that represents the unique
IDs for the hierarchy members (PROPERTY=UID).
- datafield
-
Is the field whose values are passed as
the parameter value.
After the procedure is set up, follow these steps:
-
In HTML
Composer, insert a tree control from the Components toolbar.
Tip: You may select
Single source Tree control or Multi source Tree control. If no type
is selected, Single source Tree control is the default.
The cursor changes to a crosshair.
-
Drag
the crosshair to create a tree control, and adjust it to the size
you want.
A tree control is created in the layout
and assigned the name treecontrol(n), where n is a
number. Additionally, the Properties and settings dialog box appears
for the tree control.
-
Optionally,
you may select the Expanded property from
the Properties tab of the Properties window to show the tree control expanded
at run time.
-
Optionally,
you may select the Hyperlink property from
the Properties tab of the Properties window to show the tree nodes
as hyperlinks, instead of radio buttons at run time.
-
From
the Properties and settings dialog box, select Dynamic as
the Data type.
-
Select External
Procedure and click the browse (...) button
adjacent to the first input field.
The Get source file dialog box opens.
-
Select
a procedure and click Open.
The procedure name is added as the external
procedure.
-
Click
the Value field browse button to select a field
from the hierarchy.
The Value field is the data source field
from which the values will be retrieved.
-
Click
the Display field browse button to select a
field from the hierarchy.
The Display field is the text that represents
the parameter value in the tree control.
-
Save and
run the page to view the multi-dimensional data source in the tree
control.
x
Procedure: How to Populate a Multi Source Tree Control
You can show a tree structure for a non-hierarchical
data source by using a tree control. By identifying the number of
layers for the tree control, you are able to populate each layer of
the tree control with its own procedure. Setting the number of layers
creates a tree structure by which each layer is its own subcontrol,
chained together with no conditions.
This procedure
describes how to add parameters for a tree control, where the number of
layers property is set.
-
In HTML
Composer, insert a tree control by doing one of the following:
- Click Multi
source Tree control from the Tree control drop-down
list, located on the Components toolbar, as shown in the following
image:
or
- From the Insert menu,
select Controls, then click Multi
source Tree control.
The cursor changes to a crosshair.
-
Drag the
crosshair to create a tree control, and adjust it to the size you want.
A tree control is created in the layout
and assigned the name treecontrol(n), where n is a
number. Additionally, the Properties and settings dialog box appears
for the tree control.
-
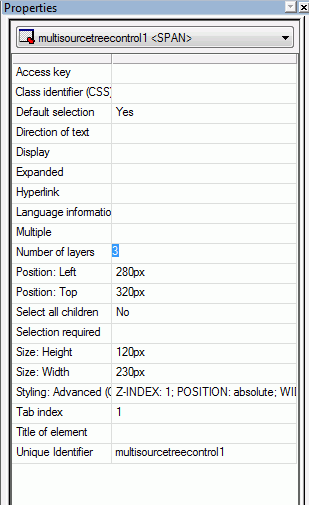
From the
Properties tab of the Properties window, type in the Number of layers
for the tree control, and press the Enter key.
This enables you to specify the number
of layers to populate. The following image shows the Number of layers
property with three (3) layers.
-
Optionally,
you may select the Expanded property from
the Properties tab of the Properties window to show the tree control expanded
at run time.
-
Optionally,
you may select the Hyperlink property from
the Properties tab of the Properties window to show the tree nodes
as hyperlinks, instead of radio buttons at run time.
-
With the
tree control selected, click the Parameters tab.
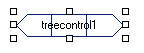
The tree control object shows the set number
of layers. For example, the following image shows a tree control
with three layers on the Parameters tab.
-
Select each
layer of the tree control and create the properties and settings
for its data population.
When creating a Multi
source Tree control, the static data type is not available. If creating
static values for the tree control, you must create a single source tree
control. To create a static list of values, see How to Add a Tree Control to an HTML Page Using Static Values.
For example, if you have a tree control with three
layers:
- Select the first
layer of the tree control and create a dynamic embedded procedure
for the REGION field of the GGSALES data source.
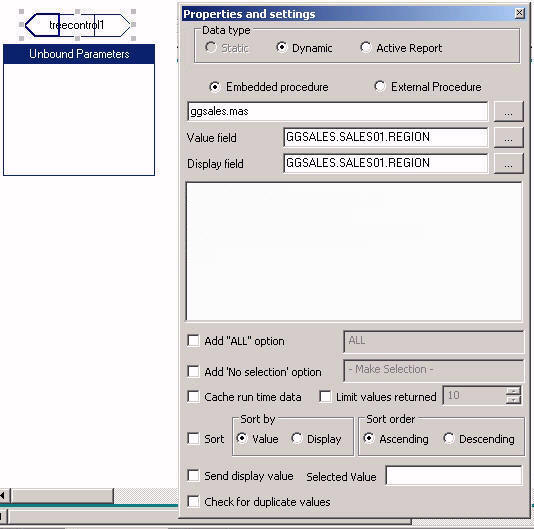
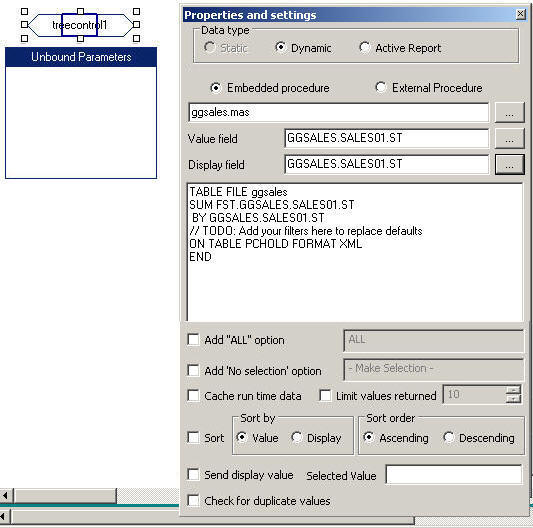
- Select the second
layer of the tree control and create a dynamic embedded procedure
for the ST field of the GGSALES data source.
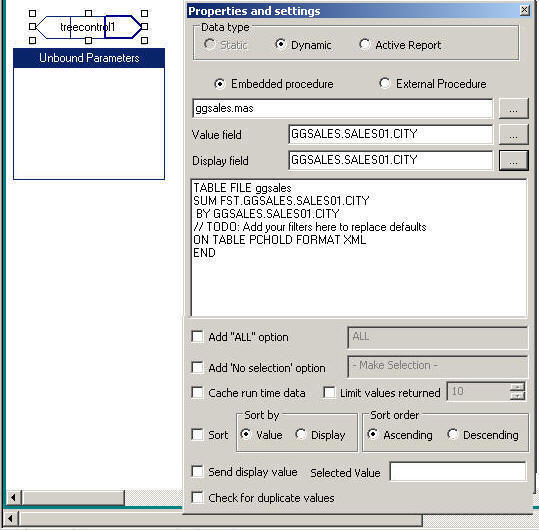
- Select the third
layer of the tree control and create a dynamic embedded procedure
for the CITY field of the GGSALES data source.
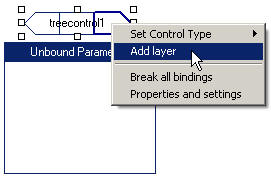
-
Optionally,
to add an additional layer for the tree control, right-click the tree
control object on the Parameters tab and select Add layer.
Note: The Add
layer option only appears for a Multi source tree control object.
-
Click the
added layer to view the properties and settings for that layer.
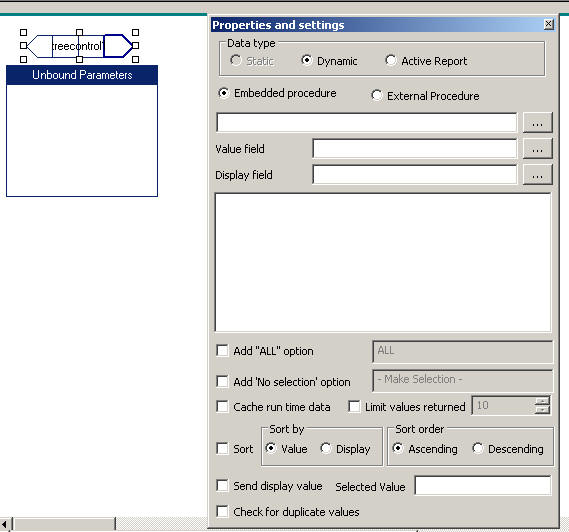
-
Switch to
the Design tab of HTML Composer to preview
the populated tree control.
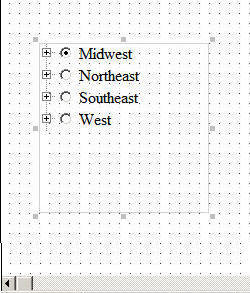
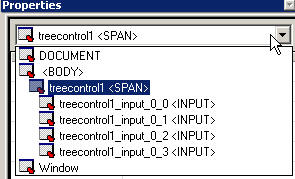
Note that the Properties window drop-down
list for the tree control shows each layer of input values.
-
Save and
run the page.
Note: If a user selects a lower
level node in one layer and a higher level node in another layer,
when the procedure is executed, only the lowest level selections will
take effect. For example, you have 3 layers: COUNTRY, CAR, and MODEL.
Under ENGLAND, TRIUMPH, you select TR7. Under FRANCE, you select
PEUGEOT. At run-time you will only receive the records for TR7 because
you did not select a MODEL under the FRANCE node.
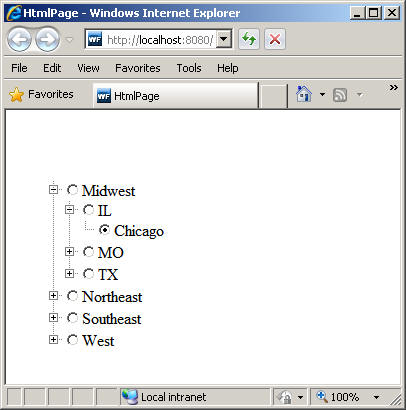
The tree
control populates each layer with values. For example, the following
image shows the REGION, ST,
and CITY fields as a hierarchy of the GGSALES
data source in the tree control.
Note: A
value must be selected for each layer before you can click the Save
Selection button.
If a selected
value is specified for a field that is not in Layer1, then
corresponding selected values must also be specified for
the preceding layers.
Only the first and second
layers load at run time. If a selected value is specified for a
field in Layer1, only values from the first two layers will
be selected.
x
Procedure: How to Add a Tree Control to an HTML Page Using Static Values
This procedure describes how
to add static data type parameters for a tree control, where the
Number of layers property for the tree control is not set. This
enables you to add a static list of values.
-
In HTML
Composer, insert a tree control by doing one of the following:
- Click Single
source Tree control from the Tree control drop-down
list, located on the Components toolbar.
or
- From the Insert menu,
select Controls, then click Single
source Tree control.
The cursor changes to a crosshair.
-
Drag the
crosshair to create a tree control, and adjust it to the size you want.
A tree control is created in the layout
and assigned the name treecontrol(n), where n is a
number. Additionally, the Properties and settings dialog box appears
for the tree control.
-
From the
Properties and settings dialog box, select Static as
the Data type.
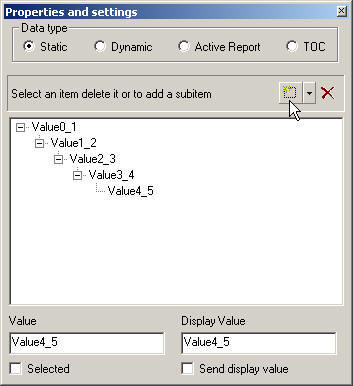
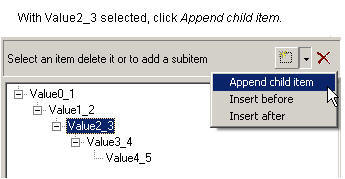
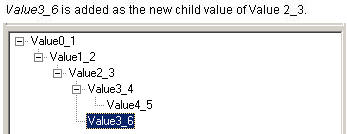
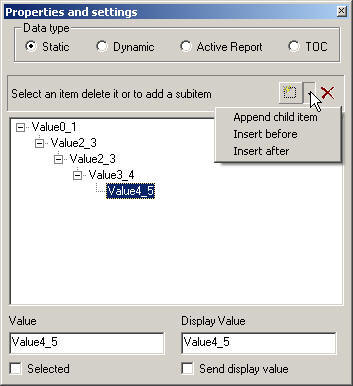
Static is selected by default. You may
select an item, delete it, or add a subitem.
-
Create the
parameter values for the control:
The following image shows the Properties
and settings dialog box and the Static data type options for a tree
control.
-
Check the Selected check
box to show the entry in the Value field as the default value.
-
Check the Send
display value check box to send the display value, rather
than the actual data, to the parameter.
-
Save and
run the page to populate the tree control with static values.
x
Procedure: How to Create a New Tree Control From the New Parameters Dialog Box
When a report contains one or more new amper
variable parameters created in Report
Painter, the New Parameters
dialog box appears when you save the report and return to HTML Composer.
You can assign a new Single source or Multi source Tree control
from the HTML page to the parameter from the New Parameters dialog
box.
For each parameter, you will find Name
and Control Type fields, a Create control check box, and options
to set the Control Type to a Single source or Multi source Tree
control.
-
From the
Design tab of HTML Composer, import or create a
report that contains a parameter.
When importing a report with parameters, the New Parameters
dialog box appears prompting you to create the control type.
-
Select the
new tree control from the New Parameters dialog box.
The following image shows the ST parameters
with Single source Tree control being selected
as the new control type for the parameter.
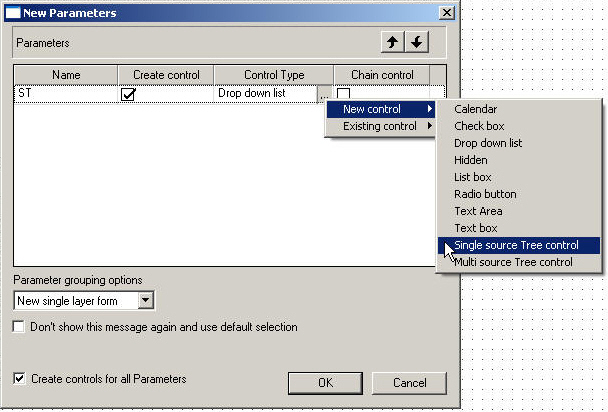
The Control Type column refreshes,
showing the selected control.

-
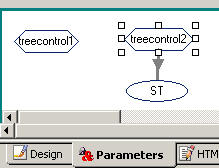
Click OK to
close the New Parameters dialog box.
The report is added and the associated
parameters are bound to the tree control, as shown on the Parameters
tab. As for any other type of input control, you can edit the Properties
and settings, chain controls, change the control type, and so on.
x
Reference: Usage Notes For Chaining Tree Controls
The following usage notes apply when chaining tree controls.
You may chain controls from the New Parameters dialog box and from
the Parameters tab.
- When the Multi source
Tree control is a link in the chain, the New Parameters dialog box
enables you to share parameters with the same multi source control.
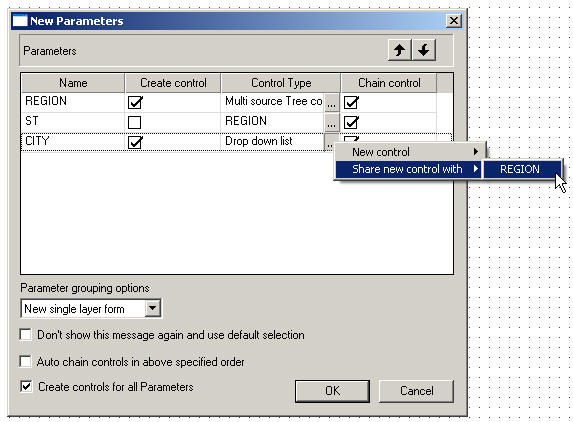
For
example, the following image shows the New Parameters dialog box
that appears when the first link in the chain, REGION, is a Multi
source Tree control. When the Chain control column is checked for
the parameters, the remaining parameters, ST and CITY, can share
the tree control with the REGION parameter. Note that when parameters
are shared with the Multi source Tree control, the Create control
column is unselected.
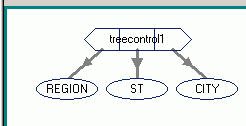
The result of sharing the new
control with a Multi source Tree control appears as follows from
the Parameters tab. Note how the tree control shows multiple layers, chaining
REGION, ST, and CITY.
- You can chain a Multi
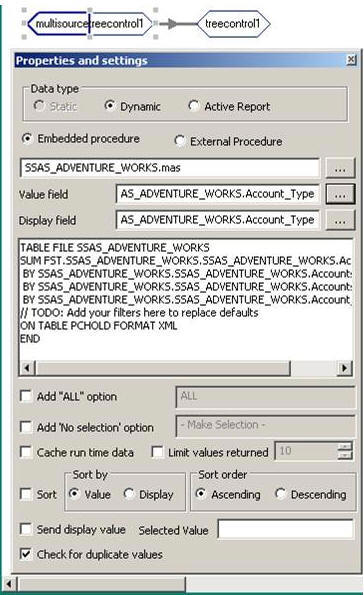
source Tree control to a Single source Tree control.
For example,
the following image shows the first layer of the Multi source Tree control
populated with Account_Type from Account Properties of the Microsoft Analysis Services sample
file, Adventure_Works. The second layer is populated with Accounts.
The Multi source Tree is chained to the Single source Tree which
is populated with Account_Number from Account Properties of the Adventure_Works data file.
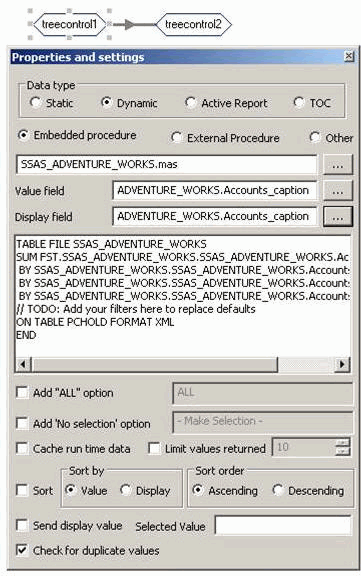
- You can chain a Single
source Tree control to another Single source Tree control.
For
example, the following image shows an example of a Single source
Tree control populated with sample data from the Microsoft Analysis Services Adventure
Works sample file, Adventure_Works. Treecontrol1 is populated
with Accounts Member Caption and treecontrol2 is populated with
Account Type.
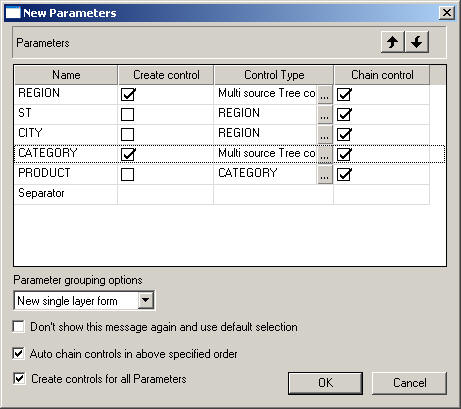
- You can chain a Multi
source Tree control to another Multi source Tree control.
For
example, the following image shows the New Parameters dialog box
that shows two Multi source Tree controls. The first tree control
contains REGION, ST, and CITY. Note that when parameters are shared
with the Multi source Tree control, the Create control column is
unselected. The second tree control contains CATEGORY and PRODUCT.
The Chain control column is selected for all parameters, indicating
that all the controls will be chained.
The result appears as follows
from the Parameters tab. Note the first tree control, treecontrol1,
is a Multi source Tree control with three layers, containing REGION,
ST, and CITY. The second tree control, treecontrol2, is a Multi
source Tree control containing two layers, CATEGORY and PRODUCT.
Treecontrol1 is chained to treecontrol2.
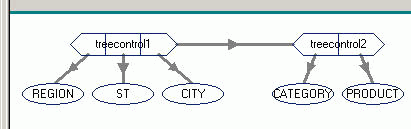
- You can chain a tree
control to another non-tree control, such as Drop down list or List
box.
For example, the following image shows the New Parameters
dialog box that shows a drop-down list and a Multi source Tree control.
The drop-down list contains the CATEGORY parameter. The Multi source
Tree control contains the REGION, ST, and CITY parameters. Note
that when parameters are shared with the Multi source Tree control, the
Create control column is unselected. The Chain control column is
selected for all parameters, indicating that all the controls will
be chained.
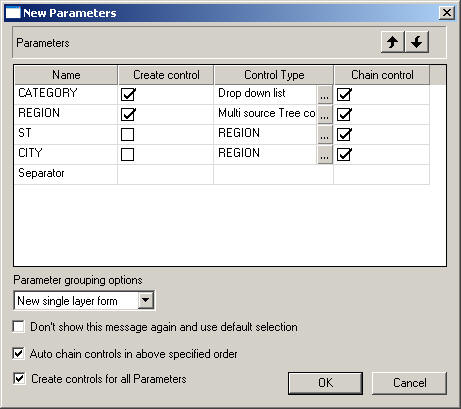
The result appears as follows
from the Parameters tab. The drop-down list, combobox1, contains
the CATEGORY parameters. treecontrol1 is a Multi source Tree control
with three layers, containing REGION, ST, and CITY. Combobox1 is
chained to treecontrol1.
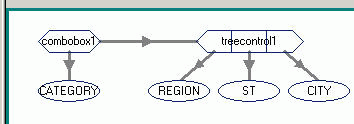
-
Chaining
cannot be done with only field names.
-
Dynamic
population of controls with field names need to use SYSCOLUMN calls.
x
Reference: Tree Control Properties in the Properties Window
When a tree control
is selected, the Properties tab in the Properties window contains options
that control the properties of tree controls.
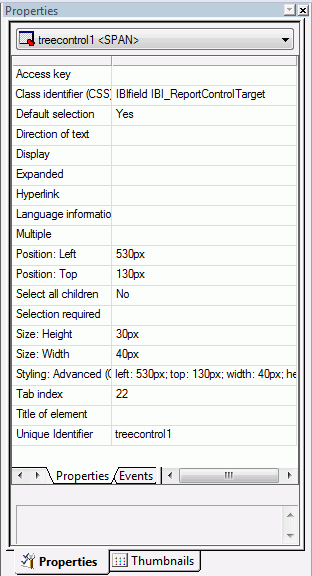
Click a property to display a description
of the selected property at the bottom of the Properties window.
Select all children. The
Select all children option, when set to Yes, makes it so that when
a parent is selected, all children are selected and when a parent
is unselected, all children are unselected. No is selected by default.
Note: The
Number of layers property is not available in a single tree source property
window.
x
You may add a slider control for numeric range values
in a report or graph. This enables you to use a slider bar to select
from a range of values.
Note: When using a Slider control in a RIA page, you can
drag the slider to any value. For example, if a slider control is
populated using a field whose only valid values are 2, 4, and 5,
you can drag the slider to 1 and 3.
x
Procedure: How to Add a Slider Control
-
Add a slider control by doing one of
the following:
- From the Components toolbar, click the Slider button.
Next, select the slider direction (Horizontal or Vertical), then
select the slider type (Simple, Color Bar and Arrows or Color Bar,
Arrows Edit).
or
- From the Insert menu, select Controls, then select Slider.
Next, select the slider direction (Horizontal or Vertical), then
select the slider type (Simple, Color Bar and Arrows or Color Bar, Arrows
Edit).
The
cursor changes to a crosshair.
-
Drag the crosshair to create a slider
control, and adjust it to the size you want.
A slider control is created in the layout
and assigned the name slider(n), where n is a number.
Note: The slider
control is determined by the default slider control type selected
from the HTML Page tab, located in the Developer Studio Options dialog
box. For details about changing the slider bar, see How to Change the Default Slider Bar.
-
Optionally,
change the slider control properties by adjusting the properties
displayed in the Properties tab of the Properties window. For details,
see Slider Control Properties in the Properties Window.
-
Bind
an existing parameter to the slider control.
Binding a parameter
to a slider control creates an incoming parameter. An incoming parameter
is a parameter that is bound to a control. The parameter value will
populate the slider control with values.
-
Bind
the slider control to a parameter.
Binding the slider control to a parameter
will populate the parameter with a range of values.
- Click the Parameters tab.
The
Properties and settings dialog box opens.
- Create the
range of values for the slider control. You can create a list of
Static or Dynamic range of values.
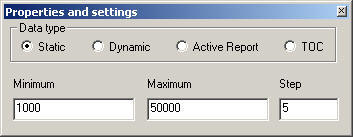
Note: If
creating a Static Data type for the slider control, enter the minimum
and maximum values for the range in the Minimum and Maximum input
fields. The Step input field indicates how
the numbers increment on the slider bar.
- Close the Properties
and settings dialog box to create the slider control with the range
of values.
- Bind the slider
control to a parameter. Select the center of the slider control, left-click
and drag the slider control to the center of the parameter object,
and release the mouse to complete the binding.
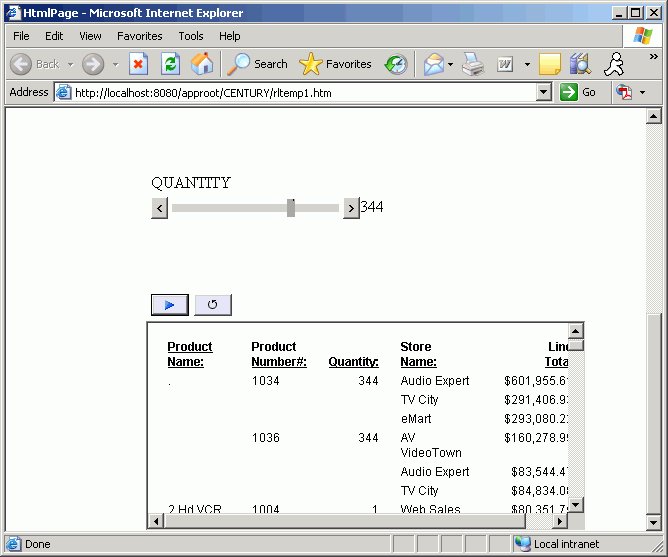
-
Run
the HTML page and use the slider bar to slide the values up or down.
You may also use the end arrows to increase or decrease the numbers
in the range. The output is generated based on the selected number
from the slider bar.
x
Procedure: How to Change the Default Slider Bar
The default slider type is determined from the HTML Page
tab, located in the Developer Studio Options dialog box.
-
To change
the default slider type, select Options from
the Window menu.
The Developer Studio Options dialog box opens.
-
Select the
HTML Page tab.
-
Click
the Form Settings button to open the Form
Settings dialog box.
-
Use
the drop-down list to change the default slider control type. You may
select from:
- Horizontal
or Vertical Slider Simple bar. The slider bar has no end arrows, just
a bar with the slider.
- Horizontal
or Vertical Slider with Color Bar and Arrows. Arrows appear at each end
of the slider bar.
- Horizontal
or Vertical Slider with Color Bar, Arrows, and Edit. Arrows and
an edit box appear at the end of the slider bar, showing the current
value.
Once a slider control
is inserted into HTML Composer, changing these options will not
affect the existing sliders. The option is only applied to new slider controls.
To change the existing slider bar type, delete the slider object
and insert a new slider control.
x
Reference: Slider Control Properties in the Properties Window
When a slider control is selected, the Properties tab in
the Properties window contains options that control the properties
of the slider control.
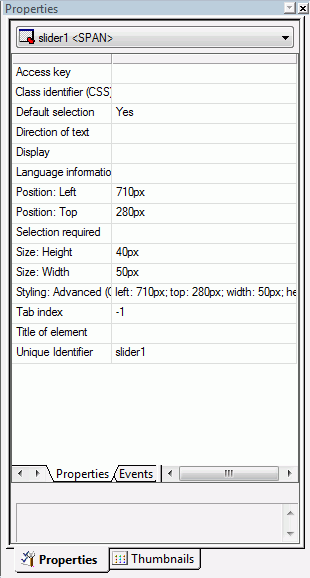
Click a property to display a description
of the selected property at the bottom of the Properties window.
xAdding a Dynamic Calendar
Date parameters can utilize a built-in calendar control
that enables you to select the desired date or range of dates in
a pop-up dynamic calendar. A procedure that is added to or referenced
in HTML Composer and contains date parameters will have a Calendar
control type available in the Properties tab of the Properties window.
When the Calendar control type is selected, a text box with a
calendar icon will display in the Design view of the layout. The
text box is the only control available for the calendar, and the
icon will always display to the right of the text box. The icon
cannot be positioned independently from the text box.
Note that when programmatically returning a date to the calendar,
the date must be in a FOCUS date format that specifies the
complete date from the list of supported data types in Calendar
Properties.
x
Procedure: How to Set Calendar Properties
-
Add
a calendar by doing one of the following:
- Click the Calendar button
from the Components toolbar.
or
- From the Insert
menu, select Controls, then click Calendar.
The cursor changes to a crosshair.
-
Drag
the crosshair to create a calendar and adjust it to the size you want.
A calendar placeholder is created in the
layout and assigned the name calendar(n), where n is
a number.
-
Optionally,
change the calendar properties by adjusting the properties displayed
in the Properties tab of the Properties window. For details, see Calendar Properties in the Properties Window.
-
Bind
an existing parameter to the calendar.
Binding a parameter
to a calendar creates an incoming parameter. An incoming parameter
is a parameter that is bound to a control. If binding a parameter
to a calendar, the parameter value must be in a FOCUS date
format that specifies the complete date from the list of supported
data types in Calendar Properties. The parameter value will populate
the calendar with date values.
-
Bind
the calendar to a parameter.
Binding the calendar to a parameter will
populate the parameter with a date value.
- Click the Parameters tab.
The
Properties and settings dialog box opens, showing the calendar setup
options. The calendar setup options enable you to set the range
of dates available to the user at run time. Available dates will
be represented as an active hyperlink (blue and underlined) and
unavailable dates will be static (black without underlines).
Note: The
Properties and settings dialog box for a calendar will contain different
options depending on the selected data type.
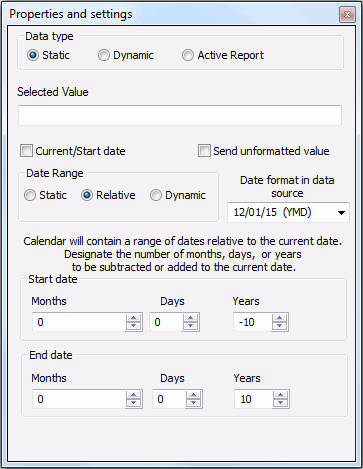
- Create the
values for the calendar. You can create Static or Dynamic values.
When
the Current/Start date option is checked, the current date will
be used in the calendar control at run time.
The Date Range options for setting up the calendar include:
-
Static. This option will set a static date range in
which the developer will select a start date and an end date using
a pop-up calendar icon, or by clicking the month, day, or year from
the controls.
The pop-up calendar  icon
appears in the From and To sections when the Static Date
Range is selected. If you click the pop-up calendar icon, a pop-up
calendar appears and shows the current date selected and circled
in red by default. As you scroll through the calendar with the left/right
arrows, the currently selected day will remain highlighted for each
month. Clicking a date will add that date to the control. Dates
can be selected by scrolling left to right, entering the month,
day, and year as text, or by selecting the month, day, and year
from the drop-down list and spin boxes.
icon
appears in the From and To sections when the Static Date
Range is selected. If you click the pop-up calendar icon, a pop-up
calendar appears and shows the current date selected and circled
in red by default. As you scroll through the calendar with the left/right
arrows, the currently selected day will remain highlighted for each
month. Clicking a date will add that date to the control. Dates
can be selected by scrolling left to right, entering the month,
day, and year as text, or by selecting the month, day, and year
from the drop-down list and spin boxes.
-
Relative. This option allows you to set a specific number
of days, months, and years relative to the current date. The current
date (at run time) will always be the reference or starting point
and the calendar will show a number of days, months, and years relative
to the current date. The range could be all in the past (for example,
five years prior to the current date) or all in the future (for
example, five years in the future). This is selected as the default
Date Range.
-
Dynamic. This option allows you to point to
a procedure that returns a range of dates. Clicking the Select
custom procedure browse (...) button allows the developer
to choose a preexisting procedure located in the current APP (local projects/data server) or Domain
(MR). The procedure must return two date values on the same data
line in XML format. The date values must be returned in a format
that returns two digits for the month and day, and four digits for
the year, for example, MM/DD/YY. For an example of returning a range
of dates from a procedure, please see the example shown later in
this section.
- Close the Properties
and settings dialog box to create the calendar with the range of
date values.
- Bind the calendar
to a parameter. Select the center of the calendar, left-click and
drag the calendar to the center of the parameter object, and release
the mouse to complete the binding.
x
The
date format can be displayed differently by selecting one of the
available formats from the Date format in data source drop-down
list in the calendar controls Property and settings dialog box.
The format you select must match the format in the data source or
the virtual field, if that is the date field you are using. By
default, it will match the format in the data source.
The
following date formats are available:
|
Display Date
|
Date Format
|
|---|
|
11/01/15
|
(YMD)
|
|
15/01/11
|
(DMY)
|
|
15/01/2011
|
(DMYY)
|
|
01/15/11
|
(MDY)
|
|
1/15/2011
|
(MDYY)
|
|
2011/01/15
|
(YYMD)
|
|
January, 2011
|
(trMYY)
|
|
January 15, 2011
|
(trMDYY)
|
|
Jan 15, 2011
|
(tMDYY)
|
|
15 Jan, 2011
|
(tDMYY)
|
|
Wednesday, January 15, 2011
|
(wrMtrDYY)
|
|
11 Q1
|
(YQ)
|
|
11.01.15
|
(Y.M.D)
|
|
11-01
|
(Y-M)
|
|
11 01 15
|
(YBMBD)
|
|
2011/01
|
(YYM)
|
|
01/11
|
(MY)
|
|
2011 Q1
|
(YYQ)
|
|
Q1 2011
|
(QYY)
|
|
Q1 11
|
(QY)
|
|
01
|
(M)
|
|
Jan
|
(Mt)
|
|
January
|
(Mtr)
|
|
Q1
|
(Q)
|
|
2011
|
(YY)
|
|
11
|
(Y)
|
|
15
|
(D)
|
|
1
|
(W)
|
|
Wednesday
|
(Wr)
|
|
Wed, Jan 15, 2011
|
(wMtDYY)
|
|
Wed, 15 Jan, 2011
|
(wtDMYY)
|
|
15 January, 2011
|
(trDMYY)
|
|
Wednesday, 15 January, 2011
|
(wrtrDMYY)
|
Note: When using a format that is missing
a component (such as the day in the MY format), the missing component
will be taken from the current days date.
x
Reference: Calendar Properties in the Properties Window
When a calendar is selected in HTML Composer, the Properties
tab in the Properties window contains the properties of the selected
calendar.
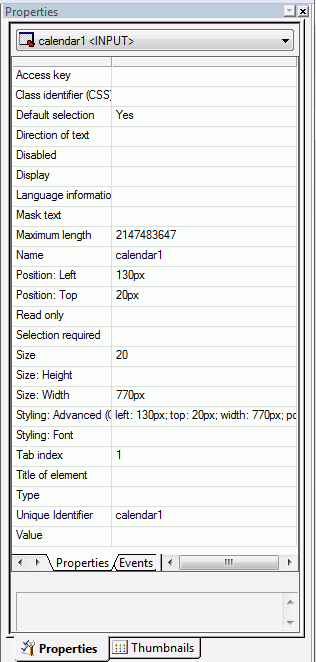
Click a property to display a description
of the selected property at the bottom of the Properties window.
Example: Returning a Range of Dates From a Procedure
The following returns the complete range of date values
for HIREDATE.
-* This extracts minimum and maximum to a single record.
DEFINE FILE EMPDATA
NEWDATE/YYMD = HIREDATE;
END
TABLE FILE EMPDATA
WRITE MIN.NEWDATE AS 'MINNEWDATE'
MAX.NEWDATE AS 'MAXNEWDATE'
ON TABLE SET ASNAMES ON
ON TABLE HOLD
END
-* This reads that record twice to create two extract files with each field having the same name.
TABLE FILE HOLD
PRINT MINNEWDATE AS 'NEWDATE'
ON TABLE SET ASNAMES ON
ON TABLE HOLD AS MINNEWDATE
END
TABLE FILE HOLD
PRINT MAXNEWDATE AS 'NEWDATE'
ON TABLE SET ASNAMES ON
ON TABLE HOLD AS MAXNEWDATE
END
-*This uses MORE to create two records.
TABLE FILE MINNEWDATE
PRINT NEWDATE
ON TABLE PCHOLD FORMAT XML
MORE
FILE MAXNEWDATE
END
The XML output is:
<?xml version="1.0" encoding="ISO-8859-1" ?>
- <fxf version="1.0" data="hold">
- <report records="2" lines="2" columns="1" rows="2">
  <target format="" version="" type="" destination="HOLD" />
  - <column_desc>
    <col colnum="c0" fieldname="NEWDATE" alias="E01" datatype="date"
       width="10" focus_format="YYMD" description="" accept=""
       help_message="" title="" property="" reference=""
       valign="right" />
    </column_desc>
  - <table>
  - <tr linetype="data" linenum="1">
      <td colnum="c0" rawvalue="19890301">19890301</td>
    </tr>
  - <tr linetype="data" linenum="2">
      <td colnum="c0" rawvalue="19910513">19910513</td>
    </tr>
    </table>
  </report>
  </fxf>
xUsing a Hidden Parameter Value
A hidden input control allows parameter values to be
used in a control without the user seeing them. When a hidden control
is used, the current input control assigned to the parameter will
not be visible. The value of the parameter can be entered in the
Properties and settings dialog box of the Parameters tab, or supplied
through chaining.
x
Procedure: How to Add a Hidden Control
-
Add a hidden control by doing one of the following:
- Click the Hidden control
button from the Components toolbar.
or
- From the
Insert menu, select Controls, then click Hidden.
The cursor changes to a crosshair.
-
Drag the crosshair to create a hidden control and adjust it
to the size you want.
A hidden control is created and assigned
the name inputhidden(n), where n is a number.
A hidden control is not visible
in the Design view of your layout. It is available as a control
object on the Parameters tab.
-
Optionally, change the hidden control properties by adjusting
the properties displayed in the Properties tab of the Properties
window.
Select inputhiddenn from
the Properties drop-down list. The Properties window contains a
hierarchical drop-down list of objects that are currently in the
layout.
-
Bind the hidden control to a parameter.
Binding the hidden control to a parameter
will hide the parameter value when you run the HTML page.
- Click the Parameters tab.
The
Properties and settings dialog box opens.
- Create the
list of values for the hidden control. You can create a Static or Dynamic
value.
Note: If you are not seeing
the value, you should set the list to evaluate to one value.
- Close the
Properties and settings dialog box to create the hidden control
with the list of values.
- Bind the
hidden control to a parameter. Select the center of the hidden control, left-click
and drag the hidden control to the center of the parameter object,
and release the mouse to complete the binding.
-
To change an existing input control to a hidden control:
- Select the
input control on the Parameters tab.
- Right-click
and select Hidden from the Set Control Type
context menu.
The input control is hidden
on the control in the Design view and when you run the HTML page.
-
To show a hidden control in the control:
- Select the
hidden control object from the Parameters tab.
- Right-click
and select the desired control from the Set Control Type context
menu.
Tip: You
may have to reposition the input control on the Design tab of the
layout when changing control types.
xCreating Hyperlink Actions With Additional Parameters
When you manually add a new parameter on the Parameters
tab, you may pass the parameter variable to a hyperlink action.
The additional parameters appear on the Hyperlink Properties dialog
box when you create a new action.
The Hyperlink Properties dialog box is available when
you create a Hyperlink, Push button, Frame, Image, and Submit button.
Note: When using Google Chrome™ and when a hyperlink action
causes a report to be run in a new window, the report will run in
a new tab instead of a new window.
x
Procedure: How to Create a Hyperlink Action With Additional Parameters
-
Create a new parameter:
- Right-click
anywhere on the Parameters tab and select Add parameter.
The
Properties and Settings dialog box opens.
- Enter the name
for the parameter in the Name field, or keep the default name.
- Optionally,
you may use the Format field to define the format of the parameter, such
as A20 or D12.2.
If this field is left blank, it automatically
applies the Alphanumeric format to the value field.
- Enter the parameter
value information. Options are Single select, Multiselect
OR, and Multiselect AND.
These are static parameter options.
- Close the Properties
and settings dialog box to create an unbound parameter.
- To bind the
new parameter to a control, select the Design view and create an input
control. For example, insert a list box, drop-down list box, and
so on.
- Click the Parameters tab.
The
Properties and settings dialog box appears for the control.
- Close the Properties
and settings dialog box.
- Select the
center of the parameter name object, left-click, and drag the parameter
to the center of the control object.
This makes it an incoming
parameter that will populate the control. If the control will populate
the parameter, select the center of the control object, left-click
and drag the control object to the center of the parameter object.
- Release the
mouse to complete the binding.
The following
image is an example of an incoming parameter.
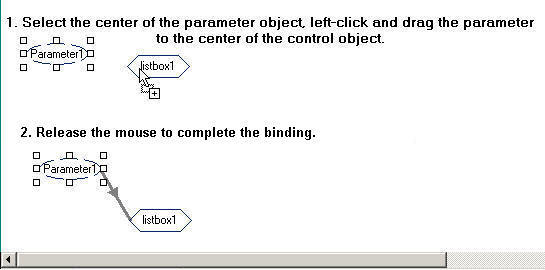
To modify the
parameter value, right-click the parameter on the Parameters tab
and select Properties and settings.
Tip: You may also use
the Undo and Redo buttons located on the Standard toolbar. Note
that undo/redo treats the entire Properties and settings dialog
as one action.
-
From the Design view, create and open the Hyperlink Properties
dialog box for the input control to create the hyperlink action.
For example, insert and right-click the Push Button object and select Create
hyperlink.
The Hyperlink Properties dialog box
opens for the selected object.
-
Click the New button to create a new action.
The Additional parameters button appears
on the Hyperlink Properties dialog box.
The Additional parameters button only appears if
parameters were created from the Parameters tab of HTML Composer.
-
Select the Action, Source, Target Type, and Target/Template
Name for the hyperlink.
-
Click the Additional parameters button
and select the parameter name(s) to pass in this hyperlink.
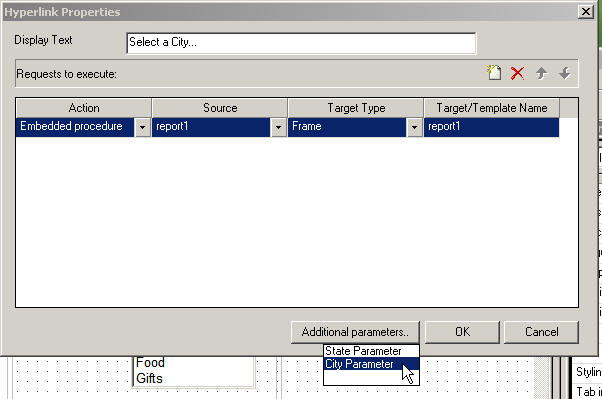
-
Click OK to close the Hyperlink Properties dialog
box.
If you are linking
hyperlink properties to another page or procedure, HTML Composer
parses the other file for unresolved parameters and opens the New
Parameters dialog box.
When you run the report and click the hyperlink, the action
passes the parameter value to the entity specified in the Source
column of the Hyperlink Properties dialog box.
xBinding a Button, Hyperlink, or Image to Populate a Control
You may bind a button, hyperlink, or image to a control
on the Parameters tab in HTML Composer. This enables you to dynamically
repopulate the control with new values at run time by clicking the
button, hyperlink, or image.
For example, the following image shows a report with a custom
list of static values for the State field in a list box control.
Clicking the button repopulates the list box control with a dynamic
list of state values, enabling you to select a state and run the
report.
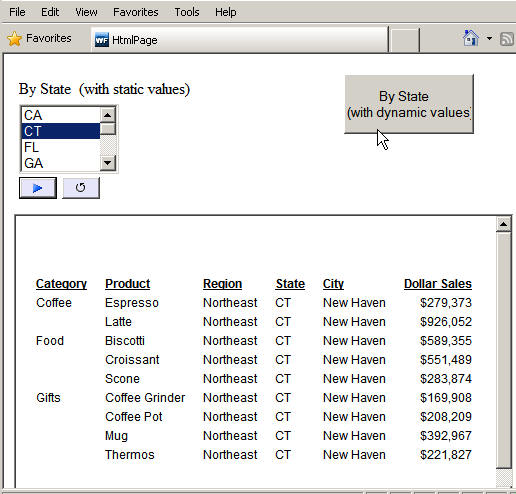
x
Procedure: How to Bind a Button to Populate a Control
Using information from the sample data source GGSALES, create
a report with a state parameter. A list box control shows a custom
list of selected state values that you have created. A push button,
bound to the list box, repopulates the control and shows a dynamic list
of state values from the data source at run time. This enables you
to selectively populate the list box with static or dynamic values
before running the report.
-
Create the
HTML page.
Tip: The Gotham
Grinds Sales data source (ggsales.mas) is
available from the ibisamp Applications on the localhost folder of Developer Studio. You may copy
this source file to the project directory of your choice.
-
Select the HTML Files folder from your
project in Developer Studio.
-
Right-click and select New/HTML File.
The Add HTML File dialog box opens.
-
Type binding_button in the File name text
box and click Open.
HTML Composer opens.
-
Create the
Gotham Grinds sales report.
-
Select New Report from the Insert menu.
The cursor changes into a crosshair.
-
Drag the crosshair to create a reporting object and adjust
it to the size you want.
-
Double-click the report placeholder.
The Open dialog box appears.
-
Select the ggsales Master File and click Open.
Report Painter opens showing the field names
for the ggsales data source.
-
Select By from the Columns toolbar.
Double-click the following field names: CATEGORY, PRODUCT,
REGION, ST, CITY
-
Insert your cursor after the City field in the Report Painter canvas,
and select Sum from the Columns toolbar.
-
Double-click DOLLARS to add it to the report.
-
Create a
parameter for the ST field. This parameter will be populated from
a static list when you initially run the report on the HTML page.
-
Click the Where/If button from the Columns
toolbar.
The Report Options dialog box opens
at the Where tab.
-
Click Assist.
The Expression Builder opens.
-
Create a parameter for ST from the Expression Builder:
- From the Fields list,
double-click ST.
- From the Logical
Relations drop-down list, select equals.
- In the Compare Type
box, select Parameter.
- Double-click the
Compare Value box to open the Variable Editor.
- Keep the default
Name as ST.
- Type By
State in the Prompt field.
- Keep the default Static
list from the Accept List section.
- Type the following
states as the Display and Return Values, respectively:
California, CA, Georgia, GA, Illinois,
IL, New York, NY.
- Click OK to
close the Variable Editor.
-
Click OK to close the Expression Builder.
-
Click OK to close the Report Options dialog
box.
-
Select Close from the File menu to close Report Painter.
-
When you are prompted to save your changes, click Yes.
You are returned to HTML Composer and
the New Parameters dialog box appears.
-
Select List box from the Control Type ellipsis
button and click OK to automatically add
the state parameter control to the HTML page.
-
Insert a
button, hyperlink, or image object.
Adding a button, hyperlink, or image to
the layout enables you to execute a request at run time. For this
example, insert a push button.
-
From the Insert menu, select Controls,
then click Push Button.
The cursor changes into a crosshair.
-
Drag the crosshair to create a push button and adjust it to
the size you want.
A push button is created in the layout
and assigned the name button(n), where n is a number.
-
Optionally, you may rename the text of the button by typing
text in the Value property field in the Properties window.
-
Add the
button object to the Parameters tab.
-
Click the Parameters tab.
The Properties and settings dialog
box opens, showing a Legend of the available controls for the values
on the HTML page.
-
From the Thumbnails tab, select the button object.
-
Left-click and drag the object onto the Parameters tab.
-
Release the mouse to move the object onto the Parameters tab.
The button object appears on
the Parameters tab and the Properties and settings for the button
appear.
-
Bind the
button object to the list box control.
Binding the button, hyperlink, or image
to a control enables you to populate the control with alternative
code.
-
Select the center of the button object, left-click and drag
the object to the center of the list box control object, and release
the mouse to complete the binding. A line indicates the direction
of the bind.
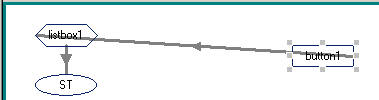
-
Create the
properties and settings for the bound object.
-
Click the arrow head in the link of the chain between the button
and list box control.
The Properties and settings dialog
box enables you to create alternative code to populate the list
box at run time.
-
Create dynamic values for the state parameter.
-
Save and
run the HTML page.
Using the default list of static state
fields, run the report.
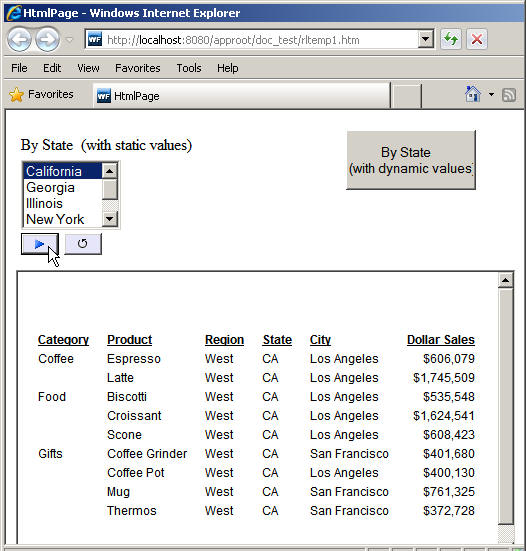
-
Click the
push button to repopulate the list box with the dynamic state values
from the GGSALES data source. Note how the list of state values changed.
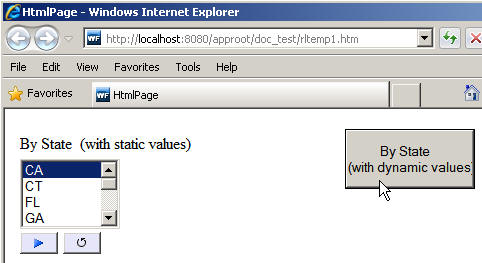
-
Select a
state value from the list box and run the report.
Tip: Click the Refresh button
to repopulate the list box with the default static values.
x
Procedure: How to Use Controls to Populate Another Control Based on Selected Values
In
this procedure, you will create multiple list box controls that will
all have parameters bound to them. When the appropriate combination
of these four parameters is selected, the fifth list box control
will be populated with the related information.
-
Create a
procedure, using the car Master File, named countrycars.fex.
-
In the procedure:
-
Insert two COUNTRY fields, Sum FST.COUNTRY BY COUNTRY.
This ensures that you get each value of country one time
and in sorted order.
-
Create selection tests comparing CAR to &Parameter1, MODEL to
&Parameter2, DEALER_COST to &Parameter3, and RETAIL_COST
to &Parameter4.
-
Set the output format for this procedure to XML.
-
Save and
close the procedure.
-
Create a
new HTML file named cars.htm.
-
In the HTML
file, create a new, Single Layer Form.
-
Delete the
Submit Form button, as shown in the following image.
-
Create four
list boxes inside the form and one list box outside the form, as
shown in the following image.
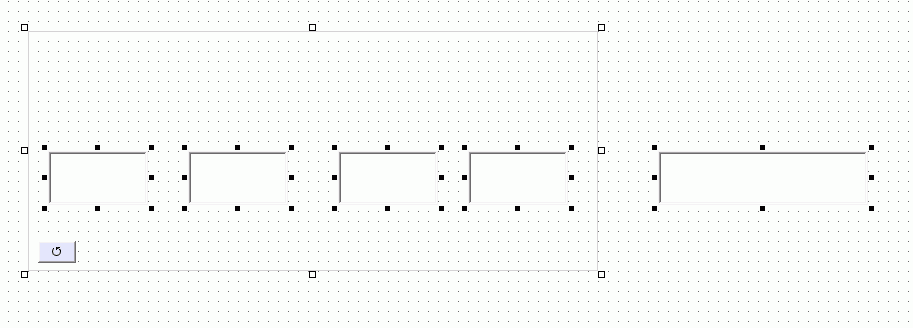
-
In the Properties
and Settings dialog box, change Selection Required to Yes for
all four list boxes inside the frame.
-
Insert labels
for each list box. Name the four inside the form, Parameter1, Parameter2,
Parameter3, and Parameter4. Name the list box on the outside Result.
-
Select the
Parameters tab at the bottom of the HTML Composer window.
-
Add four
parameters to the file, as shown in the following image.
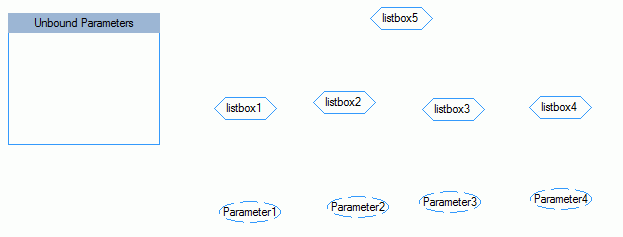
-
Bind listbox1
to Parameter1, listbox2 to Parameter2, listbox3 to Parameter3, and
listbox4 to Parameter4, as shown in the following image.
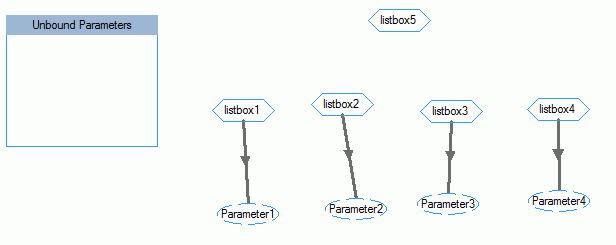
-
Bind listbox1,
listbox2, listbox3, and listbox4 to listbox5, as shown in the following
image.
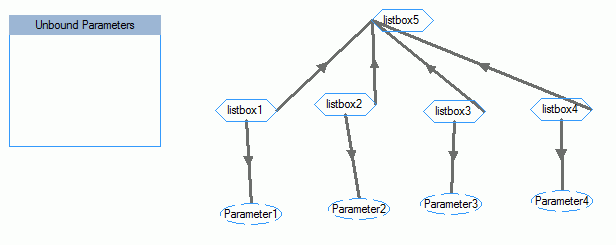
-
Edit the
properties of listbox1, listbox2, listbox3, and listbox4.
-
Select the Dynamic Data type option
for all four list boxes.
-
Select Embedded procedure for all four list
boxes.
-
Click the procedure ellipsis button (...) and
select car.mas for all four list boxes.
-
Set the Value field for listbox1 to CAR; for listbox2, MODEL;
for listbox3, DEALER_COST; and for listbox4, RETAIL_COST.
-
Edit the
properties of listbox5.
-
Select the Dynamic Data type option.
-
Select External procedure.
-
Click the procedure ellipsis button (...) and
select countrycars.fex.
-
If it is not set already, set the Value field for listbox5
to COUNTRY.
-
Edit the
binding properties for each of the bindings between listbox1, listbox2,
listbox3, and listbox4 to listbox5.
-
Select the Dynamic Data type option.
-
Select External Procedure.
-
Click the procedure ellipsis button (...) and
select countrycars.fex for all four bindings.
The Value field and Display field are assigned the COUNTRY
field upon the selection of the procedure.
-
Change Resolves Parameter to the appropriate parameter for that
list box.
For example, listbox1 is bound to Parameter1. Therefore, you
should select Parameter1 for the Resolves Parameter field.
-
Save and
run the report.
A new web browser window opens with four populated list boxes
and one empty list box.
-
For Parameter1,
select ALFA ROMEO. For Parameter2, select 2000 4 DOOR BERLINA. For
Parameter3, select 4,915. And for Parameter4, select 5,925.
Listbox5 is populated with the value, ITALY, as shown in
the following image.
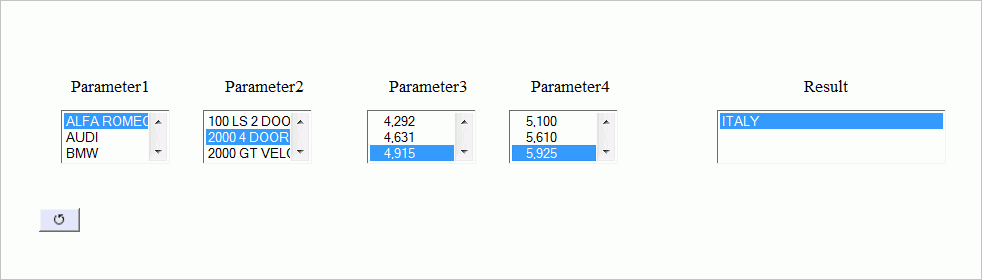
Note: Only
when the appropriate combination of values are selected does the
result display. If you were to choose 5,610 for Parameter4, no result
would be displayed.