In this section: How to: Reference: |
PMF 5.3.2 provides a completely new way to assemble measures
through a new user interface with a new and simpler way to approach
measures:
- Measures report just
as they did before. The PMF Measure cube is unchanged. Your existing
custom reports work the same as in earlier versions of PMF 5.
- The Actual and Target
components of measures are now copied directly from datapoints,
which are like database fields, but with both rows and dimensions
in their structure.
- When linking datapoints,
your measures automatically inherit the dimensionality of the summation
of all their linked datapoints.
- Defining measures
is now a quicker and easier process, because you no longer have
to define dimensionality. You define dimension links when you make
loadable and user-entered sources or when you create derived or
generated datapoints.
x
The Measure panel organizes the properties of a measure by common
tasks and concepts. It combines all the functions that were formerly
on the legacy Measure panel (mostly found on the Info and Controls
tab), and the legacy Measure Loader tabs. Everything that was previously
on the Dimensions, Field Maps, Filters, and Preview tabs has been changed.
The Dimensions, Field maps, and Filters tabs have been removed entirely.
This is now done in sources and datapoints, which control dimensionality
and how data is harvested when it is loaded, typed in by end users,
or generated.
The Link/Unlink Objectives (link objectives to measure) panel
was replaced by the Scorecards panel. The Objective Weighting panel
is still available as a drill from the Measure panel. You can weigh
your measures to objectives and risks using the Objectives panel, depending
on if you work top-down or bottom-up.
If any dimensions are configured for dimensional tolerances,
you can set them up with the Dimensional Tolerances tab.
x
Procedure: How to Create a New Measure
To
create a new measure:
-
In the Manage
tab, click the Measures panel.
-
Click New.
The New Measure panel opens, as shown in the following
image.
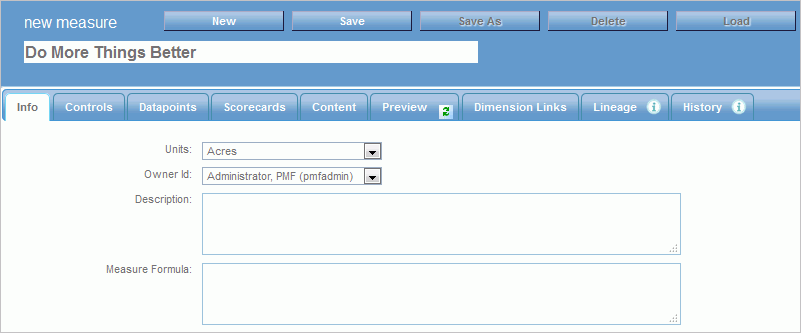
-
Name your
new measure and fill in the fields in the Info tab. The following
options are available:
-
Units
-
The unit of measure used for this measure.
-
Owner Id
-
The owner ID currently assigned to the measure. You can reassign
the measure to a different owner by selecting it from the drop-down menu.
-
Description
-
An intuitive description of the data loaded into the measure.
-
Measure Formula
-
A technical description of the measure, such as its datapoints, calculation
methods, or source fields.
-
Click the Datapoints tab
to link datapoints to the measure, as shown in the following image.
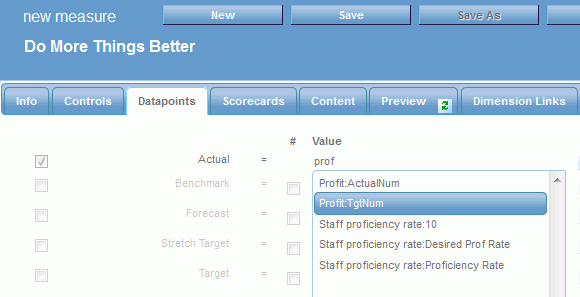
Manually enter or
select datapoints to bring in the datapoints that feed this measure.
A datapoint can be specified for the Actual field.
For the
Target field, you can:
- Choose a datapoint
for any target (Target, Benchmark, Forecast, or Stretch Target).
- Define a simple universal
numeric target for any target, such as Target, Benchmark, Forecast,
or Stretch Target. To do this:
- Select the Target check
box.
- Select the # check
box.
- Enter the target,
as shown in the following image.

-
Click Save.
x
Procedure: How to Set Measure Controls
By
default, all measures are ascending, have preset tolerances, and
have a default display format. All of these settings can be changed
in the Controls tab.
-
In the Manage
tab, click Measures.
-
Select the
measure you want to change.
The Edit Measure panel opens.
-
Click the Controls tab,
as shown in the following image.
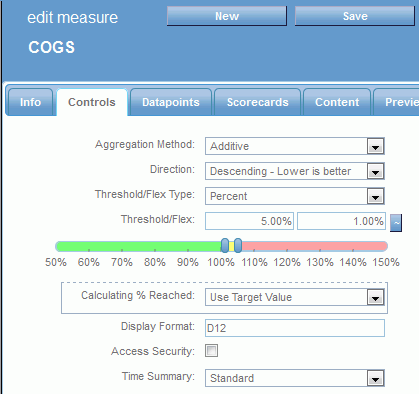
The
following options are available:
-
Aggregation Method
-
A method you can use when aggregating this measure. Choose
from Additive, Percentage, Change in Percentage, or Ratio.
-
Direction
-
Direction to be used to determine how thresholding is performed.
The options are:
- Ascending - Higher
is better
- Descending - Lower
is better
- Range - Should fall
within range
For more information about these options,
see Indicator Concepts.
-
Threshold/Flex Type
-
The type of value used in the Threshold/Flex fields. The
options are Percent or Units.
-
Threshold/Flex
-
The first field indicates the value used for the threshold,
which determines the outer range when an indicator shows red.
The
second field indicates the value used to determine the inner edge
of the yellow zone. Setting a flex of 0 indicates that the measure
does not allow any deviation from the target.
-
Threshold/FlexSlider
-
Displays a grid that enables you to graphically adjust the
threshold and flex values.
-
Display Format
-
A WebFOCUS numeric display format valid for the unit of measure.
Valid format types are:
- D (floating-point
double-precision),
- F (floating-point
single-precision),
- I (integer)
- P (packed decimal)
The
formats are In, Dn.d, Fn.d, and Pn.d, where n represents
the maximum number of digits to display, and .d, an optional
decimal point with the number of digits to display after it.
The
maximum number you can code before and after the decimal point is
10 for I, 15 for D, 7 for F, and 31 for P. You can also add at the
end, in any order:
- M or % to format
the number as currency or as a percent
- C to suppress commas
Many
other codes can also be used. For more information about numeric display
options, see the ACTUAL value options section in the Describing
Data With WebFOCUS Language manual.
-
Access Security
-
Enable this option to filter data using access security at
the security level of the user.
-
Time Summary
-
This option varies how measured data is aggregated over time.
Select Standard to
aggregate using standard Time rules. All of the measure data shown
at higher time levels adds up to the total of all data at the lowest
loaded level (for linear aggregation) and includes all percent or
ratio data over the entire time period (for percent, ratio, and
change in percent aggregation). This option is the default.
Select Average to
show an average value, which calculates a mean average of all the
data loaded across the lower Time levels for the duration of the
higher level period.
Select Most Recent to
show the latest values. Only the most recently loaded value of all
the data loaded across the lower Time levels for the duration of
the higher level period will be shown.
Note: These
options will only be available if the Alternate Time Summary setting
in the Summarization settings is enabled.
-
Click Save.
x
Procedure: How to Copy Measures
You can make an exact copy of any existing
measure. After making the copy, you can immediately alter it as
needed. To copy a measure:
-
From the
Manage tab, click the Measures panel button.
-
Select the
measure you want to copy. The Edit Measure panel opens.
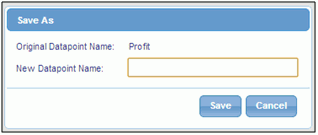
-
Click Save
As. You will be prompted for a new name for the measure,
as shown in the following image.
-
Click Save.
PMF will make an exact copy of the measure. You can edit and save
your changes at any time, and click Save As again
if you want to make more copies. This measure is what will be loaded
for editing.
x
Procedure: How to Wipe a Measure
All loaded data from any loadable
source can be wiped out or deleted in a single operation. This is
useful when you have loaded data that is invalid. It is a simple
way to delete all the data.
-
From the
Manage tab, click the Measures panel button.
-
Select the
measure that needs data to be deleted. The Edit Measures panel opens.
-
Click the Wipe
Data button. PMF will ask you to confirm the data purge.
-
Click OK.
Note: It
may take PMF a moment to purge all of the data.
x
Procedure: How to Configure External Aggregation for Each Measure
To
configure external measures to be read into PMF, you must first
activate the feature:
-
From the Manage tab, click the Settings panel
button.
-
Click Summarization.
-
From the External Aggregation drop-down menu, select Y.
-
Enter the name of the master file for the external DB
where you are storing the pre-aggregated data in the External Aggregation
MFD box.
-
Click Save.
-
Configure each measure that will use External Aggregation.
From the Author or Manage tab, click the Measures panel
button.
-
Select a measure.
-
Click the Controls tab.
-
From the Alternate Processing drop-down menu, select External.
-
In the External Dimension links box, enter the letter
that represents each dimension to which the external measure data
links.
Tip: To
get the letter that represents each dimension, click the Dimensions panel
button and click the Advanced tab. The dimension
letter will be shown next to Dimension Type.
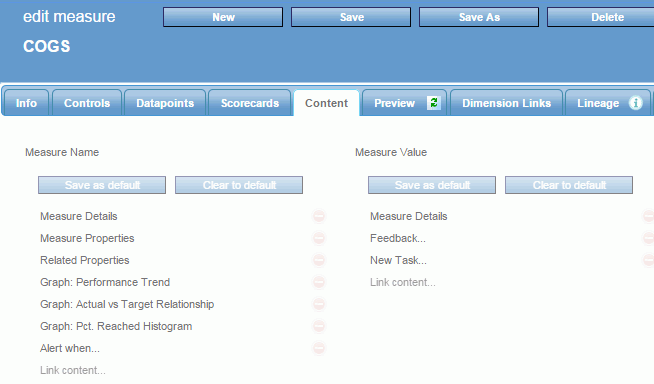
xControl Drill Menus for Measures
You can control the content visible from the drill for
each Metric in PMF using the Content tab on the Measure panel. Any
Content managed within PMF can be added to the menus.
There are two menus at the Metric level. These options control
the drill menu that is activated when you click:
- The name of a Metric on any Grid or chart.
- The data values displayed for a Metric on any Grid or chart.
x
Procedure: How to Add a New Drill Menu for a Metric
By
default, all Metrics in PMF use the same menu. You do not need to
do anything to configure this menu. It is automatically configured
whenever a new Metric is created in the system.
If you want
to configure a menu for a particular Metric:
-
Click the Measures panel button.
The available measures are displayed.
-
Select the measure you want to use.
The Edit Measure panel opens.
-
Click the Content tab.
The Content menus configured for that metric are displayed,
as shown in the following image.
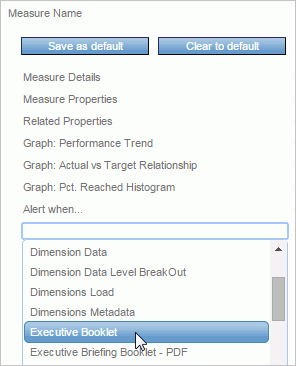
-
If you click the Link
Content box, you can:
- Add new (link) content to the Measure Name or Measure
Value menu by selecting the content item you want to add from the
drop-down menu, as shown in the following image.
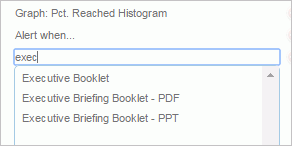
- Add new (link) content by entering the name of the item in the
box, as shown in the following image.
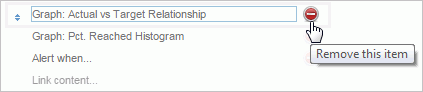
- Change the order of menu items by clicking the arrows on the
left of the link name, and dragging the item up or down, as shown
in the following image.

- Remove (unlink) any content from the Measure Name or Measure
Value menu for that metric by clicking the Remove this
item button to the right of that item, as shown in the
following image.
-
Click Save once you are done configuring
the menu. The new menu is now configured. Whenever you select the
name or values for that metric, PMF will display the Content menus
you configured.
x
Procedure: How to Make a Content Menu the System Default
You
can quickly design a default menu that all Metrics will use. This
gives all Metrics that do not have specific menus a fallback. Note
that the system ships with a default menu configured. Performing
the steps in this task will override those settings.
To change
the default menu for Metric Name or Value drills:
-
Click the Measures panel button.
The available measures are displayed.
-
Select the measure you want to use.
The Edit Measure panel opens.
-
Click the Content tab.
The Content menus configured for that metric are displayed,
-
Click Save as default for the
menu you want to make the system default, as shown in the following
image.

The
menu you specified is now configured as the default. Whenever you
click the name or values for any Metric that does not already have
a specific menu configured, PMF will display the default Content
menu you configured here.
x
Procedure: How to Clear a Specific Metric Menu to the Default
You
can clear any specific menu that was previously configured for a
Metric. When you do this, the Measure Name or Measure Value menu
of the metric will always display the default as currently configured.
-
Click the Measures panel button.
-
Select the measure you want to use.
The Edit Measure panel opens.
-
Click the Content tab.
The Content menus configured for that metric are displayed,
-
Click Clear to default for the
menu you want to clear to the system default.
Any
specific menu for the Metric is deleted and the Metric will now
always use the default. Whenever you click the name or value items
for the metric, depending on which menus you cleared, PMF will
display the default Content menu you configured here.
xMeasures and Dimensionality
The Dimensions tab has been removed from the Measures panel.
In PMF 5.3.2, measures get their dimensionality from the datapoints
that are linked. PMF uses dimensions in the most efficient way possible,
and with the most flexibility, by always choosing the lowest common
level for dimensional linkages.
Prior to PMF 5.3.2, you either had a load or a user entry option
for measures. For each measure, you had to separately define dimensionality.
Most data marts had very similar dimensionality for all their measures
that usually depended on where the data was coming from. This meant
a lot of time was spent defining separate dimensional structure
for every measure, when actually, most users were simply repeating
steps.
As detailed in The Core Paradigm, PMF 5.3.2 gives you the ability to model your
measures with consistent dimensionality by figuring out the dimensionality
you put into your datapoints. It then uses the most complete (lowest
possible) level of aggregation for all the linked-up datapoints,
to provide the most detail possible.
x
Reference: Recalculation and Copying Measure Lineage
The
datapoints linked to your measures can have a complex, multi-part
lineage, depending on their relationship to other derived datapoints
and to loadable, user-entered, or in some cases, generated, datapoints.
The
PMF design allows any derivations to be calculated in the correct
order. The PMF model allows it to discover the generations of data
lineage and to navigate in memory backwards and forwards through
this lineage. PMF always uses the correct order to calculate the
components for your measures. The process of copying the final state
of all data is handled automatically once the recalculation of all
points in the middle are completed.
x
Reference: Measure Lineage Tab
You
can view lineage for the datapoints of any measure. The Lineage
tab shows the progress of data through PMF, from the external data
harvested into datapoints, through any derived datapoints, and all
terminal points in your measure.
The following image shows
an example of the Lineage tab for a measure.
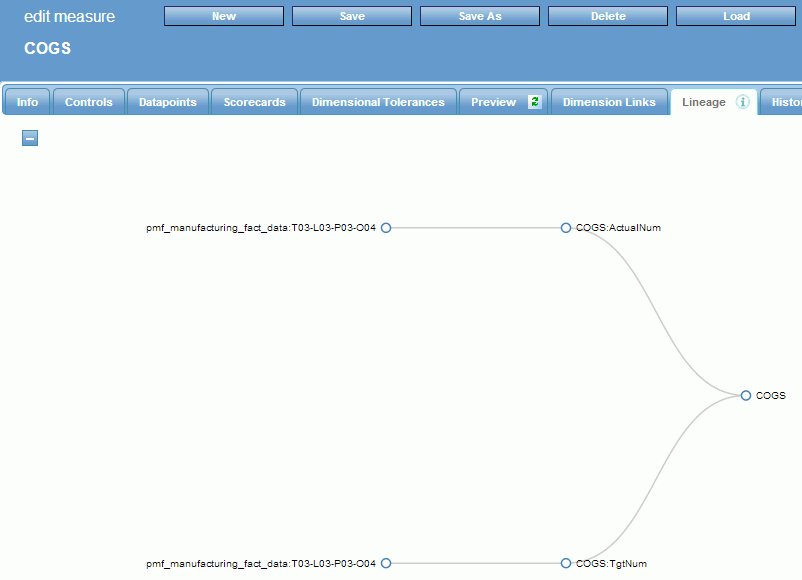
The lineage tab automatically
displays the entire lineage. You can click the Collapse
All
 button to hide the entire lineage.
x
Reference: Measure Load History
PMF
keeps track of each load that is executed for each measure in the
system, regardless of whether you loaded it manually or the load
was called by the scheduler. This data is stored in a special logging
section of the PMF data mart.
The History tab for a measure
displays the history of all loads that have been logged.
The
history of the measure shows:
- The dates that the loads
ran.
- The count of rows that were retrieved, inserted, updated, and
deleted.
- The count of total mismatches that occurred between the source
data and the PMF metrics mart. Mismatches are source data rows that
do not match to any existing keys for one or more dimensions.
- The count of gaps in data continuity, which indicate the sparsity
of the data. This does not mean there are errors but, if paired
with mismatches, can help you debug any unexpected data discontinuities.
- Any messages returned from the load system. If there is an error,
the exact error is displayed in the information shown in this tab.