The following steps explain how to set up Distinct Count measures.
- In the Manage tab, click the Dimensions panel button.
-
Click New.
The New Dimension panel opens.
-
Click the Advanced tab
and select the Distinct Count Aggregation check
box.
Note: The Distinct Count setting is non-destructive, so you can disable and re-enable it to see the differences in how measure data is processed.
-
Configure
and load at least one dimension to be a Distinct Count differentiator.
Click Save and then Load your dimension normally.
For more information on how to use the Dimension Loader, see the PMF Administration Guide.
Note:
- Once you load values
into the dimension, these values become the differentiators used
to calculate correct counts in Distinct Count processing.
For example, for the Hospital Event example mentioned previously, you might load all of your patient IDs into this dimension. During Distinct Count processing, PMF would check to see if a patient ID was re-used during any higher level Time aggregation, and prevent that patient from being counted more than once.
- If you set up a dimension
to be a Distinct Count differentiator, it is hidden and does not
appear in any of the typical locations where you would see a dimension
selector.
For example, you would not see the drop-down of the dimension on the Analysis Designer, the Measure Entry panel, or the drop-downs for Gadget Preferences.
- Once you load values
into the dimension, these values become the differentiators used
to calculate correct counts in Distinct Count processing.
-
Create a
Distinct Count measure. To specify that a measure will use Distinct
Count Processing, select the Distinct Processing check box
on the Measure panel. Make sure that you have linked exactly one
of your Distinct Count differentiation dimensions to the measure
by typing its code letter in the Dimensions text box. Click Save once
both of these actions are done.
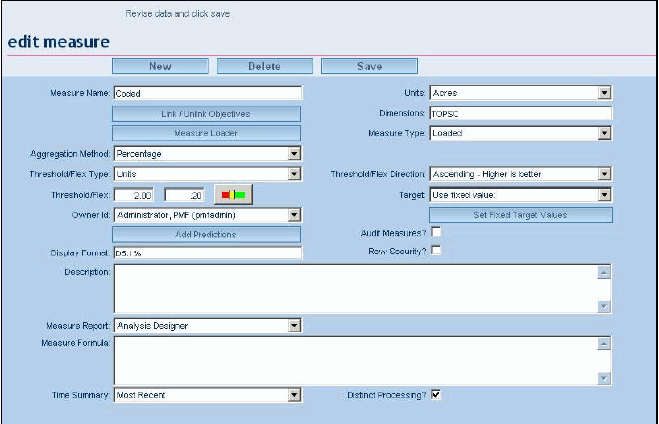
Note: Currently, the Distinct Count capability requires you to use Fixed Targets, not loaded. In the previous example, note that Alternate Time Summary is active, and the Time Summary drop-down is set to Most Recent. Since flags can change to on or off during any time period, setting this to Most Recent enables PMF to always display the most current state within the desired Time level.
-
Load the
measure normally. PMF will store measure data linked to every available
matching row for the Distinct Count differentiator dimension, as
well as all other linked dimensions.
Note:
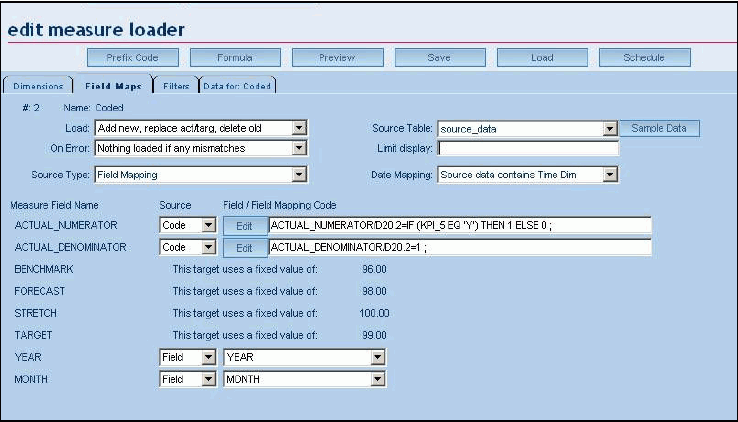
- For Additive Aggregated measures, the Actual value is always the Distinct Count of the Distinct Count differentiation dimension for that measure.
- For Ratio and Percentage Aggregated measures, the Actual Denominator is always the Distinct Count of the Distinct Count differentiation dimension for that measure. The Actual Numerator is the Distinct Count of the Distinct Count differentiation dimension for that measure, but only if those measure entries have a numerator > 0.
In the example above, which is a Flag type Distinct Count measure, note the Edit on ACTUAL_NUMERATOR, which points to the proper field and sets the value to 1 if the KPI_5 flag field contains Y.
Tip:
- PMF can handle multiple Distinct Count dimensions. Of course, you must still respect the limit of 16 total dimensions.
- Depending on the number of items in your Distinct Count dimension, you might notice a longer loading time for Distinct Count measures.