In this section: |
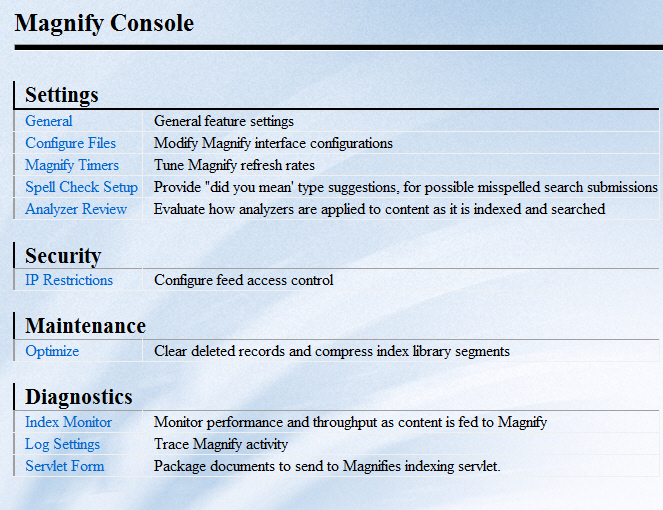
The Magnify Console provides several diagnostic pages that provide more information while working within the Magnify platform. To access the Magnify Console, you must log in to the WebFOCUS BI Portal as an administrator and click Magnify Console under the Administration menu.
Note: Magnify users must be authorized to access the Magnify Console using the WebFOCUS Security Center. For more information, see the WebFOCUS Security and Administration manual.
The following image illustrates the Magnify Console.
The General section of the Magnify Console allows you to set the following features:
In this section: |
The Configure Files Settings functionality enables you to make specifications with regard to word choices and search information. For example, you can enter stop words for various functions, including Word Cloud and More Like This.
Word Cloud stop words are words that the Word Cloud will exclude during a search (for example, and, or, and the).
Words that appear in the Word Cloud Stop Words list are added and maintained by an administrator. The Word Cloud functionality, accessed from the left category pane (Word Cloud), omits the words on the stop words list during a Word Cloud query. The following image shows the words on the Word Cloud Stop Words list.
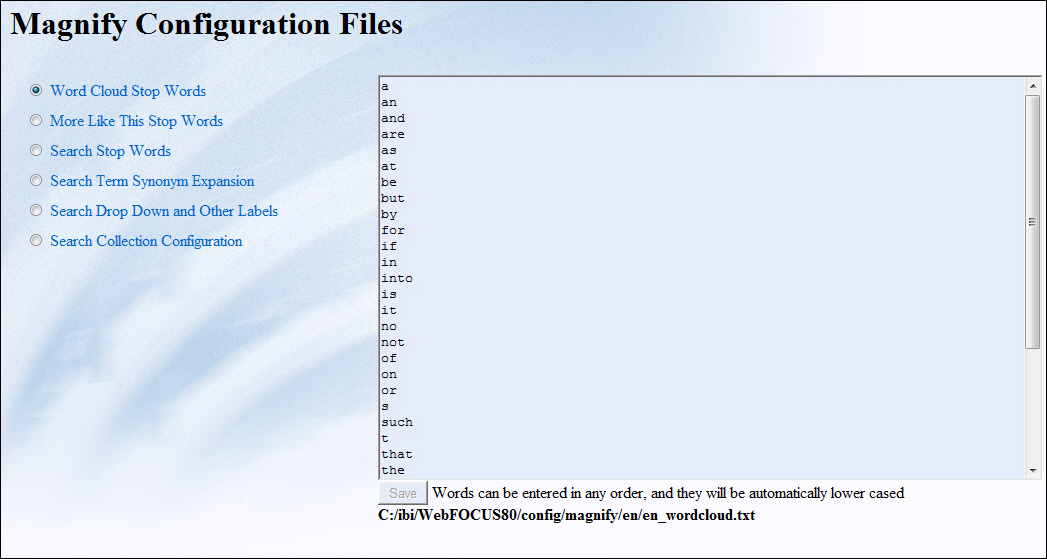
The list is reordered in alphabetical order. All words are listed in lowercase.
Words on the More Like This Stop Words list are words that the More Like This functionality will exclude during a search (for example, and, or, and the).
Words that appear in the More Like This Stop Words list are added and maintained by an administrator. The More Like This functionality, accessed by clicking the More Like This hyperlink on the main search return page, omits the words on the stop words list during a More Like This query. The following image shows the More Like This stop words.
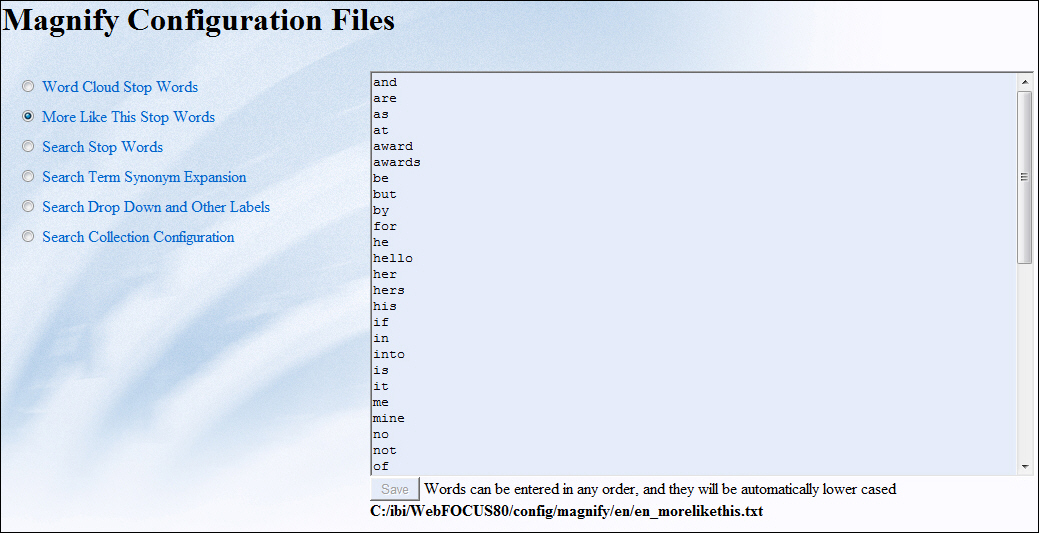
The list is reordered in alphabetical order. All words are listed in lowercase.
Search stop words are excluded from any type of search. If you search on a term or sequence of words that contain a Search stop word, the search will ignore that word.
Words that appear in the Search stop words list are added and maintained by an administrator. The Search functionality is accessed on the main page of your user interface and serves as the starting point for any search that you conduct. The following image shows the Search stop words.
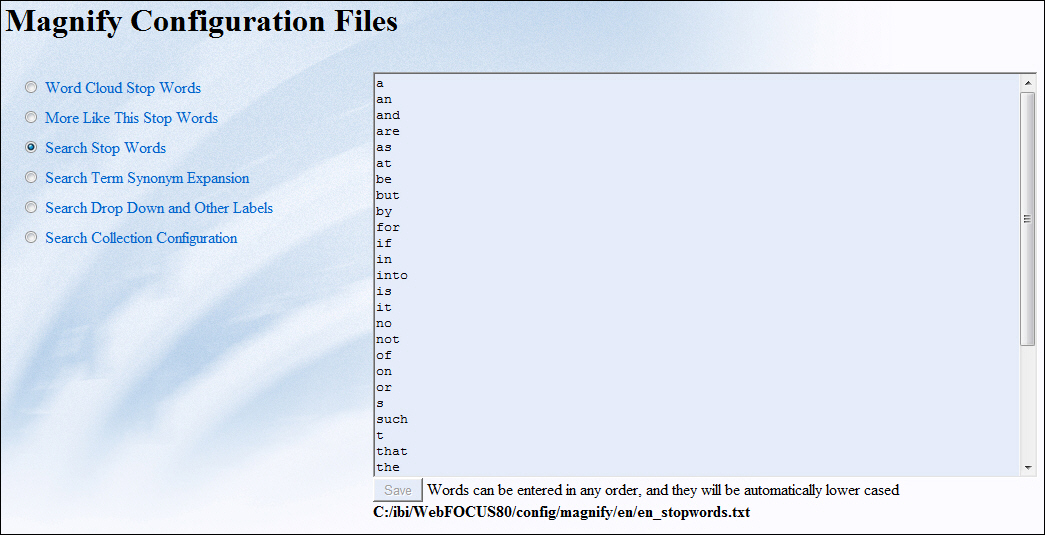
The list is reordered in alphabetical order. All words are listed in lowercase.
The Search Term Synonym Expansion functionality enables you to expand the synonyms that are stored for you, by default. In the \ibi\WebFOCUSxx\config\magnify\en directory, there is an en_synonyms.txt file that can be modified to contain additional search term synonyms. For more information, see How to Configure Synonyms.
You can modify the collections that display in the Magnify search page drop-down list. You must edit certain variables in the Magnify style sheet. For more information, see Defining Collections in the Style Sheet.
You can determine the configuration of the search collection by defining the content of the collections.xml file. For information on how to configure the collections.xml file, see Configuring the Magnify Environment in the Collections File.
You can incrementally commit data into the Lucene index so that it is available for searching while the indexing process is ongoing. This is useful when indexing large amounts of data that can take a long time before it is available for search. For more information on setting timers when loading data to the Lucene index, see Setting Timers For Feeding Data.
How to: |
A Spelling Dictionary can be used to make spelling suggestions when a user is specifying a search query to guarantee search results. You can create a dictionary file for an index or a collection by selecting the Spell Check Setup link on the Magnify Console page. Additionally, the spell checking feature is enabled in the Magnify style sheet by default. To modify the spell checking setting in the Magnify style sheet, see How to Enable Spell Checking.
To increase the effectiveness of the spell checker functionality, it is recommended that a large pool of words are collected and used for the dictionary. This can be obtained after a large first-time, historic, or batch indexing process.
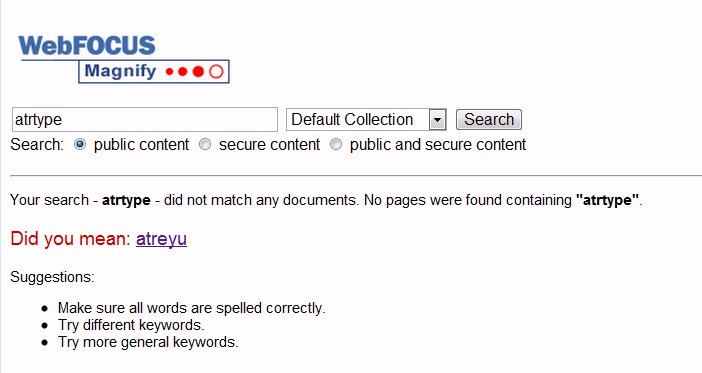
The following image displays a spelling suggestion for a search term that did not find any matches in the default collection:
When spell checking is enabled and a collection is searched without a collection dictionary created, the default dictionary is the first index library referenced.
Dictionaries are indexes that become locked while in use. To backup or remove a dictionary, you must unlock the dictionary index files by clicking the Close Open Dictionaries checkbox.
<input type="hidden" name="spelling" value="false"/>
<input type="hidden" name="spelling" value="true"/>
A list of available index libraries and collections displays.
To create a spelling dictionary for a collection, select the collection(s) under the Collections column.
Note: Before creating a collection-level dictionary, you must first create a dictionary for each index in the collection(s). Collection dictionaries are created by creating its own dictionary from combining all referenced index libraries dictionary.
The dictionary is created in the spellchecker directory under the Lucene index. For example, \ibi\WebFOCUSxx\magnify\lucene_index\centurycustomers\spellchecker. A Dictionary up to date message displays under the Status column to indicate that the dictionary was successfully created.
Note: This process may take some time depending on the size of the index.
How to: |
Each analyzer provides different functionality for manipulating the query during a search or the data during the feed process. To test the behavior of each analyzer, you can use the test analyzer page accessible in the Magnify Console. All analyzers that are configured in the collections.xml are available for testing. When testing an analyzer, the following information is provided:
Every analyzer that is configured in the collections.xml file is available in the drop-down list.
Note: The Get method is the default when using Latin-1 encoding for all application servers. If your browser is using the Chinese, Japanese, or Korean language the POST method becomes the default.
The result for the analyzer and each of its filters is displayed.
How to: |
You can restrict which servers can access Magnify and therefore prevent updates to the Lucene index from other servers. To configure the feed restrictions, you must access the Feed Security Setup Console by clicking the IP Restrictions link on the Magnify Console. Alternatively, you can specify the following URL:
http://server_name:port_number/context_root/search/jsp/feed_security_console.jsp.
The following illustrates the Feed Security Setup Console.
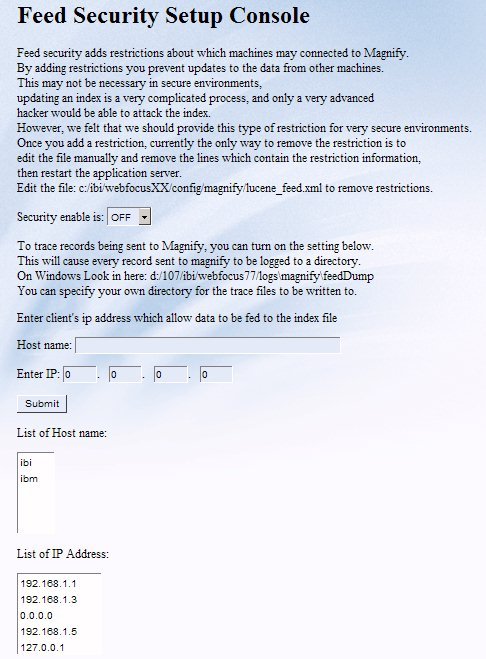
To remove any restrictions specified in the Feed Security Setup Console, you must edit the /ibi/WebFOCUSxx/config/magnify/magnify_feed_properties_defaults.xml and manually remove the syntax that contains the restriction information.
http://server_name:port_number/context_root/search/jsp/feed_security_console.jsp
How to: |
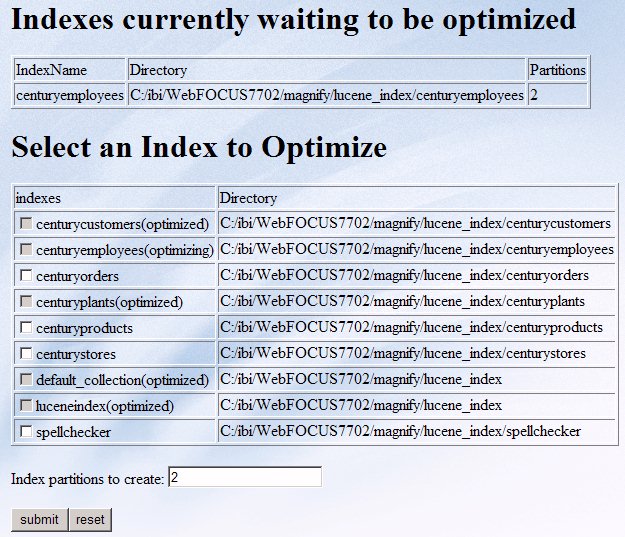
Magnify enables you to maintain a Lucene index to improve search performance. To optimize one or more indexes, click Optimize on the Magnify Console homepage.
Optimization provides the opportunity to reduce the number of segments an index library is spread across, as well as reclaim space from deleted records.
The following status displays.
It is recommended to perform optimization after large-batch indexing and after long periods of incremental indexing. This reorganizes the index of words in the Lucene index and optionally reclaims space of deleted, unsearchable documents. Lucene may not delete all documents, but will reclaim the space automatically when needed by new documents.
Note: If a segment is still in reference by Magnify it will remain undeleted on Windows, but will automatically be cleaned up later by Lucene.
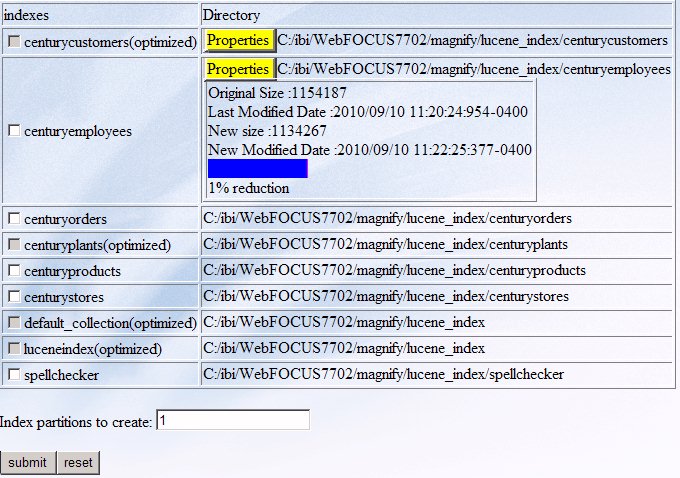
The following image displays information about the centuryemployees index after it has been optimized.
Index libraries can be searched while being optimized.
You can monitor the performance of the index process by clicking Index Monitor in the Magnify Console. Information such as the number of records indexed per minute is provided.
By default, this page refreshes every two minutes. The refresh rate can be changed by updating the refresh parameter in the \ibi\WebFOCUSxx\webapps\webfocus\search\jsp\loadperformance.jsp page as follows:
<meta http-equiv="refresh" content="120;"/>
The content value is in seconds.
In this section: |
Magnify provides the ability to trace activity when performing a search and feeding documents to the Lucene index. The granularity and type of information written to the log files can be set using the Trace page. You can access the Trace page by clicking the Log Settings link on the Magnify Console. Alternatively, you can specify the following URL in the browser address bar:
http://server_name:port_number/context_root/search/jsp/loggerLevel.jsp.
The following page displays.
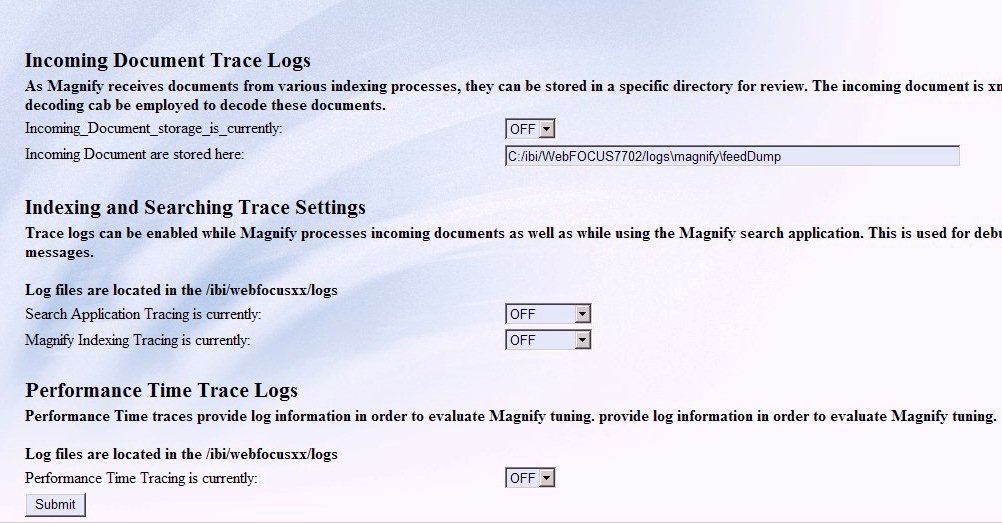
The following log levels are available for search and indexing traces:
No activity from the search and/or feed process is written to the log file.
Logs all types of messages.
Logs messages at a high level.
Logs messages at a moderately detailed level.
Logs messages at a very granular level and provides the most information.
Logs information regarding the current configuration settings.
Logs informational messages.
Logs messages that indicate a potential problem.
Logs messages that indicate a fatal problem.
The log files are located in \ibi\WebFOCUSxx\logs and have the following file format:
Each file name contains unique numbers to avoid being overwritten.
Additionally, you can trace the amount of time it takes to complete a search query by specifying On in the Performance Timing Trace drop-down box.
Alternatively, you can add the following parameters to the search URL:
&logger=trace_output_location&loglevel=log_level
where:
Is the location where Magnify displays the trace information. By default, if a trace location is not specified, the trace output is written to the application server log file. The following values are valid:
Displays the trace information in the application server log file.
Is the directory path and name of the log file to which the trace information is written. For example, c:/temp/magnify_log.txt.
Closes the log file. This parameter is specified after the path information.
Saves the trace information to the directory specified.
Sets the granularity of the trace information. Valid values include fine, finer, finest, and info. Setting the log_level to finest provides you with the most information. To reset the logging, specify info for the log_level.
Note: When tracing is enabled, several files with a .lck extension are created and can be removed only when the application server is restarted.
You can review information about each document that is indexed in Lucene by configuring Magnify to log information about each record. The log information is written into the \ibi\WebFOCUSxx\logs\magnify\feedDump directory and may be encoded. For example, the contents of the following record in the log file is encoded.
<?xmlversion="1.0" encoding="UTF-8"?>
<gsafeed>
  <header>
     <feedtype>incremental</feedtype>
     <datasource>formatmagnify</datasource>
  </header>
  <group>
     <record action="add" mimetype="text/plain" lock="false"
             url="http://localhost:8080/ibi_apps/WFServlet?FXK=21749
             &FXF1=C_SYSTEM_SOURCE&FXV1=Product+Catalog&FXT1=%3Cspan+id
             %3D1%3ESYSTEM_SOURCE%3C%2Fspan%3E&FXF2=C_PRODUCT_TYPE
             &FXV2=Cameras&FXT2=%3Cspan+id%3D2%3EPRODUCT_TYPE
             %3C%2Fspan%3E&FXF3=C_PRODUCT_CATEGORY&FXV3=Digital+Cameras
             &FXT3=%3Cspan+id%3D3%3EPRODUCT_CATEGORY%3C%2Fspan%3E">
        <content encoding="base64binary">PD94bWwgdmVyc2lvbj0iMS
                 4wIiBlbmNvZGluZz0iVVRGLTgiPz48VGFyZ2V0X1Jvb3Q+PEhFQUQ+
                 xNhdGFsb2cgSXRlbTogRWFzeVNob3QgRGlnaXRhbCBDYW1lcmEgNi4x
                 IE1lZ2FwaXhlbChEQy02MTApPC9USVRMRT48TUVUQSBuYW1lPSJXRl9
        </content>
     </record>
  </group>
</gsafeed>
There are free third-party tools available on the Internet that can be used to decode the information within the content element. For example, the following information is available after it has been decoded.
<?xml version="1.0" encoding="UTF-8" ?>
<Target_Root>
  <HEAD>
    <TITLE>
       Catalog Item: EasyShot Digital Camera 6.1 Megapixel(DC-610)
    </TITLE>
    <META name="WF_INDEX_UNIQUE_KEY" content="21749"/>
    <META name="C_SYSTEM_SOURCE" content="Product Catalog"/>
    <META name="C_PRODUCT_TYPE" content="Cameras"/>
    <META name="C_PRODUCT_CATEGORY" content="Digital Cameras"/>
    <META name="PRODUCTNAME" content="EasyShot Digital Camera 6.1
          Megapixel"/>
    <META name="PRODUCTNUMBER" content="3004"/>

    <META name="HTML_LEFT_OF_SNIPPET" content="<p><img
          src="http://localhost:8080/approot/magnify_demo/
          images/17.png" style="float:left margin:2px 18px
          5px 8px border:0"></p>"/>

    <META name="TITLE_URL" content="http://localhost:8080/ibi_apps/
          WFServlet?IBIF_ex=ibidemo_magnify_profileproducts
          &IBIAPP_app=magnify_demo&IBIF_wfdescribe=OFF&FXK=21749"/>

    <META name="LINK_DISPLAY_NAME1" content="<img
          src="http://localhost:8080/approot/magnify_demo/
          images/format_flex_16.png" border="0">
          <img src="http://localhost:8080/approot/magnify_demo/
          images/spacer.gif" VSPACE=5px HSPACE=3px border="0">
          See Similar Products <img src="http://localhost:8080/
          approot/magnify_demo/images/spacer.gif"
          VSPACE=5px HSPACE=15px border="0">"/>

    <META name="LINK_URL1" content="http://localhost:8080/ibi_apps/
          WFServlet?IBIF_ex=ibidemo_magnify_similarproductsbycategory
          &IBIAPP_app=magnify_demo&IBIF_wfdescribe=OFF&FXK= 21749"/>
<META name="LINK_DISPLAY_NAME2" content="<img
src="http://localhost:8080/approot/magnify_demo/
images/active_reports_16.png" border="0">
<img src="http://localhost:8080/approot/magnify_demo/
images/spacer.gif" VSPACE=5px HSPACE=3px border="0">
Return Trends <img src="http://localhost:8080/
approot/magnify_demo/images/spacer.gif" VSPACE=5px
HSPACE=15px border="0">"/>
<META name="LINK_URL2" content="http://localhost:8080/ibi_apps/
WFServlet?IBIF_ex=ibidemo_magnify_returnsbyproducts
&IBIAPP_app=magnify_demo&IBIF_wfdescribe=OFF&FXK= 21749"/>
<BODY>3004 Cameras Digital Cameras With Century Electronic Digital
Cameras you get exceptional picture quality and value for your
money. Century Electronic Cameras continue to be one of the
most easy to use lines of digicams. Visit to view the Century
Electronic Camera model list, and compare different cameras
at a glance. With Century Electronic Digital Cameras you get
exceptional picture quality and value for your money.
Century Electronic Cameras continue to be one of the most easy
to use lines of digicams. Visit to view the Century Electronic
Camera model list, and compare different cameras at a glance.
EasyShot Digital Camera 6.1 Megapixel DC-610 21749 Summit
Century Product Catalog
</BODY>
</HEAD>
</Target_Root>
http://server_name:port_number/context_root/search/jsp/loggerLevel.jsp.
Real-time logging begins immediately and does not require restarting the application server.
By default, the log information is written into the \ibi\WebFOCUSxx\logs\magnify\feedDump directory.
The Servlet Form Feed page enables you to:
To access the Servlet Form, click on Servlet Form from the Magnify Console homepage. For each document you want to add, delete, or verify, you must specify the following information:
Source of the data to be fed to the search engine.
Specify whether to add, delete, or verify the document specified in the input box.
Specify the correct encoding for the document. For example, UTF-8.
MIME type of the document to be added, deleted, or verified in the Lucene index.
Specify full to replace all previous data in the index from the data source specified in the Name of datasource: input box. Specify incremental to add new data to the existing index specified in the Name of datasource: input box.
URL to the WebFOCUS servlet (WFServlet), which runs WebFOCUS reports, followed by the meta tags to build the category tree. For more information on the available meta tags, see the Magnify Developer's Guide.
URL to the saxfeed servlet that feeds data to the search engine.
Optionally, you can verify a particular record by specifying a unique value. To verify a record using the WF_INDEX_UNIQUE_KEY value, click Submit Verify via GET operation. This verification method uses the URL and datasource values defined at the top of the page.
Note: In Version 8.0 Release 01, any feeds designated for xmlfeed or xmlfeedtest are redirected to saxfeed.
For more information on the required document structure, see the Magnify Developer's Guide.
How to: |
To backup a Lucene index, all indexing transactions must be stopped or quiesced. When the indexing process is paused, Magnify finishes any processes that have already been started and prevents any new ones from occurring. Records that are available for indexing are saved to the feedcache directory location specified by the magnify_feed_cache_dir parameter in the Magnify menu of the WebFOCUS Administration Console. The default value is \ibi\WebFOCUSxx\magnify\feedcache. The search is not available when an index is quiesced. Instead, the following message displays:
The Search system is unavailable it is currently down for System maintenance
There is a quiesce in progress, Please try again later
Once all backup/recover operations are complete, all paused indexing transactions resume when Magnify is restarted.
http://server_name:port_number/context_root/search/jsp/quiesce.jsp
where:
Is the name of the server and its port number where Magnify is installed.
Is the WebFOCUS web application alias.
Any records that are available to be indexed are saved to the \ibi\WebFOCUSxx\magnify\feedcache directory.
<servlet>
  <servlet-name>saxfeed</servlet-name>
  <servlet-class>
     ibi.search.lucene.feed.LuceneFastXmlFeedServlet
  </servlet-class>
  <load-on-startup>10</load-on-startup></servlet>
| WebFOCUS |