After shifts and thresholds have been created, you are
ready to build rules. The Add Rule File feature ensures that you
only create rules for the active shifts within the appropriate time
and date ranges. Ultimately when governing a data request with data
rules, you are prevented from running a request that exceeds parameter
values that were created when you set these up. In addition to selecting
date ranges for the use of monitored data, you are able to turn
Governing on and off and apply Business Rule Files to compiled rule files.
When building compiled rule files with monitored data, the Rule
Parameters are compared with the resources used by already monitored
requests. This comparison creates rules at runtime that, when governing
is activated, cancel requests judged to exceed those Rule Parameter
thresholds.
Note: When building a custom only rule, rule parameters
may be used to test for the name in effect. The threshold values
are not pertinent in the business rule execution.
For more information on Business Rule Files, see Creating Business Rules.
x
Procedure: How to Build a Rule File and Set Default Properties for Adding Rule
Files
Before
Resource Governor can govern queries, you must first generate the
rules that it uses to determine whether to allow a request to execute.
You can then set default values for some properties to be used when
you add rule files. These properties can be overridden for individual
Rule Files as necessary.
-
In the navigation pane, expand Application Directories,
and then expand an application name object.
Note: This step is available if you have previously
added a data source from that application directory to be monitored.
-
Right-click the data source object. Select Governing and
then Add Rule File.
The Add Rule File window opens, as shown in the following
image.

-
Enter a name for the rule file. The name may be up to eight
characters in length with no spaces and must be unique from any
other rule files or business rule names.
-
Select a rule file type from the Type drop-down menu.
The options are:
-
Data. Available
for a data source that has had historical monitoring at some time
-
Custom. Allows
only a business rule source to be included in a built rule file,
and a list of those rule sources will be available.
-
Both. Allows for data and business rules to be included
in the rule file. This is the default value.
-
Select a business rule if you selected a Rule Type of Custom or Both.
-
If you selected
a rule type of Data or Both,
select the earliest and latest dates for the Rule Data Date Range
using all or part of the Monitored Data Date Range.
-
Click Add.
Note: If
at any time in this process you decide you want to cancel the changes
you have made, click the Refresh button, the back button, the Cancel
button, or right-click the data source to revert to the settings
before the last save.
x
Procedure: How to Modify Rule File Settings
You
can modify the Rule File for a data source by updating its properties
or by changing the rule parameter associated with it.
-
Expand the data source object in either an application directory,
or the Data Adaptor Sources folder.
-
Right-click the data source that you are updating the rule
file settings for. Select Governing and then
click Rule Files.
The Rule File window opens.
-
Update the properties as necessary by right-clicking the rule
file line that is desired and selecting the menu item that modifies
the content or action of the rule file. That may be displaying the
properties of the current rules, changing the govern setting, re-creating
the rule file, or deleting the rule file from the system.
-
Click Update.
Note: If
at any time in this process you decide you want to cancel the changes
you have made, click the Refresh button, the back button, the Cancel
button, or right-click the data source to revert to the settings
before the last save.
x
Procedure: How to View Shift Thresholds and Date Time Ranges
-
Expand a Resource Governor application directory or the Data
Adaptor Sources folder.
-
Right-click the data source object. Select Governing and
then click Rule Files.
-
In the workspace, right-click a data source with a Rule File
and select Properties.
The View Rule Properties window opens.
-
Expand the Business Rules, Rule Parameters,
and Data and Parameter Rules drop-down lists
to see thresholds in effect for the Rule File. This indicates that
those were the active thresholds when the Rule File was created.
-
Click OK.
x
Procedure: How to View a Rule File
To
view the rule files for a particular data source, and to determine
which rule is active:
-
In the tree,
expand the Application Directories folder
and then expand the desired application directory folder. Right-click
a data source, select Governing, and then Rule
Files, as shown in the following image.
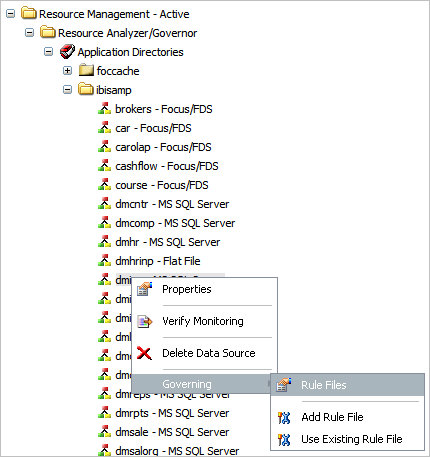
The Rule Files window
opens as shown in the following image.

-
Right-click
a Rule File line and select Properties.
The View Rule Properties window opens for the selected rule.
x
Procedure: How to Recreate Rule Files
If
for any reason the rules you are using for one or more of your databases
are no longer appropriate, you need to re-create the Rule File.
This can happen under one of the following circumstances:
- There is additional
monitored data gathered from different queries since the last rules
were created.
- You have made
changes to the Rule Parameters.
- Your monitored
information is not representative of your actual reporting. Even
if the database has not changed, you may discover that some types
of recurring requests were not submitted during the time that sampling
was done.
- There are
significant permanent changes in the characteristics of the database
or in the types of reports that are executed.
- There are
seasonal differences in database or reporting characteristics.
You
only recreate rules for data sources that have Rule Files assigned
to them.
-
Expand a Resource Governor application directory or the Data
Adaptor Sources folder.
-
Right-click the data source object. Select Governing and
then click Rule Files.
-
In the workplace, right-click a data source with a Rule File
and select Recreate Rule File, as shown in
the following image.
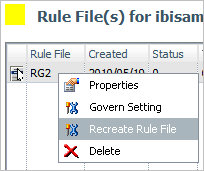
If the rule type is set to Data or Both,
the rule file or knowledge base will be re-created based on the
shifts and thresholds that are in effect at this time.
-
Click Update in the Recreate Rule File
window that opens.
x
Procedure: How to Delete a Rule File From a Data Source
-
Expand an application directory or the Data Adaptor
Sources folder.
-
Right-click the data source object. Select Governing and
then click Rule Files.
-
In the workspace, right-click the line with the rule file and
select Delete, as shown in the following
image.
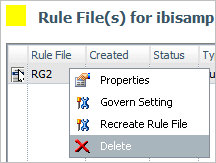
-
Click OK in the dialog box to confirm
the deletion.
Note: To
cancel the delete request, click Cancel in
the dialog box.
x
Reference: Add Rule File Window
The
Add Rule Files function is used to create a complete program or
rule file or knowledge base that contains the rules, thresholds,
and active shifts for a data source. This program (referred to as
a Rule File throughout this documentation) is what Resource Governor
runs during query or report execution to determine whether the request against
the data source should run.
The
Add Rule File window has the following fields/options:
-
Name
-
Is the name of the rule file or knowledge base that Resource
Governor executes to determine whether the request can run.
A
Rule File that contains only business rules can be associated with
multiple data sources, unless those business rules reference specific
table names or column names unique to a data source and are not
meant to be general.
-
Type
-
Is the type of rule file built for the data source.
-
Data
-
Is a rule file based on the monitored data for the data source.
-
Custom
-
Is a rule file based on Business Rules built using the Business
Rules Language.
-
Both
-
Applies both Data Rules and Business Rules to the data source.
Note: When
building a custom only rule, rule parameters are not used.
-
Business Rules
-
The name of the file containing business rules that are included
when the rule file or knowledge base is built.
Note: If
at any time in this process you decide you want to cancel the changes you
have made, click the Refresh button on the
toolbar to revert to the settings before the last save.
Click Add to
save the changes and create the rule file.