How to:
Reference: |
In order to connect to the SAP Application Server, the adapter requires connection and authentication information, which is supplied using the SET CONNECTION_ATTRIBUTES command.
You can enter connection and authentication information on the configuration pane of the Web or Data Management console. The command is added to the profile you select: the global server profile (edasprof.prf), a user profile (user.prf), or a group profile (if supported on your platform). The global profile, edasprof.prf, is the default.
After configuring the adapter, you must install the static function modules in the SAP data dictionary to complete the configuration. For details, see How to Install SAP Components.
You can configure the adapter from either the Web Console or the Data Management Console.
-
From the
Web Console menu bar, click Adapters.
or
From the Data Management Console, expand the Adapters folder.
The Adapters folder opens.
- Expand the Available folder, if it is not already expanded.
- Expand the appropriate group folder and the specific adapter folder. The group folder is described in the connection attributes reference.
-
Right-click
the adapter name and/or version and select Configure.
The Add Adapter to Configuration pane opens.
- Enter values for the parameters required by the adapter, as described in the connection attributes reference.
- Click Configure. The configured adapter is added to the Adapters list in the navigation pane.
The SAP adapter is under the ERP group folder.
The following list describes the connection attributes for which you can supply values. To complete the attribute declaration, click the Configure button.
User Authentication Parameters
The major work of the adapter is to translate user requests into code that can be understood by SAP. For this purpose, an SAP user ID, with a given set of privileges, is required. In the following list, this user ID is referred to as IBI_USER.
- System
-
Name of the connection; maximum 12 characters.
Package Parameters
- FPOOL
-
Function group where the Adapter for SAP static function modules can be cataloged. This is the function group created in Preparing the SAP Environment.
- RANGEBEG
-
Reserved for Information Builders use.
- RANGEEND
-
Reserved for Information Builders use.
Connection Parameters
The Load Balancing check box determines which of the following options is exposed.
- GROUP
-
Name of the application group. An application group defines a list of application servers, on which an RFC application can be running. SAP transaction SMLG can be used to view or modify application groups.
Note that the entries are case-sensitive and blank spaces are significant.
Appears only when Load Balancing is checked.
- MSGHOST
-
Host name of the SAP system (message server).
Appears only when Load Balancing is checked.
- R3NAME
-
System ID of the SAP system.
Appears only when Load Balancing is checked.
- HOST
-
Host name of the SAP application server.
- GWHOST
-
Host name of the machine where the SAP gateway process is running. In the case where there is only one SAP application server, gwhost and host is the same.
- SYSNR
-
SAP system number. This is a two-digit numeric value. Obtain this value from the SAP Administrator.
- CONNECTION LANGUAGE
-
For SAP ECC Unicode configurations, you can select a language that is different from the language you use when logging on to the server (as determined by your NLS configuration).
From the CONNECTION LANGUAGE drop-down list on the Add SAP ECC non Unicode to Configuration pane, select the language you wish to use to connect to SAP ECC.
Note:
- When the CONNECTION LANGUAGE option is used to specify a language other than the one used for logging in to the server, the Create Synonym Multilanguage option is not available.
- For this option to work, the codepage of the iWay server must match the codepage of the SAP ECC server. For example, if the iWay server is configured FOR codepage 942 (SJIS), the SAP server must be configured for codepage 8000.
- There is no way to check if the requested connection language can be used by either the iWay server code page (either in terms of display or number of bytes) or the SAP ECC server.
- Select profile
-
Select a profile from the drop-down menu to indicate the level of profile in which to store the CONNECTION_ATTRIBUTES command. The global profile, edasprof.prf, is the default.
If you wish to create a new profile, either a user profile (user.prf) or a group profile if available on your platform (using the appropriate naming convention), choose New Profile from the drop-down menu and enter a name in the Profile Name field (the extension is added automatically).
Store the connection attributes in the server profile (edasprof).
General User Login Parameters
- Security
-
There are two methods by which a user can be authenticated when connecting to a database server:
- Explicit. The user ID and password are explicitly specified for each connection and passed to the database, at connection time, for authentication.
- Password Passthru. The user ID and password received from the client application are passed to the database, at connection time, for authentication.
- CLIENT
-
SAP Client for the user logon, maximum 3 characters.
- USER
-
SAP user ID for the user logon.
- PASSWORD
-
SAP password for the user logon, maximum 8 characters.
Select the following check boxes, as required to:
-
Install Function Modules. This option assumes that you
have already completed the steps in Preparing the SAP Environment,
including creating a development class and Functions Group. To install
the function modules for the adapter, select this check box. Ordinarily,
function modules are installed only once. Reinstallation is required
only if significant changes are made in the SAP system or if the
Full-Function Server or the WebFOCUS Reporting Server is upgraded.
- Overwrite Existing (with the same fully qualified name). This option is displayed when you select Install Function Modules. Use it to ensure that newly installed function modules replace any older versions with the same name.
- Initialize Metadata. Before you create a SAP synonym, you must provide base metadata in the form of SAP synonym candidates. The Initialize Metadata option creates the base metadata for you. Ordinarily, you only need to initialize metadata once. The only reason to reinitialize metadata is if you reinstall the function modules.
SNC Security Mode
When SNC is checked, you must specify values for the following additional parameters:
- SNC_LIB
-
SNC_LIB contains the path to the external security product library. The external security product's library, external library, SNC_LIB, or gssapi library contains the functions provided by the external security product certified by SAP.
Set the environment variable SNC_LIB to contain the path to the security product library:
<drive>:\path\to\your\snclib.dll
- SNC_ PARTNERNAME
-
Is the external name of the SAP system. This is an extended version of the external name called the SNC name. You create the SNC name by providing a prefix with the external user name that designates the name type entered as follows:
<SNC-name_of_SAP_AppServer>
For example:
p/secude:CN=miller,
OU=ADMIN, O=SAP, C=DE
p/krb5:miller@WDF.SAP-AG.DE
Note about SNC with load-balancing. Load-balancing or "group-logon" dynamically retrieves the target SNC-Name from the message server. When using SNC with load balancing, you must specify the following additional parameters:
SNC_PARTNERNAME=p:unused
SNC_LIB=<drive>:\path\to\your\snclib.dll
Parameters for Mixed Character Code Sets
The following section applies only when the server platform and the SAP instance platform do not use the same character code set (ASCII or EBCDIC).
To configure the adapter on IBM systems using the EBCIDC character set, the following code pages must be installed on the SAP server:
- In a z/OS environment, SAP code page 0126, or the correct code page for your language environment.
- For iSeries, SAP code page 0123, or the correct code page for your language environment.
-
Create two conversion tables as described in Supporting Mixed Code Page Environments, and transfer the tables to the $EDACONF/etc
directory.
For example, if the Server environment uses the code page 1100, then two conversion tables, 11000126.CDP and 01261100.CDP, should be created and transferred to the $EDACONF/etc directory.
-
The following
environment variables are required at run time, assuming your code
page is 0126:
export SAP_CODEPAGE=0126
export PATH_TO_CODEPAGE=$EDACONF/etc/
Note: Make sure to include the trailing "/" for the value of the PATH_TO_CODEPAGE parameter and export the variables SAP_CODEPAGE and PATH_TO_CODEPAGE.
Prerequisite: The Adapters for SAP ECC and SAP BW must be installed. In addition, the Adapter for SAP BW must be properly configured and the Adapter for SAP ECC must be available for configuration as described below.
- From the Web Console menu bar, select Adapters.
-
If the Adapter
for SAP ECC has not yet been configured, click the Adapters folder
in the navigation pane and choose Add from
the menu. The Select Adapter to Add pane
opens. Expand the ERP folder, expand the SAP folder,
click a version of SAP, then click Configure.
The Add SAP to Configuration pane opens.
Tip: If the Adapter for SAP ECC has already been configured and appears in the list of Adapters in the navigation pane, and you can customize the configuration by clicking the current system connection and choosing Properties. The Change Connection Parameters pane opens, displaying the same parameters you would see on the Add to Configuration pane.
-
To establish
the connection between the Adapter for SAP ECC and the SAP BW environment,
enter values for the following configuration parameters, leaving the
default values for the rest of the parameters on the configuration
pane.
- SYSTEM
-
Enter a descriptive name of up to 12 characters to specify the connection to the SAP BW system.
- HOST
-
Enter the host name of the server on the SAP BW system.
Important: This value, along with those for GWHOST and SYSNR, must match the corresponding values on the SAP GUI under System Entry Properties for SAP BW.
- GWHOST
-
Enter the host name of the server where the SAP gateway process is running (in this case, the SAP BW system).
Generally, the entries for HOST and GWHOST are identical.
- SYSNR
-
SAP system number. This is a two-digit numeric value.
-
Click Configure.
You will see the message: Connection successfully added
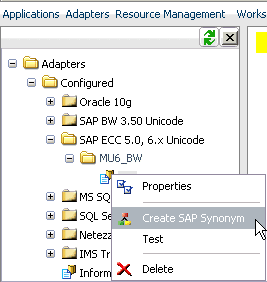
to configuration. The Adapter navigation pane displays
the new SAP BW connection, illustrated as MU6_BW in the following
example:

-
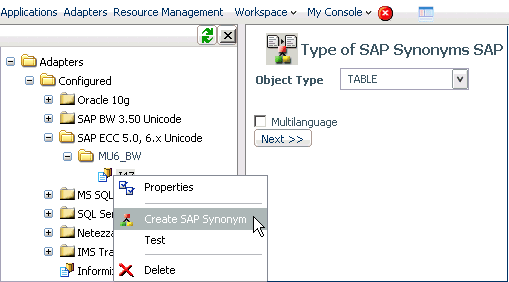
From the
pop-up menu, you can now choose:
- Test to verfiy the connection. If the connection between the SAP ECC adapter and the SAP BW environment has been established, sample data will be returned in the right pane. A positive result also verifies that the SAP BW Master Data tables you need will be accessible in the SAP BW environment
-
Create SAP Synonym to create a synonym for an SAP BW
Master Data Table. Continue to use the Adapter for SAP, following
the standard procedure for creating a synonym against a TABLE object.
(For details, see Creation Parameters for Table Synonyms.)

In this case, the TABLE will be an SAP BW Master Data Table, made accessible and usable by your entries in step 3.
When prompted, enter the name of an SAP BW Master Data table, or select one from the list of tables, and click Create Synonym.