-
Ensure
you have the installation files:
- If you received the installation on CD, insert the Server Installation CD into your CD drive.
- If you received the installation through a download, navigate to the directory where you saved the installation file. If you downloaded a ZIP file, unzip it to a directory on your machine.
-
Execute
the installation program.
In some environments, the installation begins when you insert your CD in the drive. Otherwise, execute the setup.exe file with the installation files.
In most environments, the Choose Setup Language window opens when the installation begins.
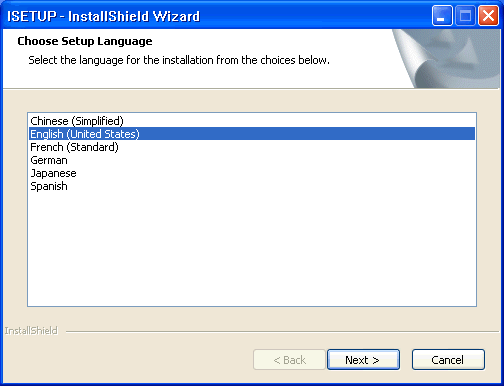
Server fields and prompts will appear in the selected language.
-
Choose
a language and click Next.
If another instance of the WebFOCUS 8.0 Reporting Server is already installed on your machine, you are prompted to overwrite the existing installation with the new build.
- Select No to create additional installations or configurations.
- Select Yes to apply a service pack and the installation begins immediately.
If multiple WebFOCUS 8.0 Reporting Servers or Clients are already installed, you may be prompted to choose one to upgrade or to create a new installation.
- Select New Installation/Configuration to install a new instance of the server.
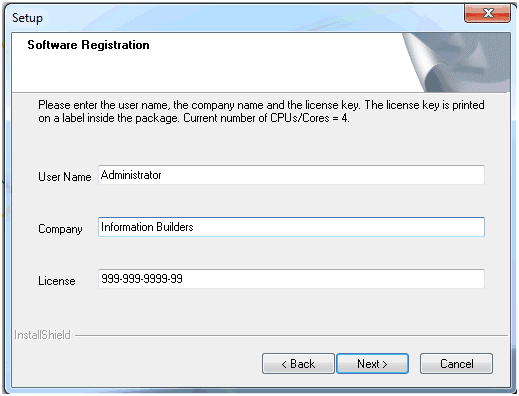
The installation program begins, and the Software Registration window opens, as shown in the following image.
-
Type
the User Name, Company, and ten or twelve digit License code, and
then click Next.
Note: The License code is printed on the packing slip included with your WebFOCUS shipment. Be sure to type it using the format:
nnn-nnn-nnnnor
nnn-nnn-nnnn-nnInformation about your license will be displayed.
-
Click OK.
If an instance of the WebFOCUS 80 Reporting Server is already installed on your machine, a window appears with two options:
- Install and create 80 configuration lets you completely install a second instance of the server and is recommended if you install more than one WebFOCUS instance.
- Create additional 80 configuration lets you run multiple instances of the server without installing the program and binary files twice.
The Software License Agreement window opens.
- Click Yes if you accept the terms of the license agreement.
-
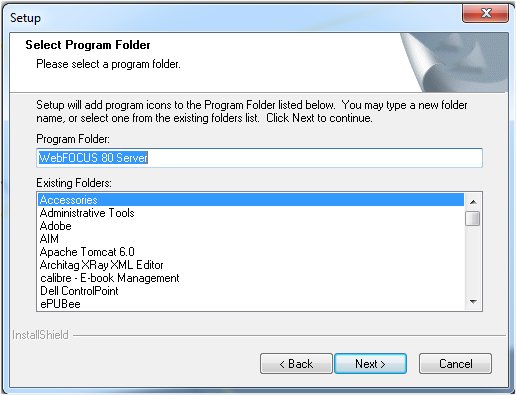
The Select
Program Folder window opens, as shown in the following image.
-
Accept the default or specify a new
program folder and click Next.
When installing multiple instances of the server, specify a different folder for each instance. For example:
WebFOCUS 80 Server Test
WebFOCUS 80 Server Dev
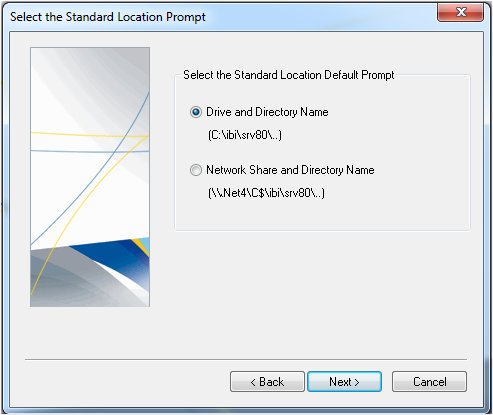
The Select the Standard Location Prompt window opens, as shown in the following image.
-
Leave Drive and Directory
Name selected and click Next.
Note: The Network Share and Directory Name option is not supported with the WebFOCUS Reporting Server.
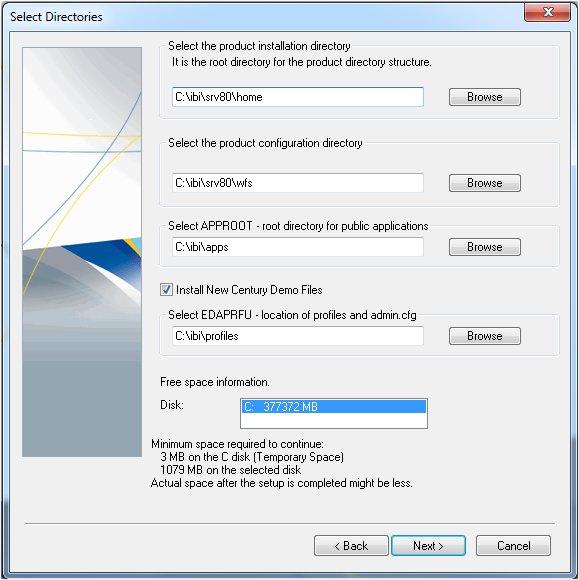
The Select Directories window opens, as shown in the following image.
-
Review
the default or specify new locations for WebFOCUS directories, and
click Next. The installation directory is
also referred to as EDAHOME and the configuration directory is also
referred to as EDACONF.
Note:
- When installing
multiple instances on the same machine, change default directories
so that the new installation does not overwrite the existing installation.
It is a good idea to place each instance in its own root ibi directory.
For example:
C:\wfTest\ibi
C:\wfDev\ibi
- When creating a new configuration, but not reinstalling the application files, change only the default configuration directory. If you have more than one full installation and are creating a new configuration, you are prompted to specify to which existing installation directory your new configuration will apply.
- If the WebFOCUS Client and Server are on the same machine and drive, they share the same Application Directory (APPROOT), by default. This means both client files (for example, HTML, GIF) and server files (for example, FEX, MAS) reside in the same directory. If you wish to ensure separation of client and server files, you can change the Application Directory. However, this prevents using the projects area of Developer Studio with this environment (project-based development).
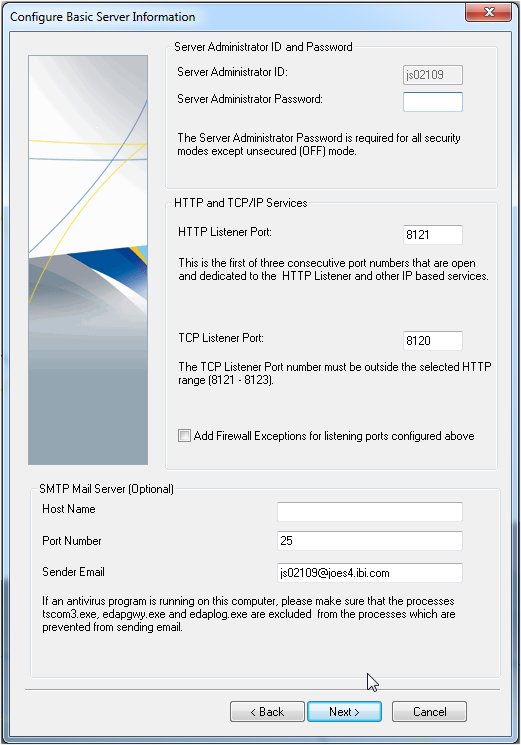
The Configure Basic Server Information window opens, as shown in the following image.
- When installing
multiple instances on the same machine, change default directories
so that the new installation does not overwrite the existing installation.
It is a good idea to place each instance in its own root ibi directory.
For example:
-
Type
the necessary sign-in credentials and port information, as explained
in the following table, and then click Next.
Parameter
Description
Server Administrator Password
Type the password you use to sign in to the Windows machine. The server cannot start with Security OPSYS if this is not provided. It is recommended that you type the password even if you will run the server with security OFF.
HTTP Listener Port
Accept the default or type a new port for the Web Console. This is normally one more than the TCP port. This is the first of three ports that the server uses.
TCP Listener Port
Accept the default or specify a new base TCP Port. This is normally one less than the HTTP Listener. This is the port WebFOCUS Client will use when accessing the server.
When installing multiple instances or configurations of the server on the same machine, each instance or configuration must use unique ports.
-
Click Next to
begin the installation.
The Copying Files window opens. When the installation is finished, the Setup Complete window opens.
- Ensure that Do not start at this point is selected, then click Finish.