Selecting Columns

In this section:

How to:

Reference:

The columns you select define the input to your data target. If you are using the DMC to format a new data target, the order of the columns will reflect the order that the columns are specified in the SQL command.

The DataMigrator Server, which DataMigrator uses to process its extraction logic, can have up to approximately 400 columns in a single data flow. If you intend to move more than 400 columns, several data flows may be linked together by creating a process flow. For information on process flows, see Designing a Process Flow.


Top of page

x
Procedure: How to Automatically Select All Columns

The default settings of the DMC require you to manually select the columns you want to extract. To change your settings so that all columns are selected automatically:

  1. On the Home tab, in the Tools group, click Options.
  2. Select Data Flow Designer from the Data Flow tree.
  3. Select the Automatically select all columns check box in the On Add Source section.
  4. Click OK.

Top of page

x
Procedure: How to Select Columns
  1. Right-click the SQL object in the data flow workspace, and select Column Selection.

    The Column Selection window opens.

  2. Double-click the columns you want to select from the Available Columns grid on the left.

    or

    Select one or more columns and click the right arrow.

    Tip: To select all columns, click anywhere in the column list and press CTRL + A.

    The columns appear in the Selected Columns grid on the right.

  3. You can change the order of the columns by selecting them and clicking the up and down arrows.
  4. Optionally, you can select the Distinct check box to remove duplicate rows from the results of your query.
  5. You can rename a selected column by entering a name in the Sql Alias field.
  6. To remove a column from the Selected Columns grid, select it and click the left arrow or the Delete button.
  7. Click OK.

Top of page

x
Procedure: How to Edit Selected Columns
  1. Right-click the SQL object in the data flow workspace, and select Column Selection.

    The Column Selection window opens.

  2. Select the column you want to edit.
  3. Click the Edit column button or double-click the number next to the column in the Selected Columns grid.

    The SQL Calculator opens.

  4. Using the Columns/Variables and Functions tabs, and the calculator buttons, edit the expression for the column. For information about using functions, see Using an SQL Function. For information about using variables, see Using Variables in a Flow.
  5. Click OK.

For information about creating a calculated column in the Selected Columns grid, see Creating an SQL Calculation.


Top of page

x
Procedure: How to Add or Change Column Descriptions From the Column Selection Window

If a column in a source synonym has a description, that description will be carried over with the column into any new target synonyms. You can also use the Column Selection window to add descriptions for columns that do not have them, or to change the descriptions for columns that do have them. These descriptions will also be carried over into any new target synonyms in the current flow.

  1. From the data flow workspace, double-click the SQL object, or right-click it and select Column Selection.

    The Column Selection window opens.

  2. Double-click the Description field for the column in the Selected Columns grid.
  3. Type the description.
  4. Click OK.

Top of page

x
Reference: Column Selection Window

The Column Selection window is available from the data flow workspace by double-clicking the SQL object, or by right-clicking it and selecting Column Selection.

Columns Selection Window

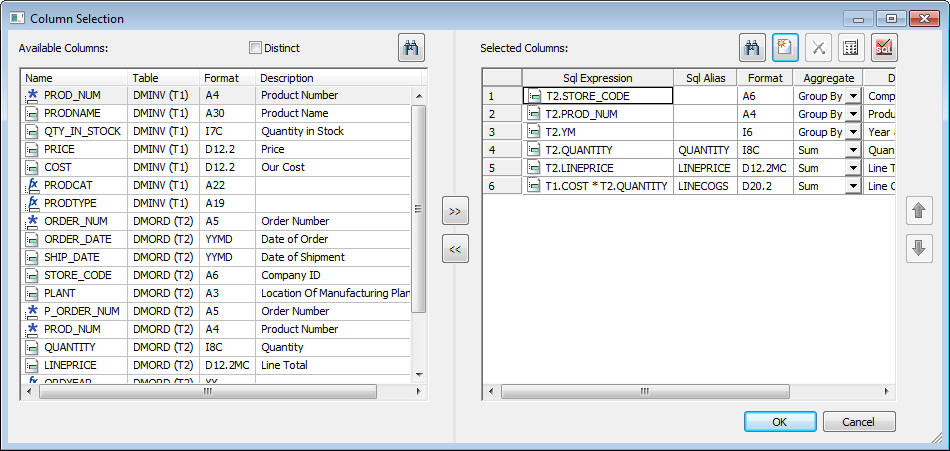
The Column Selection window contains the following fields and options by default:

Distinct

Removes duplicate rows from the results of your query.

Available Columns

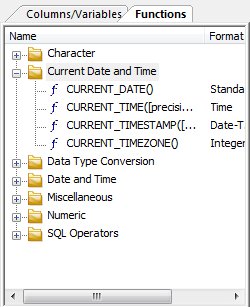
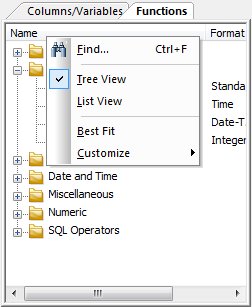
Lists the columns in each data source. Right-clicking on a column header opens a context menu with the following choices

  • Find. Opens the search dialog.
  • Field View. Switches views of the synonyms.
  • List View. Switches views of the synonyms.
  • Best Fit. Optimizes the column widths for best viewing.
  • Customize. Allows selecting the columns that are displayed,
  • Column naming display strategy.

Note: When in List View, clicking a column heading will sort the column grid on that heading.

The columns symbols are:

Symbol

Description

Regular column

Key column

Index column

Virtual column

Note: The symbol for a virtual column in the synonym is blue, while the symbol for a transformation (virtual column in the flow) is yellow.

Name

Is the name of the column. Next to each column name there is a symbol that indicates regular columns, key columns, index columns, virtual columns, and transformations.

Table

Is the name of the data source.

Format

Is the format of the column.

Description

Is the description of the column.

Nulls

Indicates if the column can contain NULL values.

Right arrow

Adds columns to the Selected Columns grid.

Left arrow

Deletes columns from the Selected Columns grid.

Selected Columns

Lists the columns to be extracted from the data source(s).

Sql Expression

Is the column name, or an expression created in the SQL Calculator.

Sql Alias

Is an alternate name for referencing the column. If you add an alias and expression, the expression shows up where the column name would normally be.

Format

Is the format of the column.

Aggregate

Is the aggregation applied to the column. The available options are Group By, Group By Not Selected, Sum, Min, Max, Count, Avg, Sum Distinct, Count Distinct, and Avg Distinct.

Description

Is the description of the column.

Nulls

Indicates if the column can contain NULL values.

Find button Find

Allows you to search for a column.

Insert Columns button Insert columns

Opens the SQL Calculator to create a column.

Delete button Delete columns

Deletes the selected column.

Edit button Edit condition

Opens the SQL Calculator to edit a column.

Test SQL Statement button Test SQL Statement

Tests the SQL statement and displays the result.

Note: The test button will be grayed out if you have not selected any columns.

Up and down arrows

Moves the selected column up or down within the Selected Columns grid.

If you right-click anywhere on the header bar, you get the following options:

Find

Allows you to search for a column.

Best Fit

Resizes the column to fit its data.

Customize

Allows you to select what information is displayed for each column.

If you right-click any column, you get the following options:

Edit

Opens the SQL Calculator where you can edit the properties of a column.

Delete

Deletes the selected column.


x
Aggregating Columns

How to:

You can aggregate your columns in the Column Selection window.


x
Procedure: How to Aggregate a Column

In the Column Selection window:

  1. Select the column or columns you want to aggregate. To select more than one column, hold the Shift or Ctrl keys while selecting columns.
  2. Click the down arrow in the Aggregate field to display the drop-down list containing the types of aggregation, and select an aggregation. Your options are:
    • Group By. Groups the data by each distinct value in the column.
    • Group By Not Selected. Groups on (or by) column that you do not want to appear in the results.
    • Sum. Adds the values within the column.
    • Min. Returns the minimum value found in the column.
    • Max. Returns the maximum value found in the column.
    • Count. Returns a count of all non-null column values.
    • Avg. Returns the average value for the column.
    • Sum Distinct. Adds the distinct values within the column, excluding duplicates.
    • Count Distinct. Returns a count of all distinct, non-null column values, excluding duplicates.
    • Avg Distinct. Returns the average value for the column, excluding duplicates.

Note: If you apply an aggregate function to one of your selected columns, the rest of the selected columns must, in most cases, have aggregation functions applied or be GroupBy columns. After an aggregation is applied to a column, all columns without an aggregation turn red until an aggregation is applied to them as well.


Top of page

x
Creating an SQL Calculation

How to:

Reference:

You can create an SQL calculation for your data flow that:


x
Procedure: How to Create a Calculation
  1. In the Column Selection window, click the Insert columns button.

    The SQL Calculator opens.

  2. Enter the calculation you want to perform using the Columns/Variables and Functions tabs, and the calculator buttons. For details, see SQL Calculator. For information about using functions, see Using an SQL Function. For information about using variables, see Using Variables in a Flow.
  3. Enter an alias for the column in the Alias field.
  4. Click OK.

    The calculation appears in the SQL Expressions field.

    Note: When you create expressions, keep in mind their order of evaluation. For details, see Order of Evaluation.

  5. Optionally, select an aggregation for the column in the Aggregate field. For details, see Aggregating Columns.

    Note:

    • You can type a calculation directly into the Selected Columns grid by double-clicking the SQL Expressions field.
    • You can type an alias directly into the Selected Columns grid by double-clicking the SQL Alias field.


x
Procedure: How to Create a Column That Uses a Variable

From the Column Selection window:

  1. Click the Insert Columns Insert Columns button button.

    The SQL Calculator opens.

  2. Type an alias for the virtual column.
  3. Double-click the variable you want assigned to the column from the Columns/Variables tab. You can also type in character-valued or date-valued variables, which must be enclosed in single quotation marks.
  4. Click OK.

The variable and alias appear in the Selected Columns grid.

For more information about using variables, see Using Variables in a Flow.


x
Reference: SQL Calculator

The SQL Calculator is available from the Column Selection window by clicking the Insert Columns button, or by selecting a column and clicking the Edit Column button.

SQL Calculator window

The SQL Calculator contains the following fields and options:

Alias

Is an alias for the column.

Expressions window

Displays the expression.

Columns/Variables tab

Displays available columns and variables in a hierarchical tree or in a grid.

Functions tab

Displays a list of SQL functions that are available for your transformations.

Function Assist button

Allows you to specify parameters for the function through a dialog box when creating or editing a transformation.

Calculator buttons

Insert numbers and operators.

( )

Adds parentheses.

''

Inserts two single quotation marks. Enter alphanumeric test values between these.

a->A

Converts selected text to uppercase.

A->a

Converts selected text to lowercase.

Date

Opens the Date Editor window which lets you use the current date, or specify a date from the a calendar.

Datetime

Opens the Date Editor window which lets you use the current date and time, or specify a date and time from the a calendar.


x
Reference: SQL Operators

The following table describes the result of an operator on an expression or expressions, where expr is an expression.

Operator

Result

expr + expr

Returns the sum of two expressions.

expr - expr

Returns the difference of two expressions.

- expr

Returns the negated value of an expression.

expr * expr

Returns the product of two expressions.

expr / expr

Returns the dividend of two expressions.

expr || expr

Returns the concatenation of two character strings.


x
Using an SQL Function

How to:

Reference:

You can use an SQL function in the SQL Calculator to create a complex expression. In addition, most ANSI 92 SQL functions can be used in a SELECT command, depending on the data source type and platform.


x
Procedure: How to Use an SQL Function
  1. In the SQL Calculator, click the Functions tab.
  2. Double-click the folder for the type of function you want to use.

    Using an SQL Function window

  3. Double-click the function you want to use.

    The Function Assist dialog box opens.

  4. Use the Function Assist dialog box to set the parameters for the function and click OK.
  5. The function appears in the Expressions window. Click OK.
  6. The function is added to the Selected Columns grid of the Column Selection window.

For more information about the Assist dialog box, see How to Use Function Assist.


x
Reference: SQL Functions

Functions in the SQL Calculator Functions tab can be viewed by category (Tree View) or alphabetically (List View). Right-click the Name header bar to select between the two views.

SQL Functions Window

SQL Function

Description

Character Functions

CHAR_LENGTH(arg)

Returns the length of arg in a character string.

CONCAT(arg1, arg2)

Concatenates the values of two arguments.

DIGITS(arg)

Converts a numeric expression to a fixed length character string. DB2 only.

EDIT(arg, mask)

Edits a numeric or character value according to a format specified by a mask.

LCASE(arg)

Converts a character string value to lowercase. Identical to LOWER and LOWERCASE.

LTRIM(arg)

Removes leading spaces from a character string.

POSITION(substring IN arg)

Returns the location of substring in arg, or returns a zero if substring is not found.

RTRIM(arg)

Removes trailing spaces from a character string.

SUBSTR(arg FROM 
start-pos[FOR length])

Returns a string from arg starting at start-pos to the end of the string, or if specified length characters.

SUBSTR(arg, start_pos[, length])

Returns a string from arg starting at start-pos to the end of the string, or if specified length characters.

TRIM(arg)

TRIM(trim_char FROM arg)

TRIM(trim_where[trim_char] 
FROM arg)

Removes leading and/or trailing spaces and other characters from a character string.

The character to be removed may be specified as trim-char, if it is not, the space character is assumed.

Whether to remove leading and/or trailing characters may be specified as trim-where, if not, both leading and trailing spaces are removed.

UCASE(arg)

Converts a character string value to uppercase. Identical to UPPER and UPPERCASE.

Current Date and Time Functions

CURRENT_DATE

Returns the date in YYMD format.

CURRENT_TIME[(precision)]

Returns the current time of the operating system in the form, HHMMSS.

CURRENT_TIMESTAMP
[(precision)]

Returns the current timestamp of the operating system (date and time) in the form, YYYYMMDDHHMMSS.

CURRENT_TIMEZONE()

Returns the current time zone.

Data Type Conversion

CAST(expression AS data_type [ (length) ] )

Converts the value of its argument to a specified data type.

Length is an optional integer that specifies the length of the target data type.

char(arg[,date_format])

Converts a number to a character string or data value to a string in a specified format.

DATE(arg)

Returns a date, time or timestamp value that is computed from arg.

DECIMAL(arg, [length 
[dec_places]])

Converts a number into a fixed-length decimal where dec-places is the number of decimal places in the result.

FLOAT(arg)

Converts arg to a floating point value.

INT(arg)

Converts a number to an integer. Identical to INTEGER.

SMALLINT(arg)

Converts a number to a small integer.

TIME(arg)

Converts its argument to a time.

TIMESTAMP(arg)

Converts its argument to a timestamp.

VARGRAPHIC(arg)

Converts its argument to a vargraphic.

Date and Time Functions

DAY(arg)

Returns a number that contains the day of the month from a date or timestamp.

DAYS(arg)

Returns the number of days since December 31, 1900.

EXTRACT(field FROM arg)

Extracts a numeric value from a date or time value arg, where field is either a year, month, day, hour, minute, or second.

HOUR(arg)

Returns the hour field from a time or timestamp value.

MICROSECOND(arg)

Returns the number of microseconds from a time or timestamp value.

MILLISECOND(arg)

Returns the number of milliseconds from a time or timestamp value.

MINUTE(arg)

Returns the number of minutes from a time or timestamp value.

MONTH(arg)

Returns the number of the month in which arg falls.

SECOND(arg)

Returns the second field from a time or timestamp value.

YEAR(arg)

Returns the year in which arg falls.

Miscellaneous Functions

COUNTBY(arg)

Produces a column whose values are incremented row-by-row by a specified amount.

HEX(arg)

Converts its input value to hexadecimal.

Note: This function is available only for DB2, Ingres, and Informix.

IF(test, val1, val2)

Tests a condition and returns a value based on whether the condition is true or false.

LENGTH(arg)

Returns the number of bytes of storage used by arg.

USER()

Returns the user ID running the query.

Numeric Functions

ABS(arg)

Returns the absolute value of a number.

LOG(arg)

Returns the natural logarithm of the input value.

SQRT(arg)

Returns the square root of the input value.

POWER (arg1, arg2)

Returns the first number raised to the power of the second.

EXP (arg)

Returns e raised to the power of the argument.

SQL Operators

CASE test-expr 
   WHEN value-expr-1 THEN  
result-expr-1 
   . . .
   WHEN value-expr-n THEN  
result-expr-n 
   [ ELSE else-expr ] 
END

Allows a value to be computed depending on the values of expressions.

CASE
   WHEN cond-1 THEN  
result-expr-1 
   . . .
   WHEN cond-n THEN  
result-expr-n 
   [ ELSE else-expr ] 
END

Allows a value to be computed depending on the truth or falsity of conditions.

COALESCE(arg1, arg2, 
[ ... argn ])

Can take two or more arguments. The first argument that is not NULL, is returned. If all arguments are NULL, NULL is returned.

EXISTS(SELECT * FROM LOOKUP_MFD SQ [WHERE condition] )

Tests if subquery returns one or more rows.

NULLIF(arg1, arg2)

Returns NULL if its two arguments are equal. Otherwise, the first argument is returned.

test_exp1 IN (exp1, exp2)

Determines whether a specified value matches any value in a list.

(SELECT lookup_result from LOOKUP_MFD [WHERE condition])

Used in a select list to return a column value.

(SELECT * FROM LOOKUP_MFD SQ [WHERE condition] )

Returns result set based on subquery.

(test_exp1, test_exp2) IN ( SELECT exp1, exp2 FROM mfd WHERE condition)

Determines whether a specified value matches any value in a subquery.


iWay Software