In the business climate today, cutting costs and increasing profitability
are critical. Organizations create and distribute reports for evaluating
and taking action when management-defined conditions are not met.
The evaluation can largely be automated using Alert reporting.
Alert reporting automates the evaluation of a defined condition
to determine whether or not a report should be submitted. Recipients
of the report know before they open it that they are receiving
this report because there is an exception in their area of responsibility.
x
A data-driven Alert is an event that is prompted by
a guideline that you define. This guideline can vary from the simple
to the complex. For example, a simple guideline is to alert a sales
manager when an order that exceeds $1 million is entered. An example
of a more complex guideline is to alert a department manager when
cumulative expenses exceed budget for any category. The report sent
to the manager as a result of the Alert might show the most recent
transactions, the amounts, and the sources.
Alert reporting is an integrated feature of WebFOCUS Managed
Reporting and ReportCaster. An Alert report can be run interactively
or by authorized users. You can use ReportCaster to schedule and
distribute an Alert report. Burst capability can send targeted information
to the people who need it, so that there is less information for
each person to analyze.
Alerts work with all email clients. They are supported on the
following mobile devices: iPhone®, iPad®, BlackBerry®, and email
enabled mobile phones. Alerts can also be sent to any PC or laptop
computer with email capability.
Alerts provide the following:
-
Alert tools. Using
Alert Assist, you can quickly set up test conditions (rules) that
determine if an Alert condition should be triggered (true). This
is called the Alert test. When the Alert test is triggered (true),
the Alert result is run. An Alert result can be an existing report
procedure or you can create the Alert test using InfoAssist. This
is called the Alert result.
-
Scheduling flexibility. Optionally,
you can schedule an Alert to run as often as every minute to evaluate
the Alert test conditions.
xIn this section: Reference: |
The Alert feature requires the following components:
-
WebFOCUS Reporting Server. This
server is responsible for processing the procedure, accessing and
retrieving the requested data, and creating the report when the
Alert test is triggered (true).
-
Managed Reporting. This
environment is used to create and manage Alerts.
An Alert consists of the following:
An Alert test is required to check whether or not a set of defined
test conditions (rules) is met (true or false). An Alert test can
be a WebFOCUS Test, which is a simple TABLE request that
you create to define the condition to test for. Alternatively, an
Alert test can be a Test for File Existence, which checks
for the existence of a file that is accessible to the WebFOCUS Reporting
Server to which the Alert test is submitted. The file does not need
to be in the APP PATH. It just needs to be in a location where it
can be found by the Reporting Server.
The Test for File Existence file does not need to be
an actual file with an extension. Testing for the existence of a
folder is also valid.
If the Alert test is triggered (true), returns records, the Alert
result request is processed. You have the option of creating the
result report or selecting an existing Managed Reporting report
you are authorized to run.
Alerts Created in the Browser
If you select WebFOCUS Test in the browser,
you are prompted to create the Alert test using InfoAssist. The
version of InfoAssist that is invoked does not have field styling,
heading, footing, or report options, such as OLAP and On-Demand
Paging. The Alert test determines whether or not a specified condition
is true. It is not the report that is displayed as the result of
the Alert.
You can create the Alert result using InfoAssist, this time with
all the available styling and report options. Alternatively, you
can select an existing Managed Reporting report.
One consideration when creating an Alert is the flexibility
of editing the Alert result. It is recommended that you select an
existing report for the Alert result request, as it is available
to edit, run interactively, or schedule independently of the Alert.
If you create the Alert result using InfoAssist within Alert Assist,
you need to use Alert Assist and select the open option again to
edit the request, because the Alert test and the report to be run
are contained within the Alert procedure.
x
Reference: Alert Assist Sample Code Created With InfoAssist
In the sample code that follows,
both the Alert test and the report to be run (Alert result) are
created with InfoAssist. To keep the sample code simple, styling
and report options, such as report headings and conditional styling,
are not included in this request.
Notice that
after the first TABLE request, there is a –IF statement that checks
if the number of lines in the Alert test is equal to zero (-IF &LINES
EQ 0). This test condition determines if the second TABLE request,
to execute the report, should be triggered (true).
If the
number of lines is greater than zero, then there are records that
satisfy the Alert test, and the report is run. If the number of
lines is equal to zero, then there are no records that satisfy the
Alert test, and the report is not run.
-* Created by Alert Assist
-* start of the test report
-DEFAULTH &WF_SUMMARY='Summary';
-DEFAULTH &WF_TITLE='WebFOCUS Report';
TABLE FILE CENTINV
SUM CENTINV.INVINFO.QTY_IN_STOCK
BY CENTINV.INVINFO.PROD_NUM
BY CENTINV.INVINFO.PRODNAME
BY CENTINV.INVINFO.PRODTYPE
BY CENTINV.INVINFO.PRODCAT
WHERE CENTINV.INVINFO.QTY_IN_STOCK LT 5000;
ON TABLE HOLD
ON TABLE NOTOTAL
ON TABLE SET PAGE-NUM NOLEAD
ON TABLE SET SQUEEZE ON
ON TABLE SET HTMLCSS ON
ON TABLE SET HTMLENCODE ON
ON TABLE SET EMPTYREPORT ON
END
-* end of the test report
-* start of the test
-RUN
-IF &LINES EQ 0 GOTO ALERTEXIT;
-* end of the test
-DEFAULTH &WF_SUMMARY='Summary';
-DEFAULTH &WF_TITLE='WebFOCUS Report';
TABLE FILE CENTINV
SUM CENTINV.INVINFO.QTY_IN_STOCK
BY CENTINV.INVINFO.PRODTYPE
BY CENTINV.INVINFO.PRODNAME
BY CENTINV.INVINFO.PROD_NUM
WHERE CENTINV.INVINFO.QTY_IN_STOCK LT 5000;
ON TABLE SUBHEAD
"Products with Inventory Below 5000"
ON TABLE PCHOLD FORMAT HTML
ON TABLE NOTOTAL
ON TABLE SET PAGE-NUM NOLEAD
ON TABLE SET SQUEEZE ON
ON TABLE SET EMPTYREPORT ON
ON TABLE SET HTMLCSS ON
ON TABLE SET HTMLENCODE ON
ON TABLE SET STYLE *
INCLUDE=IBFS:/FILE/IBI_HTML_DIR/javaassist/intl/EN/ENIADefault_combine.sty,$
TYPE=REPORT,TITLETEXT=&WF_TITLE.QUOTEDSTRING,SUMMARY=&WF_SUMMARY.QUOTEDSTRING,$
TYPE=TABHEADING, LINE=1, JUSTIFY=CENTER,$
TYPE=TABHEADING, LINE=1, ITEM=1, OBJECT=TEXT, SIZE=14, STYLE=BOLD+ITALIC,$
ENDSTYLE
END
-* end of the output report
-* start of the options
-* end of the options
-ALERTEXIT
-* Finished by Alert Assist
x
Reference: Accessing Alert Assist From the Browser
If you create an Alert in the web browser, it invokes
Alert Assist and then InfoAssist. Alert Assist has a user interface
similar to InfoAssist.
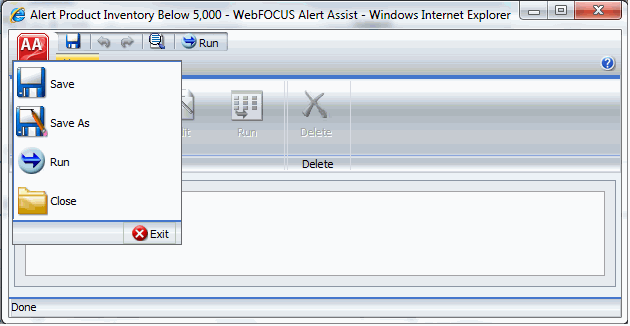
Alert Assist Main Menu
In
the upper-left corner of the browser window is the Alert Assist
Main Menu. When you click this menu, a drop-down list containing
the Save, Save As, Run, and Close options opens. Some of these
options are also on the Alert Assist Quick Launch toolbar.
The
following image shows the expanded Alert Assist Main Menu.
-
Save
-
Saves the Alert. This option is disabled until both parts
of the Alert are created.
-
Save As
-
Saves the current Alert with a new name. The Save As dialog
box displays a field in which you enter the new name. This option
is disabled until both parts of the Alert are created.
-
Run
- Submits the Alert procedure to the Reporting Server. This option
is active when both parts of the Alert have been created. The output
always opens in a new browser.
-
Close
-
Closes the current Alert and prompts you to save any changes.
-
Exit
-
Exits the Alert Assist and prompts you to save any pending
changes to the open Alert.
Alert Assist Quick Launch Toolbar
The Alert Assist Quick Launch toolbar
contains the following buttons.
|
Button
|
Description
|
|---|
|

|
Saves the Alert. This
option is disabled until both parts of the Alert are created.
|
|

|
Reverts back by undoing
one action.
|
|

|
Moves forward by redoing
one action.
|
|

|
Displays the Alert
procedure code in a read-only window.
|
|

|
Submits the entire
Alert procedure to the Reporting Server. This option is active when
both parts of the Alert have been created. The output always opens
in a new browser.
|
Options Ribbon
Under the Alert
Assist Quick Launch toolbar is a ribbon. When Alert Assist first
opens, none of the ribbon options are activated.
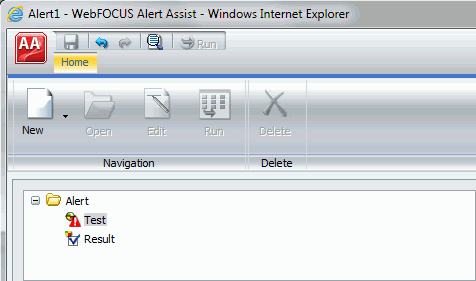
You must
select the Test node or Result node to activate the New option,
as shown in the following image.
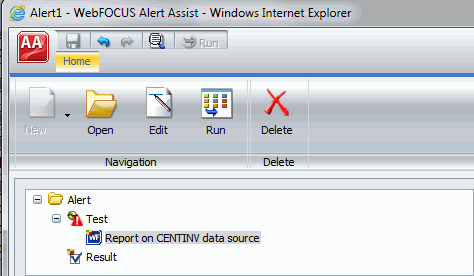
You
must create a Test to activate the remaining options, as shown in
the following image.
The ribbon contains the following options:
Navigation Group
-
New
-
Displays a menu from which you can choose to create a new WebFOCUS
Report or Test for File Existence when Test or Result is
selected. New provides the same functionality as if you right-clicked
the Test node and created a report from the menu.
-
Open
-
Invokes InfoAssist so that you can make changes to the report
when an Alert Test or Alert Result is selected. The Open option
is only activated after a report test is created.
-
Edit
-
Opens the Report on FILENAME data source dialog box when
an Alert Test or Alert Result is selected. You can then edit the
report in a text editor.
-
Run
-
Runs the report in a new browser window when an Alert Test
or Alert Result is selected.
Delete Group
-
Delete
-
Removes the report from the Alert Test or Alert Result node.
x
Authorized users can run an Alert test interactively
and optionally schedule it to be distributed by ReportCaster.
The following image shows basic Alert processing.
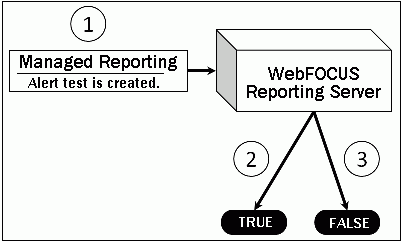
- The Managed Reporting
developer, using Alert Assist or the Alert Wizard, creates an Alert
test and designs the report that is run if the Alert condition is
true.
- If the Alert test
is true, the WebFOCUS Reporting Server runs the Alert result.
- If the Alert test
is false, the Alert result is not run.
The following image shows scheduled Alert processing.
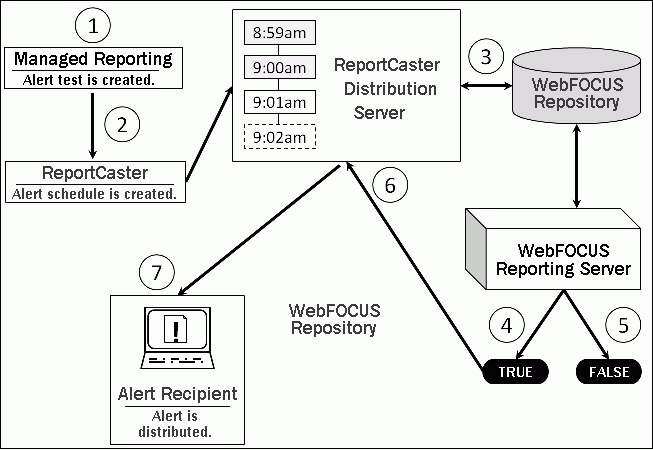
- The Managed Reporting
developer, using Alert Assist or the Alert Wizard, creates an Alert
test and designs the report that is run if the Alert condition is
true.
- If desired, an Alert
schedule is created using ReportCaster.
- The ReportCaster
Distribution Server checks for scheduled jobs in the WebFOCUS Repository.
- When the ReportCaster
Distribution Server processes a scheduled Alert procedure, it is
submitted to the Reporting Server to evaluate if the Alert test
is true.
- If the Alert test
is false, the Alert is returned to the queue for the next scheduled
time.
- If the Alert test
is true, the Reporting Server runs the Alert result and returns the
results to the ReportCaster Distribution Server. The ReportCaster
Distribution Server distributes the Alert result to the recipients,
as specified in the schedule.
x
To facilitate the creation
and scheduling of Alerts, the Alert Assist tool guides you through
a series of windows that complete the following tasks:
- Create
an Alert test.
- Create
a new report to be run, or select an existing report.
If you are logged on to Managed Reporting as a Managed Reporting
developer, you can access Alert Assist through a Published Content
or Private Content folder or subfolder within the tree.
When you use InfoAssist through the browser to create an Alert
test, a subset of the tabs and options is available, because the
Alert test is used only to state the conditions or rules, of the
test. Users do not see this report. This is a simple report that
states the selection criteria and includes an ON TABLE HOLD command.
When an Alert test is evaluated and the result is true, a report
(the Alert result, which is the second report that you create) is
run. This is the report that users see. Therefore, you can add styling
to this report. More options are available in InfoAssist when you
are creating an Alert result.
When you create an Alert result report, it is not shown to the
Managed Reporting end user by default, since all content is Private
by default.
x
Procedure: How to Create an Alert in the Browser
When you select a new
Alert from the BI Portal or BI Dashboard, the WebFOCUS Alert Assist
tool opens for the creation of components. Alert Assist is a Bindows™
application that is launched in a separate browser window.
The browser tab uses the generic name Alertn,
where n is an index number starting at 1. All subsequent
Alerts increase by 1. If you save the Alert, the dialog box is
automatically set up with this generic name. However, you can change
the name as desired.
As
you use Alert Assist to create reports, you may see messages that
state Report Saved. Your changes to the report have been saved,
but they are not written to the WebFOCUS Repository until the Alert
is saved. If you exit Alert Assist before you click Finish,
the Alert is not saved.
The
following steps provide options for accessing Alert Assist from
a browser to create an Alert.
-
Sign on
to the BI Portal, and expand the tree to show the folders and subfolders.
-
Right-click a folder or subfolder,
select New, and then select Alert from
the menu.
The Tool Setup
dialog box opens, as shown in the following image. It provides options
for selecting a Reporting Server and Application Paths.
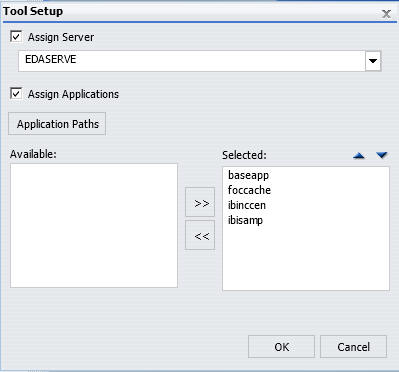
Note: User
access to the Tool Setup dialog box to specify Reporting Server
properties is controlled by a WebFOCUS security privilege. For information
on WebFOCUS security privileges, see the WebFOCUS Security
and Administration manual.
-
Select a
Reporting Server and Application Paths when not using the default
Reporting Server specified in the WebFOCUS Client configuration
or the default application path for that Reporting Server, and click OK.
The WebFOCUS Alert Assist opens.
-
Right-click
the Test node in the Alert Assist main window,
and click New, as shown in the following image.
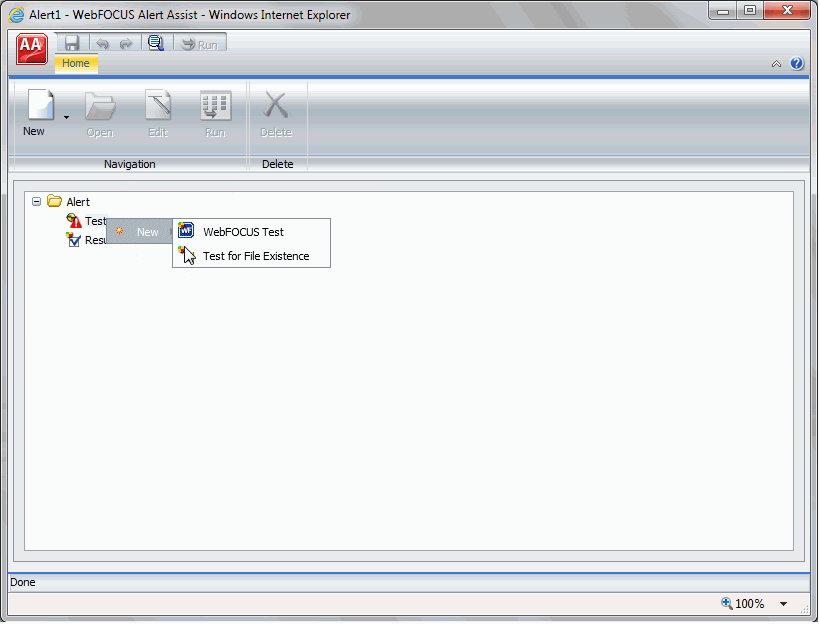
-
Select one
of the following options:
-
WebFOCUS Test. Allows you to create a new report in a
scaled-down version of InfoAssist. Proceed to step 6.
-
Test for File Existence. Allows you to select an existing report.
Proceed to step 9.
Note: The scaled-down version of InfoAssist is used to create basic
TABLE requests with HOLD (not PCHOLD FORMAT) statements. It generates procedure
syntax that is written to the Alert the same way as in earlier WebFOCUS releases.
The Edit option on the ribbon allows you to open the editor and
manually enter the procedure code or edit existing procedure code.
When the test is saved from the editor, the syntax needs to be validated
as having an ON TABLE HOLD statement, a prerequisite for an Alert
test.
-
When you
select WebFOCUS Test, InfoAssist opens. Select
a Master File from the Select a data source dialog box.
-
Create your
report as desired, and then save it.
-
Close InfoAssist
to return to Alert Assist. Proceed to step 11.
-
When you
select Test for File Existence, type the
full path to the file accessible to the Reporting Server that you
want to check exists. Do not use a file name or folder path that
includes spaces.
Testing a folder for existence is also
valid. Type the full path to the folder accessible to the Reporting
Server. If the file is located, the Alert is triggered (true) and the
Alert result report is run. Proceed to step 11 to create the Alert
result.
-
Click OK to
save the Alert test.
-
Right-click
the Result node in the Alert Assist main
window, and click New, as shown in the following image.
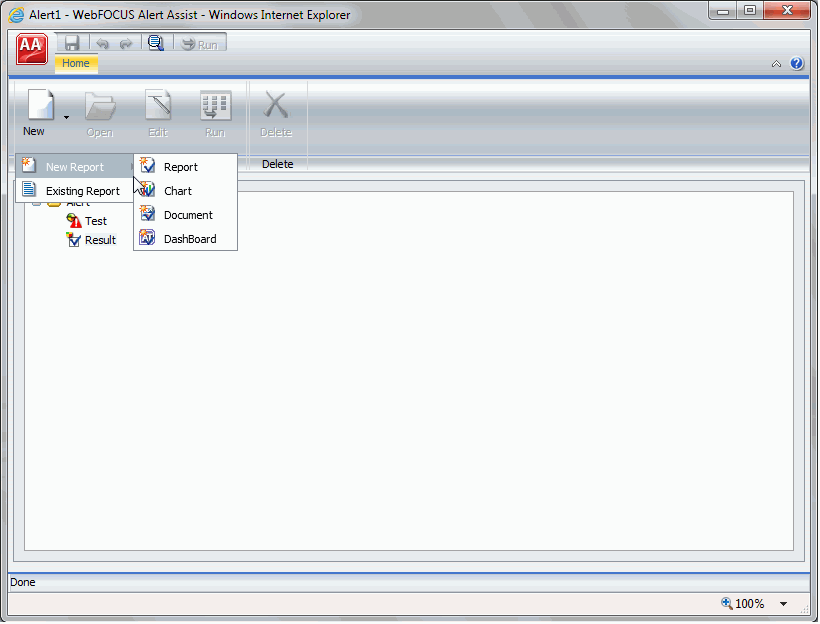
-
Select one
of the following options:
-
New Report. Allows you to create a new report, chart,
document, or dashboard, using the full version of InfoAssist. Proceed
to step 13.
-
Existing Report. Allows you to choose from the existing reports
in the tree. Proceed to step 15.
-
If you select New
Report, the Master File dialog box opens. Select a Master
File.
InfoAssist opens and you can create the
report that will be run when the Alert test is triggered (true).
-
Save your
report, and close the InfoAssist window to return to Alert Assist.
Proceed to step 19.
-
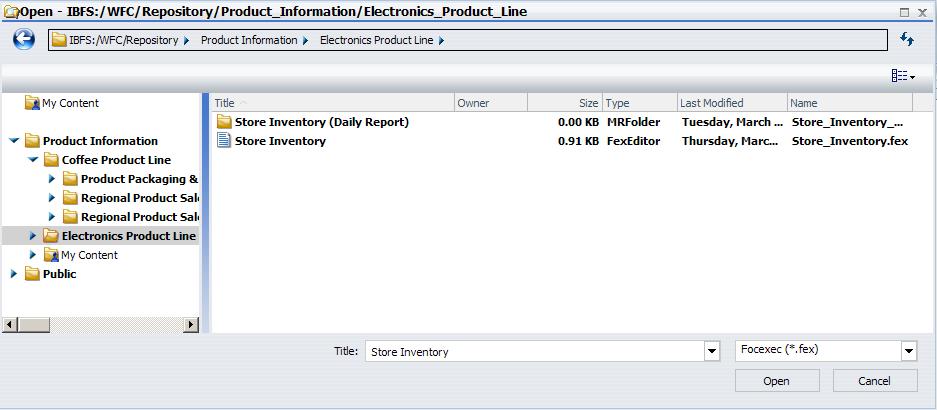
If you select Existing
Report, when the Open dialog box appears, as shown in
the following image, select a report you are authorized to run from
the tree.
-
Click Open.
The Open dialog box closes and the selected
report appears under the Result node.
-
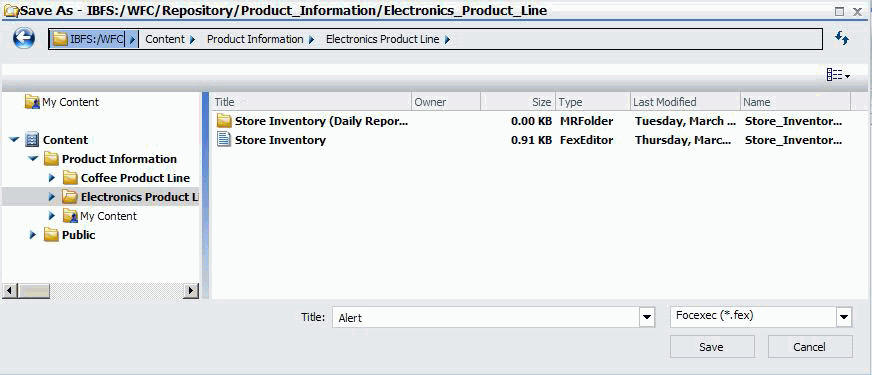
Select Save from
the Alert Assist menu. The Save As dialog box opens, as shown in
the following image.
-
Type the
Alert Title, and click OK.
Note: The default value for Title is Alert1.
-
Close Alert
Assist to return to the BI Portal.
The Alert result is automatically run if the Alert test
report is triggered (true). If you are authorized to schedule reports
for distribution, you can optionally schedule the Alert. If you
would like to schedule the Alert, proceed to step 20.
-
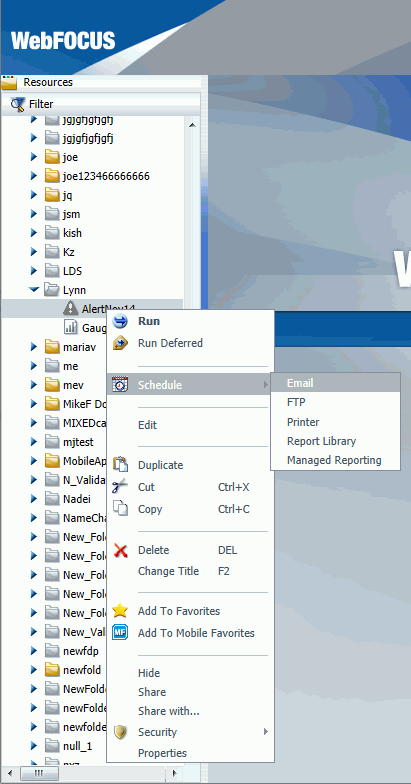
Scheduling
Alerts in the browser invokes the ReportCaster Basic Schedule tool.
In the tree, right-click the Alert, and then from the context menu
Schedule option, select how the Alert report will be distributed
when the Alert test is triggered (true). The following image shows
the Email schedule option selected.
The ReportCaster Basic Scheduling tool opens in a new browser
window, as shown in the following image. For more information on
the Basic Scheduling tool and distribution options, see the ReportCaster manual.

-
If your
Alert uses parameters, select the Parameters ribbon
option to review and specify parameter values. Ensure that you have
the correct Path, Procedure, and Server Name. For more information
on specifying parameter values when scheduling a report procedure
(FEX), see the ReportCaster manual.
-
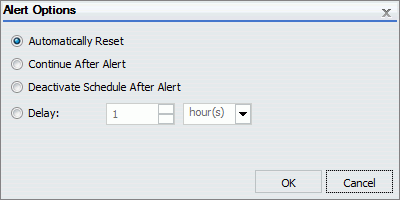
Click Alert.
The Alert Options dialog box opens, as
shown in the following image.
-
Select one
of the following Alert Options:
-
Automatically Reset. This option continues
to run the schedule at the specified time and checks to confirm
that the Alert test is no longer true before the Alert test is evaluated
again. It is best to use this option when you do not want to receive
the Alert result again until after the exception condition has been
addressed and occurs again. For example, when the quantity in inventory is
greater than 20,000, the Alert is triggered. You do not want to
receive the report again until after the inventory is less than
or equal to 20,000 for all products and then goes back over 20,000
again.
-
Continue After Alert. This option continues to run the schedule
at the specified time and distribute the report each time that the
Alert test is true. It is best to use this option when you want
to be notified at the interval specified in the schedule that the
Alert test is true.
-
Deactivate Schedule After Alert. This option deactivates the
schedule after the Alert is triggered. The schedule has to be activated
again for the Alert test to run after the Alert is triggered. It
is best to use this option for one-time Alert tests. This is the
default value.
-
Delay. This option is best used when you want to allow a
specific period of time to address the Alert test but want to be
notified again if the Alert test has not been met. You can restart
the Alert after a maximum of 99 hours, days, weeks, months, or years.
As
you complete the creation of the schedule, remember to consider
the burst option to distribute specific report values, instead of
the entire report. When a report is burst, the distribution information
must be provided in a distribution list, distribution file, or dynamic
list for email distribution and an access list for library distribution.
The email and library distribution options are the most effective
for Alert reports because of the push versus pull notification through
email. For more information on using the burst option in ReportCaster,
see the ReportCaster manual.
-
Click Distribution and
specify the destination information for where you want the report
to be distributed. For more information on specifying schedule distribution
information, see the ReportCaster manual.
-
Select the Properties tab
and type a title and summary for the scheduled report.
-
Click Recurrence and
specify when and how often to run the schedule.
For more information on Recurrence options, see the ReportCaster manual.
-
Click Save
and Close.
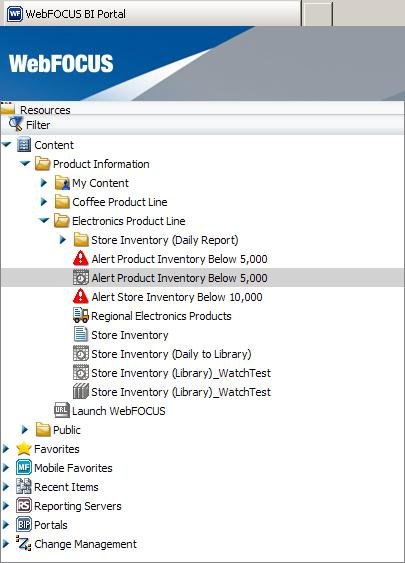
The schedule report now appears in the tree, as shown in
the following image.
xChecking Scheduled Alerts
When an Alert test is false (and therefore not activated),
the Alert result report is not run. When an Alert schedule runs,
information about the Alert test evaluation (true or false) and
any error or warning messages that occur during schedule or Alert processing
are written to the log file.
In order to track the completion of a scheduled Alert, or errors
that occurred during processing without checking the log report
for the Alert schedule, we recommend that you use the Schedule Notification
option.
In the Scheduling tool, the Notification
tab allows you to specify:
- The
terms for supplying notification (Never, which is the default value,
Always, or On Error).
- The
level of detail in the notification (full notification or brief
notification).
- The email addresses
to distribute the notification information to.


