A chain contains conditions for each link in the chain. The conditions are linked to the values being selected in the control object. You may apply multiple conditions to one link. The settings for the condition describe how the link should behave. The following options are available:
- Apply Actions for the links on the chain.
- Apply the Values compare operator for the condition.
- Apply Selected values with a Multiselect operator for the condition.
- Apply the Resolves parameter values for the condition.
- Apply the Compare operator for the condition.
If using static controls, you must apply conditions for each link in the chain. Conditions need to be created for each value of the control chained from, and those values must be mapped to the correct values that will be displayed in the control that it is being changed to.
The Settings panel appears when creating a condition for a chain link on the Parameters tab. A chain contains conditions for each link in the chain.
The conditions are linked to the values being selected in the control object. The settings for the condition inherit the values of the prior bound control and provide additional condition settings. This section describes the additional condition settings.
The Settings panel contains the following fields and options when creating a condition:
- Conditions
-
The conditions list enables you to create multiple conditions for the link. Default is the only initial condition.
- To create a new condition, click the New icon. Condition(n) is created, where (n) is the number, and added to the Conditions drop-down list. You may type in a unique condition name, choose Selected values, and set the condition settings.
- Click the Delete icon to remove the selected condition from the list. Note that the Default condition name cannot be deleted.
- Actions
-
Select an action for the chain link to control. The options offer variations to populate, show, hide, execute, and select the values. The list of available options are:
- Populate, show. Populates the control and displays it at run time. This is the default action for all conditions.
- Populate, hide. Populates the control and does not display it at run time.
- Populate with alternate, show. Populates the control with alternate values derived from a procedure, or value list, that is not the default and displays the control at run time.
- Populate with alternate, hide. Populates the control with alternate values derived from a procedure, or value list, that is not the default and does not display the control at run time.
- Show. Shows the control but does not populate it.
- Hide. Hides the control but does not populate it.
- Execute. Executes the bound object. For example, if you bind a control to a Submit button and change the value in the control at run time, the report/chart automatically executes when you change the value, without having to click the Submit button.
- Select. Selects the bound object. For example, if you bind a control to a tab item and select a value in the control at run time, the bound object (the tab item) is automatically selected as the active tab on the page.
- Values compare operator
-
Values compare operator provides chaining logic scenarios to include such options as Equal, Not Equal, Greater Than, Less Than, and so on. This option sets the condition for how to populate the control being linked to.
Equal is the default Values compare operator.
- Selected values
-
Selected values enable you to provide the values used in the condition. When creating a new condition, the Selected values section is activated. You may type selected values in the input box or click the ellipsis button to select values from the list.
The list of values that appears is based on the values of the prior bound control in the chain.
When selected values are entered, the Multiselect operator field is activated.
- Multiselect operator
-
The Multiselect operator options are activated when selected values are entered for the condition. Options are One of or All of. One of is based on one of the values shown in the Selected values, being selected in the prior control, in the chain. All of is based on the value of all of the Selected values, being selected in the prior control, in the chain.
One of is the default multiselect operator.
- Resolves parameter (“To:” field is required)
-
From. The From field specifies where to get the value used in the To field, if the control being chained from is a map or activeX control.
To. The To field is used to dynamically generate the selection list used to populate the control being chained to. This field displays the parameter whose value will drive the condition evaluation. The parameter name linked to the prior control in the chain is displayed by default. The ellipsis button provides a pop-up dialog of the other parameter values (from the report) to be resolved.
- Compare operator
-
The Parameter’s compare operator provides chaining logic scenarios to include such options as Equal, Not Equal, Greater Than, Less Than, and so on. This sets the compare operator to populate the control.
Equal is the default Compare operator.
- Insert a report with parameters in the HTML canvas.
-
Drag control objects on the Parameters tab to create
a chain.
Chains are represented by lines connecting control objects on the Parameters tab.
Chaining controls will populate parameters with values at run time, based on values selected in prior controls on the chain.
-
Click a link in the chain.
The Settings panel shows the bound control values and the Default condition settings for the link in the chain.
-
Click the New icon to create a
multiple condition for the chain.
Condition(n) is created, where (n) is the number, and added to the Conditions drop-down list, and the Selected values section is activated. You may type in a unique condition name.
- You may type in a unique condition name, choose Selected values, and set the condition settings for the new condition.
-
Optionally, you may click the Delete button
to remove the selected condition from the list.
Note: Default, the initial condition, cannot be deleted.
- Insert a report with parameters in the HTML canvas.
-
Drag control objects on the Parameters tab to create
a chain.
Chains are represented by lines connecting control objects on the Parameters tab.
Chaining controls will populate parameters with values at run time, based on values selected in prior controls on the chain.
- Click a link in the chain.
-
In the Setting panel, select the action for the condition
from the Actions drop-down list. For example,
to hide the control being chained to, select Hide.
Populate, show is the default option.
- Close the Settings panel.
When running the HTML page, the action for the chained control is applied.
- Insert a report with parameters in the HTML canvas.
-
Drag control objects on the Parameters tab to create
a chain.
Chains are represented by lines connecting control objects on the Parameters tab.
Chaining controls will populate parameters with values at run time, based on values selected in prior controls on the chain.
- Click a link in the chain.
-
In the Setting panel, select the chaining logic for the
parameter being chained to, in the condition, from the Values compare
operator drop-down list.
Equal is the default option.
The compare operator is applied to the value selected.
- Insert a report with parameters in the HTML canvas.
-
Drag control objects on the Parameters tab to create
a chain.
Chains are represented by lines connecting control objects on the Parameters tab.
Chaining controls will populate parameters with values at run time, based on values selected in prior controls of the chain.
- Click a link in the chain.
-
In the Setting panel, click the New icon
to create a multiple condition for the chain.
Condition(n) is created, where (n) is the number, and added to the Conditions drop-down list, and the Selected values section is activated. You may type in a unique condition name.
-
You may type selected values in the input box or click
the ellipsis button to select values from the list.
The list of values that appears is based on the values of the prior bound control in the chain.
Tip: You may also use the pop-up icons to select a field and close the pop-up dialog. The green icon is OK, the red icon is Cancel, double-clicking a value will select the value and close the dialog without using any button, and pressing the Esc key will cancel the dialog without using any button.
When selected values are entered, the Multiselect operator field is activated.
-
Select the chaining logic for the selected values from
the Multiselect operator drop-down list.
- One of is based on one of the values shown in the Selected values, being selected in the prior control, in the chain. This is the default selection.
- All of is based on the value of all of the Selected values, being selected in the prior control, of the chain.
The selected values and multiselect operator are applied to the condition.
It is recommended that you populate the controls first, before chaining. When you populate first certain information is obtained that allows the determination of the best choice for Resolves parameter. If you chain first and then populate, the information cannot be obtained because the chaining is already established. If you chain first, you must manually set Resolves parameter.
- Insert a report with parameters in the HTML canvas.
-
Drag control objects on the Parameters tab to create
a chain.
Chains are represented by lines connecting control objects on the Parameters tab.
Chaining controls will populate parameters with values at run time, based on values selected in prior controls on the chain.
- Click a link in the chain.
-
In the Setting panel, click the Resolves parameter ellipsis
button to select a parameter name to resolve. If a custom procedure
that has a filter (or filters) populates the control, the values
list shows the parameters from the filters. If a data source populates
the control, the values list shows all of the fields from the data
source shown in the Object Inspector.
The value in the Resolves parameter field should be either:
- The field name that limits the values for the next control in the chain, if a data source populates the control.
- The parameter name from the procedure, if a procedure populates the control.
In most cases, this value will be populated by default and will not need to be changed.
Tip: You may also use the pop-up icons to select a field and close the pop-up dialog. The green icon is OK, the red icon is Cancel, double-clicking a value will select the value and close the dialog without using any button, and pressing the Esc key will cancel the dialog without using any button.
- Close the Settings panel.
The parameter value is resolved in the chain if no filter is specified.
An example of when to apply chaining logic is when a form offers two lists of dates so that you can select a FROM/TO date range. By chaining these parameters together and applying the Greater than parameter compare operator, this ensures that when a date is selected for the FROM parameter, only dates that follow the FROM date display in the TO date control, eliminating the possibility of selecting an invalid date range.
- Insert a report with parameters in the HTML canvas.
-
Drag control objects on the Parameters tab to create
a chain.
Chains are represented by lines connecting control objects on the Parameters tab.
Chaining controls will populate parameters with values at run time, based on values selected in prior controls on the chain.
- Click a link in the chain.
-
In the Setting panel, select the chaining logic option
from the Compare operator drop-down list. This sets the compare
operator to populate the control.
Equal is the default option.
The compare operator is applied to the parameter selected.
You may enable cache processing for chained values in two ways:
- Enable the caching option for the HTML page and all objects on the page.
- Enable cache run time data for a dynamic control or a condition.
A chain contains conditions for each link in the chain. The conditions are linked to the values being bound to the control object. If you change the options for the condition, it will also be applied to the control, and vice versa.
Caching options are turned off by default.
-
To enable caching options for all objects on the
HTML page, in the App Studio Options dialog box:
- Select the HTML Page tab.
- Select Default caching option.
- Click OK to close the App Studio Options dialog box.
-
To enable caching options for a dynamic control or condition:
A chain contains conditions for each link in the chain. The conditions are linked to the values being chained to the control object. If you change the options for the condition, it will also be applied to the control, and vice versa.
For a dynamic control:
- Create a dynamic input control to supply parameter values.
- Select the dynamic control object from the Parameters tab.
The Settings panel opens, showing the dynamic control options.
- Select Cache run time data to cache the
run time data for the selected input control.
Note: This setting overrides the Default caching option from the HTML Page tab, in the App Studio Options dialog box.
- Select the center of the control object and drag the control
to the center of the next control object.
When binding controls, the conditions inherit the values set in the dynamic control settings.
For a dynamic condition:
- Click a link on the chain to open the Settings panel for the condition.
- Select Cache run time data to cache the
run time data for the selected input control. This option is only
available for dynamic controls.
This setting overrides the Default caching option from the HTML Page tab, in the App Studio Options dialog box.
When running the HTML page, data for the chained value is cached to improve performance.
If a control or parameter has two or more incoming bindings, one of those bindings can be set as the default link. This ensures that population occurs in the control or parameter. When a control or parameter has multiple incoming bindings, the shortcut menu for each of those bindings has the Default link option, as shown in the following image.
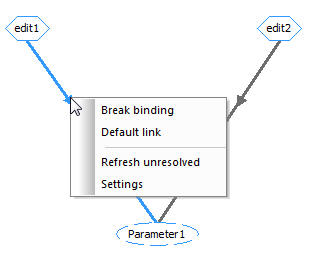
When a binding is the default link, it will have a check mark next to the Default link option in the shortcut menu, as shown in the following image.
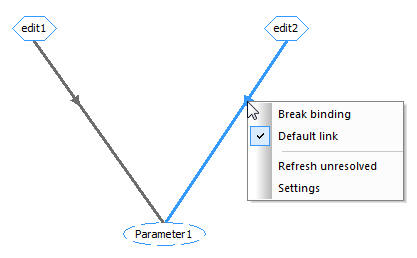
Note:
-
If only one control is chained to another control, the Default link option is unavailable from the shortcut menu. If a single control is chained to a single parameter, the Default link option is shown, but will be used for future development in a later release.
-
The first incoming binding that you create is automatically set as the default link when you create additional bindings. The first incoming binding is populated automatically. All additional bindings need to be populated manually using the Settings panel.
If two controls are chained to a third control, the binding that has Default link selected shows which control will be used to populate the third control by default. Similarly, if two controls are bound to a parameter, the Default link option shows which control is used to populate the parameter.
If two parameters are bound to a control, the binding that has Default link selected makes the initial selection in the control.