PMF Dimensions
|
How to: |
PMF supports 16 user-configurable dimensions that can go to 16 levels deep, so you can describe complex multi-dimensional structures. There is only one default dimension in PMF, the Time dimension, and multiple Time dimensions are supported.
The following steps are helpful for analyzing your dimensions:
- Ask users to describe how they understand their organization structure. This may relate to their customers, locations, and products.
- Speak to more than one business representative to understand the view of the business. It is important to speak with personnel who know the business.
- Speak with Information Technology (IT) personnel and Database Administrators (DBAs).
- The default Time dimension is built in the data load process by specifying the start and end year values, where the end year is one year ahead of the current year.
- You can create and use an Organization dimension to control data security access across the organization. PMF enables you to filter measures data by specifying for users, or groups of users, the level of data access depending on dimensional values.
- If you create a Customer dimension (which is recommended), consider the following example for a vendor who deals with many clients. Level 1 is the organization or business name and level 2 is the contact name at the customer site.
- Understand
how the business is divided geographically.
Consider a high level break-down of region where there are four regions in the USA and two regions in Canada. From the standpoint of collecting data, decide whether you keep the data in six regions, or two countries with regions as the next level.
- Levels in dimensions must make sense. In a geographical example, in the United States, putting State below City is incorrect.
- Consider systems where there are input capable fields for text entries such as states and provinces. These are highly prone to error and it is better to define a set of accepted names for these states and provinces rather than build a list of names from data that could have many inconsistent spellings.
- For fields that have a large number of possible values, but the data only uses a subset, consider populating that dimension with the content of the data.
- Ensure that the dimensions are available. Either they are in an existing data file or they must be input into a flat file or spreadsheet for loading.
At the end of dimension gathering, an agreement must be reached on the types of dimensions, their levels, and the contents at each level. No loading of dimensions should occur prior to the sign-off of the agreement.
Procedure: How to Create a New Dimension
The following procedure outlines the steps required when creating a new dimension. For information about editing an existing dimension, see How to Design a Simple Dimension Load.
- In the Manage page, click the Dimensions panel button.
- Click New.
The New Dimension panel opens.
Note: You can also click New in the Edit Dimension panel to create a new dimension.
- Enter a name for the dimension in the field box.
- From
the drop-down menu, select one of the following options:
- Harvested from Data. Choose this option to immediately start creating a structure from a preexisting data source.
- Collected from Users. Choose this option if you want to create a structure yourself.
- Do one of
the following:
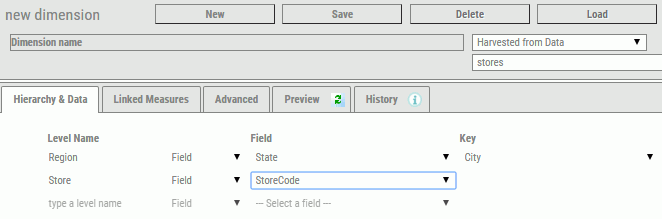
- If you chose Harvested
from Data, enter a Level Name and set its properties.
As you enter information for each line, a new one opens, as shown
in the following image.
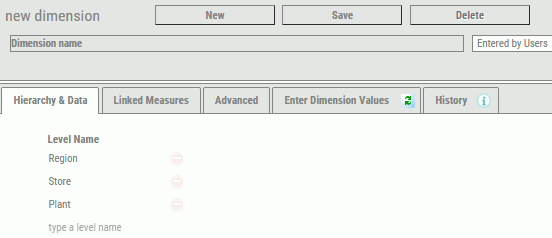
- If you chose Entered
by Users, start by creating a structure in the Hierarchy
& Data tab by entering Level names, as shown in the following
image.
Click Save.
Click the Edit Dimension Values tab to set dimension properties for the Levels that were created.
- If you chose Harvested
from Data, enter a Level Name and set its properties.
As you enter information for each line, a new one opens, as shown
in the following image.
- Click Save.
Procedure: How to Edit a Dimension
- In the Manage page, click the Dimensions panel button.
- Click the
dimension you want to edit in the tree.
The Edit Dimension panel opens.
- Using the
drop-down lists for each dimension, make your desired changes and
click Save.
Note: To change the order of the dimension levels, place the mouse over the dimension you wish to move and use the
 icon
to drag the dimension up or down.
icon
to drag the dimension up or down.
Procedure: How to Preview a Dimension Load
- In the Manage page, click the Dimensions panel button.
- Click the
dimension you want to edit in the tree.
The Edit Dimension panel opens.
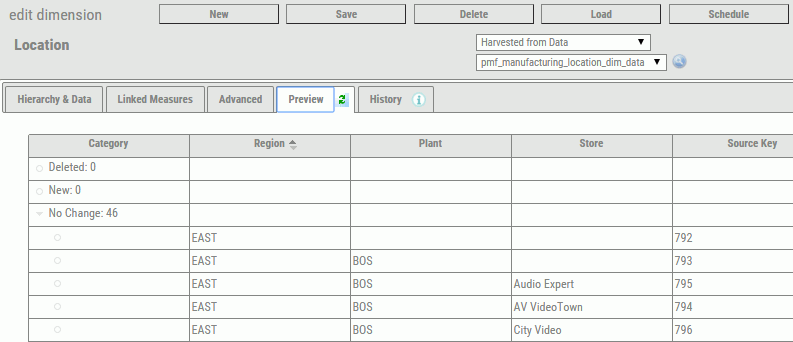
- Click the Preview tab.
The Dimension Load information opens, as shown in the following
image.
To refresh the Preview contents, click the Refresh icon that is shown on the Preview tab.
Procedure: How to Rename a Dimension
- In the Manage page, click the Dimensions panel button.
- Click the
dimension you want to rename in the tree.
The Edit Dimension panel opens.
- Click the dimension name at the top of the panel tab. The field becomes editable.
- Enter the new dimension name and click Save. The dimension is automatically renamed throughout PMF.
Procedure: How to Delete a Dimension
- In the Manage page, click the Dimensions panel button.
- Click the
dimension you want to delete in the tree.
The Edit Dimension panel opens.
- Click Delete.
A delete confirmation dialog box opens.
- Click OK.
When a dimension is deleted, all measures that were linked to it have their dimensional linkage deleted. The measure records are automatically re-summarized, and any orphaned extra records are automatically cleaned up.
Note: Re-summarization is a one-time change and cannot be reversed. Once you perform a re-summarization, measure values are now permanently changed. It is strongly recommended that you take a snapshot of your PMF data mart before making this change.