- Right-click an application directory and select New,
then Flow.
- Right-click the SQL object and select Add,
then Join.
- Right-click the Join object and select Add,
then Source.
The Select synonym panel
opens.
- Select checkjob and click Select.
- Right-click on Join object and select Add,
then Source.
The Select synonym panel
opens.
Select the target synonym for the flow you created
to load data, such as jobbatch, and click Select.
- Double-click the Join object to open it. Under Left Source,
right-click Name and select Field
View. Scroll down and select the JOBID field.
Under Right Source, select the JOBID field.
Click the
 button. The Join Editor should
look like the following image.
button. The Join Editor should
look like the following image.
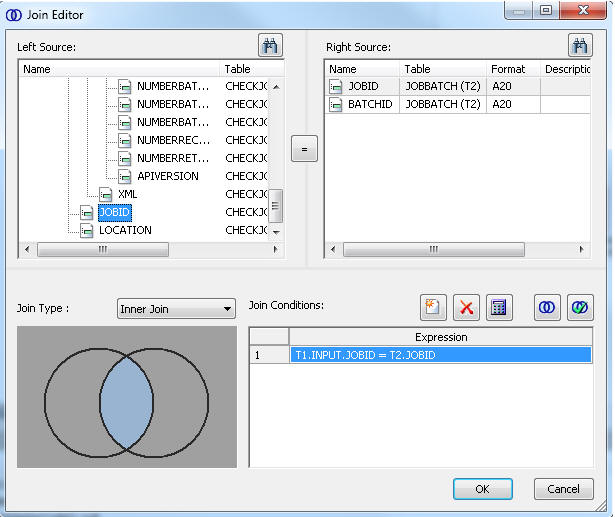
Click OK.
- Double-click the SQL object to open it.
The Column Selection
window opens.
Select all seven fields in the segment BATCHINFO.
- Click OK to close the window.
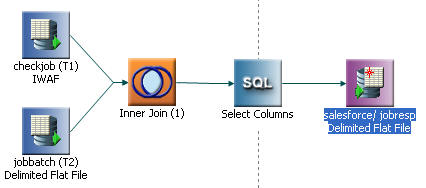
- Right-click the workspace to the right of the SQL object and
select Add Target, then New.
The data flow should look like the following image.
- Right-click the target object and select Properties.
The
target properties window opens.
- Select an available adapter, such as Delimited Flat file. Enter
an application directory and synonym name, such as salesforce/jobresp.
- Enter a location for the table or file, such as salesforce/jobresp.ftm.
Enter a comma (,) for the field delimiter and select Yes for
the Header.
- Click the Save button to save the flow.
The
Save Procedure as window opens.
Enter a name for the flow,
such as check_job_request. Click Save.