Creating and Using Reusable Transformations
There are many situations where you need to perform
the same calculation on several different columns. It could be something
as simple as converting a date to a different format, adding dashes
to an id number so that it displays as you would expect a social
security number to display, or something much more complex that
requires you to perform the same calculations on different columns
of data. Instead of coding the calculation over and over for each
column, it would be more efficient to create the calculation once,
and then use it whenever you need that calculation. In essence,
you create a reusable transformation.
Before you build the transformation, you must first create the
function to perform the necessary transformations. Functions are
created in the DMC as a server object with the type Define Function.
This technique is divided into two parts. In the first part,
we build the function. In the second, we use the function in transformations
within a data flow, then incorporate the data flow object into a
process flow to make it available at execution time. In the following example,
we build two functions:
-
DMPROPER converts
a name to last name, first name format, where the first letter of
each name is in upper case and the rest of the name is in lowercase.
-
DMDATFMT converts
a date to 2009-JUL-04 format, which includes dashes between the
year, month, and day.
These routines are stored in a stored procedure which is identified
in the Data Management Console with a distinguished icon and a type
of Userin Functions. In the following example, DMHR, a human resource
table, is the data source, and the extracted records are loaded
into a new data target named EMPDATES. Employee name (PROPERNAME),
start date (START), and termination date (TERM) are calculated using
the define functions.
Refer to the sample data flows in the ibisamp directory, DMREUSE,
for the complete example. The User Functions procedure DMFNS contains
the sample function DMPROPER and DMDATFMT.
Example: Creating the DEFINE Functions
The
first function, which we call DMPROPER, takes two parameters, a
last name and a first name. It returns a formatted proper name.
In
the DMC:
- Right-click
an application directory in the navigation pane, select New,
and then click User Functions.
The Define
Function View opens in the workspace in tree view.
- Click FUN1
and change the name to DMPROPER.
- Under the Parameters
folder, click PARAM1. Its properties panel
opens to the right. In the PARAM field box, click the PARAM1 value
and type the name of the first parameter LASTNAME.
In the FORMAT field box, type in the value A17.
Remove 1 from
the DEFAULT field box in the Miscellaneous section. Select the Show
Field List check box.
- Right-click
the Parameters folder, select Insert,
and then click Parameter. In the PARAM field
box in the properties panel, click the PARAM1 value
and type the name of the first parameter FIRSTNAME.
In the FORMAT field box, type in the value A14. Under Miscellaneous,
select the Show Field List check box.
- Under Defines
folder, click DMPROPER. Its properties panel
opens to the right. In the EXPRESSION field box, click the ellipsis
 button.
The
Define Calculator opens.
- Enter A34V in
the Format field.
Type the following in the Expression field and
click OK to close the calculator:
LCWORD(17, LASTNAME, 'A17') || (', ' | LCWORD(14, FIRSTNAME, 'A14'))
- Click Save
As in the Quick Access Toolbar and save the function
file as dmfns.
The second function
converts a date to a common format.
- Right-click DMFNS,
select Insert, and then click Function.
A
new function prototype is added.
- Click FUN1 and
change the name to DMDATFMT.
- Under the
Parameters folder, click PARAM1. Its properties panel
opens to the right. In the PARAM field box, click the PARAM1 value
and type the name of the first parameter INDATE.
In the FORMAT field box, type in the value YYMD and
in the DEFAULT field box under the Miscellaneous section, type in
the value &YYMD. Select the Show field
list check box.
- Right-click
the Defines folder, select Insert,
and then click Define. In the DEFINE field
box in the properties pane, click the DEFINE1 value
and type the name of the parameter CONVDATE.
In the EXPRESSION field box, type in the value
DATECVT( INDATE, 'YYMD', 'A8YYMD' )
In
the FORMAT field box, type in the following value:
A8YYMD
- Click OK to close the calculator.
- Under the
Defines folder, click DMDATFMT. Its properties panel
opens to the right. In the EXPRESSION field box, type in the following
value:
CHGDAT( 'YYMD', 'YYMTD', CONVDATE, 'A11' )
In
the FORMAT field box, type in the following value:
A11
- Test the transform
by selecting the function name DMDATFMT.
Click the Test Function
 button.
The
Test Function window opens. Under Value, enter a numeric date, such
as 20120202. The Report window opens, showing the default value
of today’s date.
- Click Save from
the Quick Access Toolbar.
Note: When creating
a define function, the following names must be the same:
- The name of
the function.
- The name of
the last define in the function.
Example: Using the DEFINE Functions
In
the DMC:
- Right-click
an application directory in the navigation pane, select New,
and then click Flow. The Data Flow tab opens
in the workspace, with the SQL object displayed.
- Drag the data
source object DMHR from the ibisamp application
directory in the navigation pane into the workspace, to the left
of the SQL object.
- Right-click
the DMHR object and click Source Transformations.
The
Source Transformations window opens.
- Click the Insert
Transforms
 button.
The Transformations
Calculator opens.
- Enter PROPERNAME in
the Name field and A30 in the Format field.
- Click the Functions tab
and expand the User Defined folder, followed
by the baseapp directory and the dmfns procedure,
as shown in the following image.
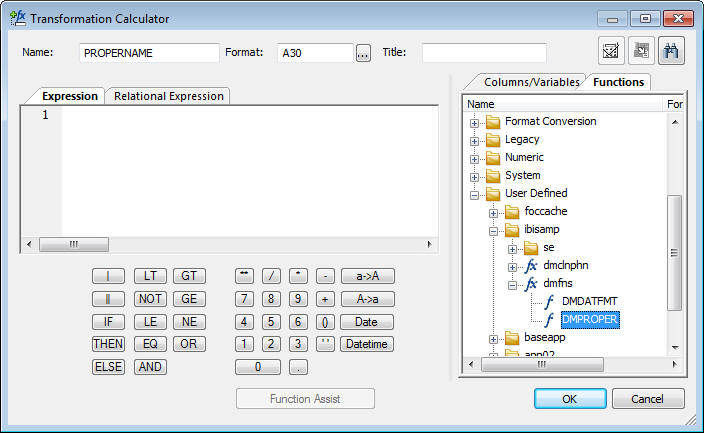
- Double-click DMPROPER.
The Function
Assist window opens. Select LNAME and FNAME from
the Field list drop-down menus for the parameters, as shown in the
following image.

- Click OK to
close the Function Assist window and the Transformation Calculator.
- Click the Insert
transforms button.
- Enter START
in the Column field and A12 in the Format field.
Click the Functions tab.
Expand the User Defined folder, the baseapp directory,
and the dmfns procedure.
- Double-click
the DMDATFMT function. The function assistant
opens. Select START_DATE as the parameter for the function.
Click OK to
close the Function Assist and the Transformations Calculator.
- Click the Insert
Transforms button. Enter ENDDATE in
the Column field and A12 in the Format field.
- Click the
ellipsis button
in the Format field. Select the Show Advanced Properties check
box and select the Allow Missing Data check
box.
Repeat the above procedure to select the DMDTEFMT function,
using TERM_DATE as the parameter.
- When you have
completed the transformations, the Source Transformations window
opens.
- Click OK to
close the Transformations window.
- Right-click
the SQL object and click Column Selection.
The
Column Selection window opens.
- In the Available
Columns list, select PROPERNAME, START,
and ENDDATE and click the arrow to add them
to the Selected Columns list.
- To test the
transformations, click the Test SQL Statement button.
Note that the transformations are correct, with PROPERNAME correctly
defined, and the correct START and ENDDATE dates.
- Click X to
close the Test SQL window, and OK to close
the Column Selection window.
- Right-click
the workspace to the right of the SQL object, select Add Target,
and then click New.
- In the new
target, right-click and click Properties.
- In the Properties
panel, select the Adapter you used for your sample procedures, the
application directory you are using for your samples, and enter EMPDATES as
the synonym. Click X to close the panel.
- Save the flow
as DMXREUSE.
- On the Flow
tab, in the Run group, click Run, and then select Submit from
the drop-down menu.
To verify that the transformations
have worked properly, click the Data Flow tab
and right-click the EMPDATES data target
and select Toggle. Click the Sample
Data tab to review the output.