PMF provides a rich model of mechanisms that control how metrics are evaluated against their targets and interact with each other. To give you a better understanding of how metrics are evaluated, this section provides a model of the indicators PMF works with to calculate the grading of measures:
There are alternate ways of expressing how your metrics are performing. You can define new scales or grading systems for displaying indicators. For example, you can display scales such as 1-10 or A-J, alongside the standard red/yellow/green stop lights. You can also establish your own criteria for how these grading systems are defined. Grading systems can be based on scoring scales, indicators (colored dots, graphical, or character-based), or both. Grading systems are based on setting a varied number of breakpoints in a range of percent achieved. These breakpoints can then have tolerances set globally or dimensionally. Multiple grading systems can be applied at the same time, but only one grading system can control the indicators for all metrics.
Note: There is no user interface for establishing new grading systems. Setting up new grading systems requires direct manipulation of the PMF data mart and the assistance of a qualified PMF consultant.
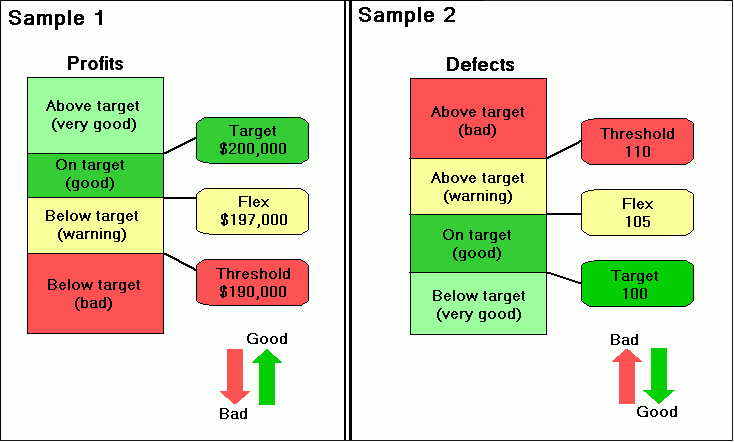
The following image provides two samples of how designing an indicator works.
In Sample 1, the target value for the measure (profits) is set to $200,000. The direction is ascending, the threshold is $10,000, and the flex is $3,000. If the actual profit is:
In Sample 2, the target value for the measure (defects) is set to 100. The direction is descending, the threshold is 10, and the flex is 5. If the actual number of defects is:
Clicking the Threshold/Flex button in the Edit Measures panel opens a pop-up dialog box where you can adjust the threshold and flex values for a measure by clicking and dragging the Threshold and Flex flags in either direction to change the values. The following image shows an example of the pop-up dialog box used for adjusting descending threshold and flex values.
This will be deprecated in a future release.
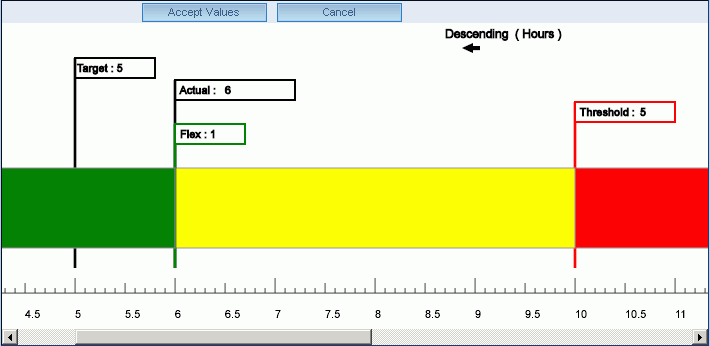
For more information about adjusting threshold and flex values, see How to Adjust the Threshold and Flex Values.
The following image shows how to design an indicator for the range direction.
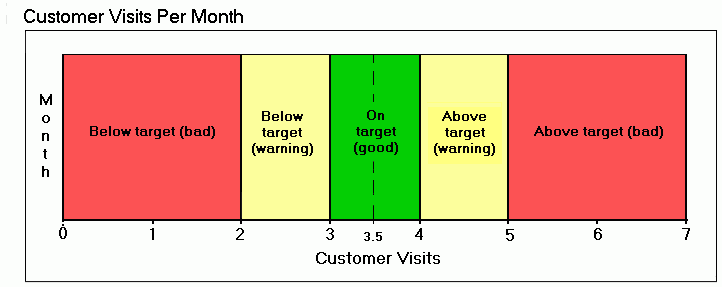
In this example, the target value for the measure (customer visits per month) is set to 3.5. The threshold is 1.5 and the flex is .5, meaning that you should have at least 2, but not more than 5, customer visits per month. Ideally, you should have between 3 and 4 customer visits per month. If the actual number of customer visits per month is:
Clicking the Threshold/Flex button in the Edit Measures panel opens a pop-up dialog box where you can adjust the threshold and flex values for a measure by clicking and dragging the Threshold and Flex flags in either direction to change the values. The following image shows an example of the pop-up dialog box used for adjusting a range of threshold and flex values.
This will be deprecated in a future release.
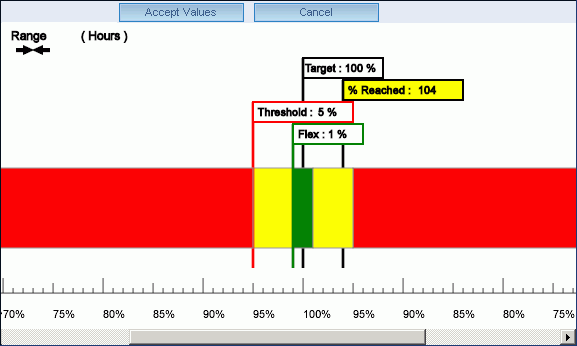
For more information about adjusting threshold and flex values, see How to Adjust the Threshold and Flex Values.
| WebFOCUS |