Migration Using Quick ETL Copy With the MySQL JDBC Driver
Quick ETL Copy using the MySQL JDBC driver allows for
migration of individual Hyperstage MySQL tables to Hyperstage for
PostgreSQL. Once you have installed and configured the JDBC Driver
on your machine, you will access the Reporting Server Web Console
to configure the adapter connection and run the Quick ETL Copy.
Note: You must access the Hyperstage version of the Reporting
Server Web Console to complete these steps.
x
Procedure: How to Install and Configure the MySQL JDBC Driver
To
install the MySQL JDBC driver:
-
Download the installation file for the MySQL JDVX
driver from the following location: http://dev.mysql.com/downloads/connector/j/.
-
From the Select Platform drop-down menu, select Platform Independent,
as shown in the following image.
-
In the Platform Independent (Architecture Independent),
ZIP Archive row. click Download.
The mysql-connector-java-5.1.35.zip file is downloaded.
-
Unzip mysql-connector-java-5.1.35-bin.jar to the
desired location, for example, C:\ibi\SQLJDBC, as shown in the following image.
x
Procedure: How to Configure the Hyperstage MySQL JDBC Adapter Connection
-
Launch the Web Console and click the Adapters tab.
-
Expand Available, and then expand
the SQL and Hyperstage folders,
as shown in the following image.
-
Right-click JDBC, and then click Configure,
as shown in the following image.
The Add Hyperstage
JDBC to Configuration window opens.
-
Complete the following fields:
- In the Connection Name box, type a name for the connection.
- In the URL box, type the JDBC URL in the following format: jdbc:mysql://host:port/webfocus?useCursorFetch=true&/defaultFetchSize=50000
- In the Driver Name box, type com.mysql.jdbc.Driver.
- In the IBI_CLASSPATH box, add the fully qualified path of the
JDBC Jar file, for example, C:\ibi\SQLJDBC\mysql-connector-java-5.1.35-bin.jar.
- In the Home Directory box, enter the location of the home directory
for Hyperstage MySQL, for example, C:\HyperstageMySQL.
- In the Tools Directory box, type the location of the tools directory
for Hyperstage MySQL.
- Type the User and Password for the MySQL database.
The
following image shows the window with all fields completed.
-
Click Configure.
x
Procedure: How to Run Quick ETL Copy
-
Ensure that the Lite mode for Quick
ETL Copy is turned off.
-
Launch the Web Console and click the Adapters tab.
-
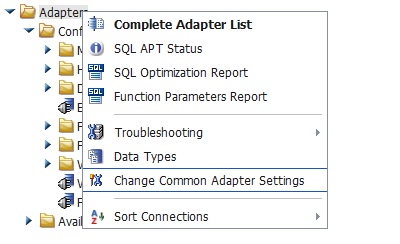
Right-click Adapters and then
click Change Common Adapter Settings, as
shown in the following image.
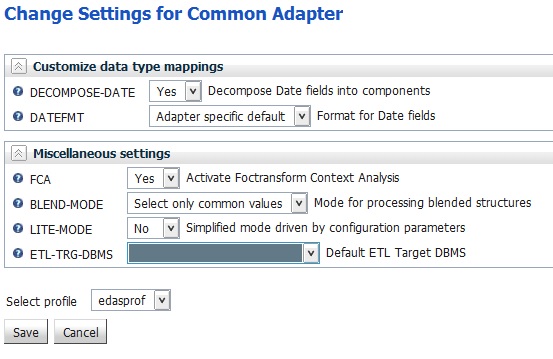
The
Change Settings for Common Adapter window opens.
-
From the LITE-MODE drop-down menu, select No.
-
From the ETL-TRG-DBMS drop-down menu, select blank space,
as shown in the following image.
-
Click Save.
-
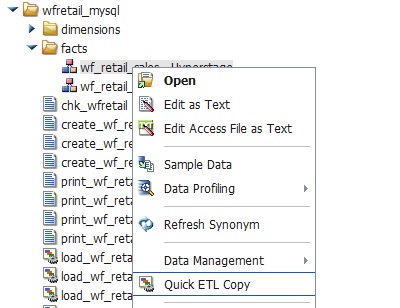
Right-click the Hyperstage MySQL Master file for the
data to be migrated, and then click Quick ETL Copy,
as shown in the following image.
-
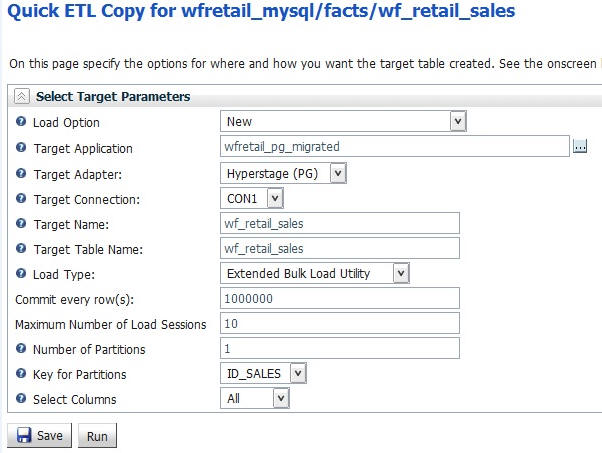
Select a Target Application for the Hyperstage PostgreSQL metadata.
-
From the Target Adapter drop-down menu, select Hyperstage
(PG).
-
From the Load Type drop-down menu, select Extended
Bulk Load Utility.
The following image shows the Quick ETL Copy window with
all of the fields completed.
-
In order for the Partition parameters for Quick ETL Copy
to appear, the KEYS attribute must be set in the Access File that
pertains to the MySQL table.
For example:
SEGNAME=FACT_SALES,TABLENAME=wrd_fact_sales,CONNECTION=CON1,KEYS=1,$