|
|
|
Creating Business Rules
|
How to: |
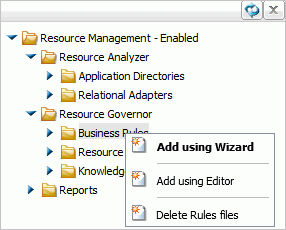
When you right-click the Business Rules folder, a context menu is available, as shown in the following image.
For additional information about building rules with BRL, see Business Rule Language (BRL).
|
|
|
Procedure: How to Create a New Business Rule Using the Wizard
- Launch the Web Console.
- Click the Resource Management option on the toolbar.
- From the navigation pane, right-click Business Rules and select Add using Wizard.
The Resource Governor New Business Rule pane opens, as shown in the following image.
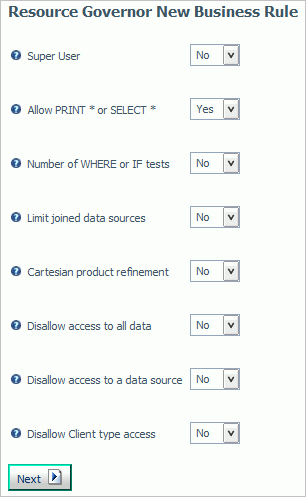
The Resource Governor New Business Rule pane has the following options:
- Super User
-
A user ID that is entered into the rules that will be allowed to execute any request that may be canceled by the governor under normal operating. A user ID may be up to 48 characters in length. Selecting Yes from the drop-down menu will open a text field for the user ID input.
- Disallow PRINT * or SELECT *
-
This setting allows the user to set whether or not a rule will be written. If Yes is selected, a rule will not be created and a SELECT or PRINT * may be used at any time in a data request. If No is selected, a rule will be written disallowing the condition regardless of any other rules in the source. The default value is Yes.
- Number of WHERE or IF tests
-
This setting allows you to specify the number, and name, of a condition.
- How many tests? Allows you to specify that a certain number of conditions or relational clauses are required on a data request. Values can be 0-256. The default value is 0.
- With a field name? Allows you to require a specific field name.
- Limit joined data sources
-
The number of data sources used in the request. The limit is 16 and the default value is 0, or No. Selecting Yes will open a text field for input.
- Cartesian product refinement
-
A Cartesian product occurs when two or more data sources are joined without any selection criteria. This produces an uncontrolled display of all possible connections between that tables. Requiring a WHERE or IF refinement prevents a Cartesian product from being issued. If Yes is selected then one or more WHERE or IF clauses must be used to limit the data returned by the request that uses more than 1 data source. If No is selected then all data for the request columns in the joined data sources will be returned. You do not have a rule that requires all requests to have a WHERE or IF test to use this rule, but if the rule that requires all requests to have a WHERE or IF test is active then this rule is not required.
- Disallow access to all data
-
Allows you to specify a time of day when data reporting is not allowed. The times are based on a 24 hour clock. The values allowed are 0000-2359.
- Disallow access to a data source
-
Allows you to disable a data source name from reporting availability.
- Disallow Client type access
-
The type of Client being used to submit a request can be tested for and if necessary the request can be canceled. For example any request that is submitted from Report Caster can be limited to specific times of the day or to a specific service of the server.
- Make your selections from the standard rules and click Next.
- In this example, set Disallow PRINT* or SELECT* to No and Limit joined data sources to Yes. When Limit joined data sources is set to Yes, an additional box opens. Enter 3 in the field provided.
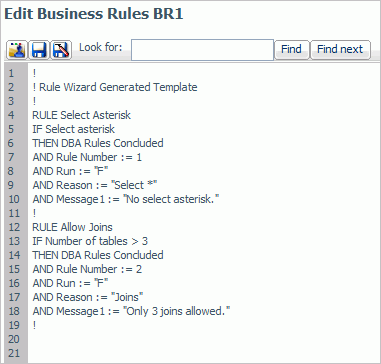
The New Business Rules window opens showing the generated code, as shown in the following image.
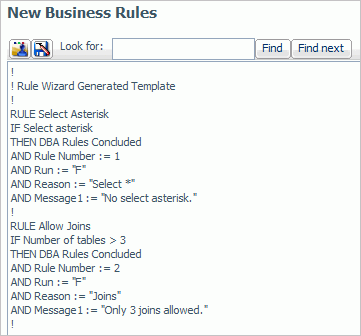
The New Business Rules window has the following buttons:
- Verify Rules

-
Allows you to verify BRL syntax at any point while building rules. If there are no syntax errors, control is returned to the editor window with the rule text. If there are errors, a dialog displays error messages.
Note: The errors need to be corrected before you can continue.
- Save As

-
Saves the new rule.
- Verify Rules
- Click the Save As button.
- Enter a name for the new business rule, (for example, br1), and click Save.
Note: All business rules names in Resource Governor must be eight characters or less.
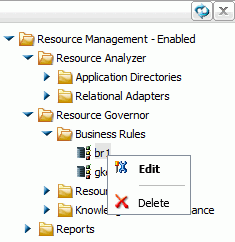
The new business rule is now listed in the expanded Business Rules folder in the navigation pane.
|
|
|
Procedure: How to Create a Business Rule Using the Editor
- Launch the Web Console.
- Click the Resource Management option on the toolbar.
- From the navigation pane, right-click Business Rules select Add using Editor.
The New Business Rules window opens.
- Enter the code for the new business rule, click the Verify Rules icon to check your code. Correct any errors and then click the Save As button.
For more information on building rules with BRL, see Business Rule Language (BRL).
|
|
|
Procedure: How to Delete Rules Files
- Launch the Web Console.
- Click the Resource Management option on the toolbar.
- From the navigation pane, right-click Business Rules select Delete Rules files.
A confirmation dialog box opens.
- Click OK. The rule will be deleted from the Business Rules folder.
