After you have completed the configuration of the XML definition file (for example, esriconfig_new.xml) for your application using the ESRI Configuration Utility, you must create an HTML file, which will be used to call the WebFOCUS GIS Viewer for Flex.
WebFOCUS Developer Studio provides direct integration with the WebFOCUS GIS Viewer for Flex and allows you to create an HTML file where you can add all of the numerous controls, report objects, and map objects for your application.
For more information, see the Designing a User Interface for a Web Application With the HTML Composer documentation.
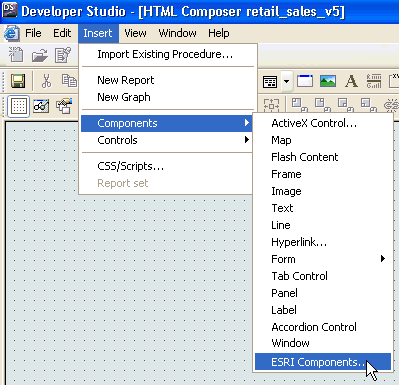
In the HTML Composer tool of WebFOCUS Developer Studio, click Insert, select Components, and then click ESRI Components, as shown in the following image.

You can then click and drag the crosshair to the desired size for the WebFOCUS GIS Viewer for Flex controls and report. The WebFOCUS GIS Viewer for Flex component will contain a number of controls, a report, and a map object. It is recommended that the WebFOCUS GIS Viewer for Flex component be drawn large enough to accommodate all of these items.
You will then choose the XML definition file (for example, esriconfig_new.xml) to use with the WebFOCUS GIS Viewer for Flex component.
Note: The following line must be present in your XML definition file for you to pass parameters from the controls to the map object and from the map object to the report.
<callback identify="parmcollect" map="IBI_GetLayoutPainterParameters"
report="IBI_GetLayoutPainterParameters"/>
The New Parameter dialog box will open and you will be able to change the options for the parameters contained within the WebFOCUS GIS Viewer for Flex component. The WebFOCUS GIS Viewer for Flex component will then be inserted into the HTML page.
Note: Controls and reports within the WebFOCUS GIS Viewer for Flex can be chained. Maps within the WebFOCUS GIS Viewer for Flex component cannot be chained.
| WebFOCUS |