The letters on the left correspond to the notes explaining the code.
Procedure: SCROLL
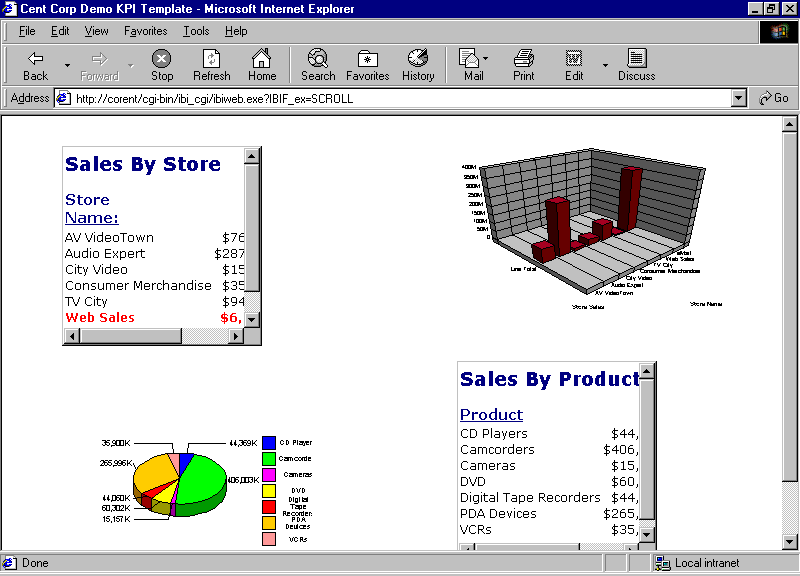
   SET PAGE-NUM=OFF

   TABLE FILE CENTORD
   HEADING
   "Sales By Store"
   SUM LINEPRICE AS 'Sales'
   BY SNAME
a. ON TABLE SET STYLE *
b. TYPE=HEADING, CLASS=HEAD, $
b. TYPE=TITLE, CLASS=TITLE, $
   TYPE=REPORT, GRID=OFF, $
   TYPE=DATA,COLUMN=SNAME,COLOR=RED,STYLE=BOLD,
   WHEN=LINEPRICE LT 10000000,$
   TYPE=DATA,COLUMN=LINEPRICE,COLOR=RED,STYLE=BOLD,
   WHEN=LINEPRICE LT 10000000,$
   ENDSTYLE
   ON TABLE HOLD AS CREPORT1 FORMAT HTMTABLE
   END

    GRAPH FILE CENTORD
    SUM LINEPRICE
    ACROSS SNAME
a.  ON GRAPH SET STYLE *
    UNITS=IN, LEFTMARGIN=0.250000,
        RIGHTMARGIN=0.250000, TOPMARGIN=0.250000,
        BOTTOMMARGIN=0.250000, SQUEEZE=ON, ORIENTATION=PORTRAIT, $
    DEFMACRO=COND0001, MACTYPE=RULE, WHEN=N1 LE    100000.00, $
    TYPE=REPORT, FONT='VERDANA', SIZE=10, BACKCOLOR=NONE,
        STYLE=NORMAL, $
    TYPE=DATA, ACROSSCOLUMN=N1, COLOR=RGB(144 24 24), $
    TYPE=DATA, ACROSSCOLUMN=N1, COLOR=YELLOW, MACRO=COND0001, $
    ENDSTYLE
    ON GRAPH SET LOOKGRAPH 3D_BAR
    ON GRAPH SET GRAPHEDIT OFF
    ON GRAPH SET GRAPHSTYLE *
    setConnectLineMarkers(true);
    setO1LabelDisplay(true);
    setO1AxisSide(0);
    setO1MajorGridDisplay(false);
    setO1MinorGridDisplay(false);
    setY1LabelDisplay(true);
    setY1AxisSide(0);
    setY1MajorGridDisplay(false);
    setY1MinorGridDisplay(false);
    setPieFeelerTextDisplay(1);
    setPieLabelDisplay(0);
    setTextFormatPreset(getPieSliceLabel(),1);
    setLegendDisplay(true);
    setFootnoteString("Store Sales");
    setTextJustHoriz(getFootnote(),1);
    setFontStyle(getFootnote(),2);
    ENDSTYLE
    ON GRAPH SET BARNUMB OFF
    ON GRAPH SET 3D ON
    ON GRAPH SET GRID ON
    ON GRAPH SET VAXIS 200
    ON GRAPH SET HAXIS 300
    ON GRAPH HOLD AS CGRAPH1 FORMAT HTMTABLE
    END

    SET LOOKGRAPH=PIE
    SET GRAPHEDIT=OFF
    SET GRID=ON
    SET BARNUM=ON
    SET 3D=ON
    SET VAXIS=250
    SET HAXIS=250
    GRAPH FILE CENTORD
    SUM LINEPRICE
    BY PRODCAT
a.  ON GRAPH SET GRAPHSTYLE *
    setLegendDisplay(true);
    setTitleDisplay(true);
    setTextRotation(getO1Label(),0);
    setY1LabelFormat(10);
    setO1LabelAutofit(false);
    setO1LabelStagger(false);
    setTextRotation(getO1Label(),0);
    setFontSizeVC(getO1Label(),1500);
    setY1LabelAutofit(false);
    setFontSizeVC(getY1Label(),1800);
    setTextWrap(getLegendText(0),true);
    setRect(getLegendArea(), new Rectangle(9000, -8000,8000, 15000));
    setAutofit(getLegendText(0),false);
    setFontSizeVC(getLegendText(0),850);
    setGroupLabel(0,"Sales By Product");
    setPieTilt(45);
    ENDSTYLE
    ON GRAPH HOLD AS CGRAPH2 FORMAT HTMTABLE
    END

    TABLE FILE CENTORD
    HEADING
    "Sales By Product"
    SUM LINEPRICE AS 'Sales'
    BY PRODCAT AS 'Product'
a.  ON TABLE SET STYLE *
b.  TYPE=HEADING, CLASS=HEAD, $
b. TYPE=TITLE, CLASS=TITLE, $
    TYPE=REPORT, GRID=OFF, $
    ENDSTYLE
    ON TABLE HOLD AS CREPORT2 FORMAT HTMTABLE
    END
c.  -HTMLFORM scrollpg
- These commands indicate the start of a WebFOCUS StyleSheet.
- The CLASS attribute in the WebFOCUS StyleSheet refers to a set of styling characteristics in an external Cascading Style Sheet (SCROLLSS.CSS, which you create in step 3).
- This command calls an HTML display page named SCROLLPG, which you create in step 2. It will incorporate the report output.
In Windows and UNIX, an HTML file called by a -HTMLFORM command must have the extension .HTM.
The display page links to an external Cascading Style Sheet you create in step 3.
HTML Display Page: SCROLLPG.HTM
<!DOCTYPE HTML PUBLIC "-//W3C//DTD HTML 4.0 Transitional//EN">
<html>
<head>
<title>Cent Corp Demo KPI Template</title>
<link rel="stylesheet"
href="/ibi_apps/ibi_html/NewCentCorp/scrollss.css" type="text/css"></head>
<body>
<div class="report1">!IBI.FIL.CREPORT1;</div>
<div class="graph1">!IBI.FIL.CGRAPH1;</div>
<div class="graph2">!IBI.FIL.CGRAPH2;</div>
<div class="report2">!IBI.FIL.CREPORT2;</div>
<div id="toolbar">
<img src="/ibi_apps/ibi_html/NewCentCorp/images/wflogo.gif" width="96"
height="14" border="0" alt="" style="position: relative;
top: 2px;">
</div>
</body>
</html>The letters on the left correspond to the notes explaining the code.
Cascading Style Sheet: SCROLLSS.CSS
a.  { color: Navy;
      font-weight : bold;
    }
    /* the following rule controls the default styling for fonts in
    the application */
    body, td {
      font-family : Verdana, Geneva, Arial, Helvetica, sans-serif;
      font-size : 12px;
      font-style : normal;
      font-variant : normal;
      font-weight : normal;
    /*  width : 10%; */
    /* the rule below allows the scroll bars to be customized */
    scrollbar-base-color : Blue;
    scrollbar-arrow-color : white;
    }
      #toolbar {
        position: relative;
        top: 500;
        left: 0;
        width: 430px;
        height: 20pt;
        padding: 6px;
        background: 0033ff;
        border : thin outset;
    }
    /* the following defines position and properties of top left
       report */
    .report1 { position: absolute;
a.      top: 30;
        left: 60;
        width: 200;
        height: 200;
        border: thin outset;
b.      overflow: auto;
    }
    /* the following defines position and properties of top right
       graph */
    .graph1 { position: absolute;
c.      top: 0;
        left: 440;
        overflow: auto;
    }
    /* the following defines position and properties of bottom left
       graph */
    .graph2 {  position: absolute;
        top: 246;
        left: 60;
        overflow: auto;
        }
    /* the following defines position and properties of bottom right
       report */
   .report2 { position: absolute;
        top: 245;
        left: 455;
        width: 200;
        height: 200;
        border: thin outset;
        overflow: auto;
   }
   /* this class sets the styling for a WebFOCUS heading */
   .HEAD {
d.    font-family: Verdana, Geneva, Arial, Helvetica, sans-serif;
      font-size: 14pt;
      font-weight: bold;
      color: #333366;
      position: relative;
      top: -13px;
   }
   /* this class sets the styling for WebFOCUS column titles */
   .TITLE {
e.    font-family : Verdana, Geneva, Arial, Helvetica, sans-serif;
      font-size : 11pt;
      font-weight : bold;
      color:  Navy;
      /*position: relative;
      top : 3px; */
   }
   /* this rule controls the defaults for all tables */
   TABLE {
     border-collapse: collapse;
     /*  table-layout : fixed; */
   }
   /* the two rules below controls styling for various headings */
   h2 {  font-size: 14pt; color: gold; }
   h3 {  font-size: 14pt; color: white; }
   /* this rule sets the style for the mouse over effect on an
      anchor */
   a:hover {  color: red; }
- Position the first report on the HTML page.
- Create scroll bars if the report cannot be entirely displayed at one time in a frame.
- Position the first graph on the HTML page.
- Set styling characteristics that are applied to WebFOCUS report headings.
- Set styling characteristics that are applied to WebFOCUS column titles.