Generating a Surrogate Key
Many data warehousing applications make use of a surrogate
key instead of using the keys from an operational system like an
alphanumeric employee id or an integer employee number.
A surrogate key is usually an incrementing integer with no intrinsic
meaning. One reason applications use surrogate keys is to improve
the performance of JOINs.
You can build a data flow to load a table that has surrogate
keys by using a self-referential transformation to generate the
values for the surrogate key field.
In the following example, DMSALE, a sales table, is the data
source, and the extracted records are loaded into a table named
DMREPS. Values for the surrogate key REPNO are generated when the
data flow is run.
Refer to the sample data flow DMSURRG for the complete example.
Example: Generating a Surrogate Key in a Data Flow
In
the DMC:
- Right-click
an application directory in the navigation pane and choose New,
then Flow. The Data Flow tab opens in the
right pane, with the SQL object displayed.
- Drag the data
source object DMSALE from the ibisamp application
directory in the navigation pane into the workspace, to the left
of the SQL object.
- Right-click
the SQL object and select Column Selection.
The
Column Selection window opens.
- Select EMPID, PLANT,
and SALESREP in the Available Columns list
and click the arrow to add them to the Selected Columns list. Click OK.
- Drag the data
target object DMREPS from the ibisamp application
directory into the workspace, to the right of the SQL object.
- Right-click
the target object DMREPS, and select Properties.
The
Properties dialog box opens.
- If the flow
may be rerun, you should clear the target using the Prior
to Load Option. For a relational target, select Delete
all rows from table or Truncate Table.
For a FOCUS/FDS target, select Drop Table.
Click OK.
- Right-click
the target object and select Target Transformations.
The
Transformations window opens.
- Double-click REPNO in
the Target Columns list to move it to the Expressions list.
- To create the
surrogate key column, double-click REPNO in the
Expressions tab, or select REPNO and click
the Edit transforms button.
The Transformation
Calculator opens.
- Enter the calculation REPNO
+ 1 in the expression field and click OK.
- Click the Automap button
to map EMPID and PLANT.
This moves them to the Expressions list.
To map FNAME and LNAME,
use substring to extract the necessary characters from the SALESREP
source column of which the first 16 characters are first name and
the next 34 characters are last name.
- Double-click FNAME and LNAME in
the target columns list. This moves the columns to the Expressions
list.
- Double-click
the Transform Expression field for FNAME
to open the Transformations Calculator. Click the Functions tab and
expand the Character folder. Select SUBSTR.
- Select SALSREP from the Source field
drop-down menu. Enter 16 for End type and press Enter. The remaining
values are filled automatically. Click OK.
- Double-click
the Transform Expression field for LNAME
and type the following expression:
SUBSTR (50, SALESREP, 17, 50, 34, 'A34')
Note: While
the creation of a surrogate key does not require the use of the
SUBSTR function it is a useful routine that can be used in a number
of different situations.
- To map STATE,
double-click STATE in the Target Columns list.
This moves the column to the Expressions list.
- Double-click
the Transform Expression field for STATE
and type
DECODE PLANT (BOS MA DAL TX LA CA ORL FL SEA WA STL MO)
This
converts a three-character city name to its two character state
code.
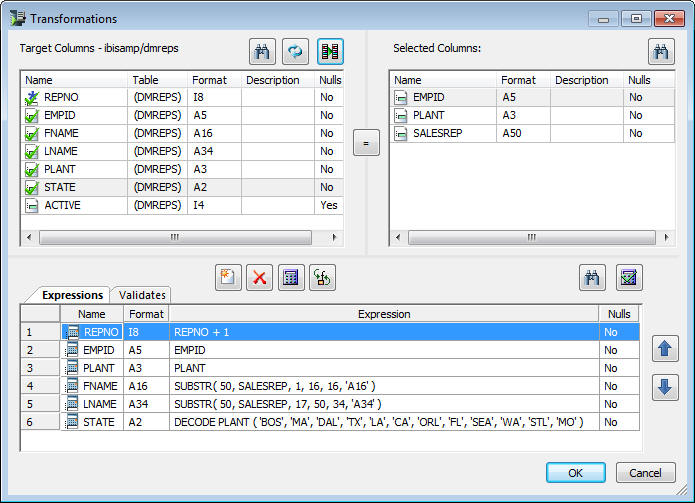
When you have completed the transformations, the Transformations
window should appear, as shown in the following image.
- Test the transformations
by clicking the Test Transforms button. Click Close.
The following image shows the Test Transformations window.

Note
that REPNO is incremented by one for each record and that FNAME
and LNAME are transformed correctly.
- Click OK to
close the Transformations window.
- Save the data
flow as DMXSURRG.
- On the Flow
tab, in the Run group, click Run and select Run from
the drop-down menu.
When the data flow run is complete,
verify that the target was loaded properly and that the surrogate
key was generated by right-clicking the DMREPS object
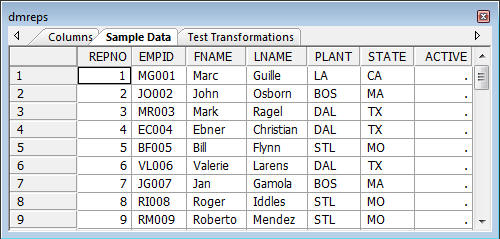
and selecting Toggle, and then Sample Data.
The following image shows the DMREPS window with the Sample Data
tab selected.
There are two ways
to confirm that the job ran correctly:
On the Flow tab, in
the Reports group, click View Last Log
or
Right-click
the flow from the navigation pane, select Logs and then Last
Log.
The following image shows the log of the
most recently run procedure.
